Ways to do a Share-Point Bulk File Transfer — Reactive and Batch Job
In this blog, we will be discussing how we can do a file transfer from share point to azure blob store and load the files into our application in either a reactive way or via a batch job.
 Image Generated by Canva
Context:
We have developed a system for processing documents and conducting semantic searches. Users can upload files of any size and wait for our machine learning pipelines to analyse them. This generates valuable insights about the content of the documents, allowing users to quickly understand the document’s insights. Additionally, users can perform semantic searches over a loaded document database within the application.
Use case:
It was crucial for us to have a bulk upload feature where we would be able to directly load the documents from the client’s email inbox. This will avoid the hassle of downloading the files and uploading them manually into the application.
Our client had set up a power-automate flow which allows all the files in the emails with a certain pattern in the mail header/body to land in a SharePoint folder.
We needed to have a pipeline to pull those files in client’s share point into our own azure cloud store and load the file metadata into a database table post which we can use existing pipelines to load the data into the application.
Explorations:
 Photo by James Harrison
Reactive Approach:
We explored ways to reactively pick the files from the share point location i.e., whenever a new file is added or existing is changed, the updated file would land in our blob storage.
For this purpose, we have explored the below solutions:
- Creating a power-automate flow for sending any new/updated files to azure blob.
- Leveraging web-hooks to automatically trigger a file movement script whenever a new/updated file is present in share point.
We will discuss the process and challenges we faced in each of these explorations.
Power Automate Way of File Transfer
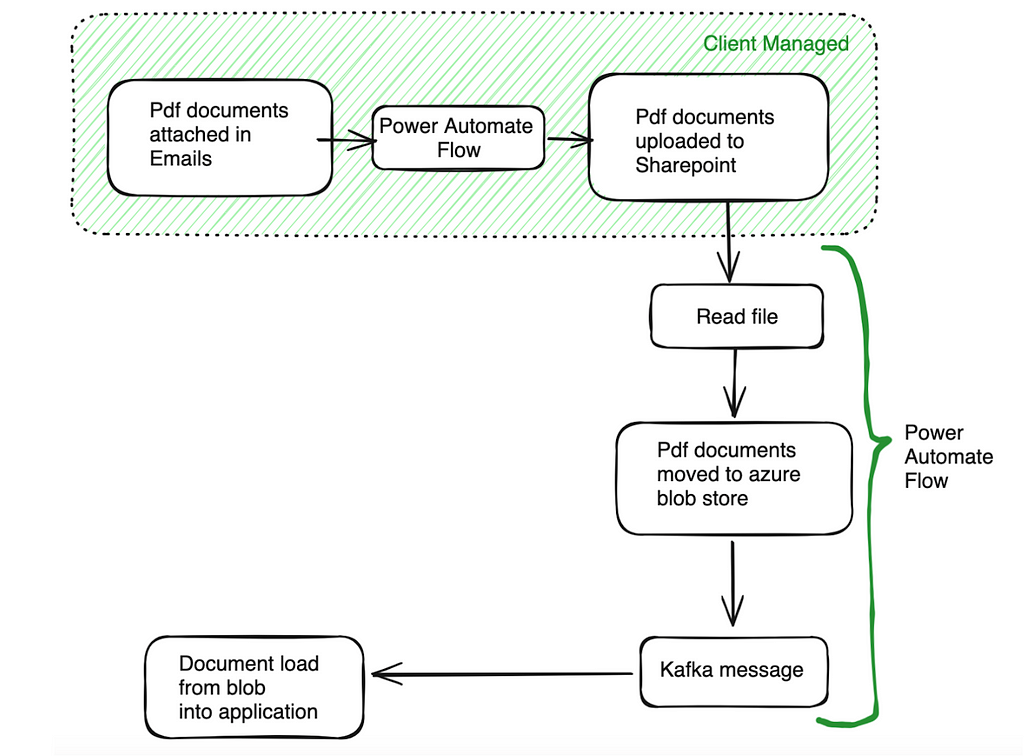 Flow chart describing PowerAutomate Flow
Power Automate is a cloud-based low code no code platform that allows users to create automated workflows across multiple services without any major code development.
Actions we wanted the power-automate to do:
- Connect to share point and load the file.
- Move the file to a /uploaded folder in share point.
- Copy the file from /uploaded to a blob in azure.
- Produce a Kafka message to a topic.
Triggering a Kafka message is crucial for us since it will inform us when to run our data load pipeline to fetch files from blob store to our application.
Steps 1,2,3 were straight forward since power automate has predefined tasks for achieving the connections to share point and azure by supplying proper credentials.
For triggering a Kafka message when the file transfer was successful, there were no out of the box tasks available. To achieve this, we had to write our custom azure function to connect to KAFKA and trigger a message. Since most of the Kafka connections are certificate based, we would need to save the certificates in a blob and write a custom Azure function which will trigger a message.
Azure functions is a serverless computing service which will help any user to write and execute the code without the need to think about the infra setup and.
**Note: Creating Azure functions under the azure account would need approvals from its owners.
Limitations we had in this setup and why we did not pursue this approach:
- In any enterprise, since the application deployment happens in multiple environments like dev, stage, and prod, we would need to create multiple power automate flows for each environment and maintain the flows in all environments individually.
- As a developer, we would not have in-depth control of the actions being performed by the power automate tasks like exception and failure handling where we would like the flow to perform different action for different failures.
Since the latter point was important for us, we did not pursue this approach and simultaneously getting approvals for the power automate flow and azure functions was time consuming since it had to go through multiple stages of security check as the share point is client facing.
File Transfer via share point web hooks
 Flow Chart for SharePoint Webhooks
To get started, we would initially need to perform Azure App registration which is a powerful way to configure authentication and authorization to various workflows or actions within the azure cloud.
In our use case, we would be accessing SharePoint via application context (also called app-only). For doing app-only in SharePoint, the preferred approach in our org currently is using a SharePoint App only principal where we try to authorize our registered Azure app via SharePoint. Steps followed for achieving this are as below:
Step 1: We need to create an Azure Application under ‘App Registrations’ and generate client-id and client-secret.
**NOTE: Safe keep the client-id and client-secret (This will be available for copying only the time you create it)
Step 2: Give the necessary permission to the app under API (Application Programming Interfaces) Permissions. Identify if you would be needing application or delegated permissions for the azure app
Step 3: In the share point, go to below URL and enter the client-id of the app registered above.
https://<sharepoint-site>/sites/<sharepoint_tenant>/_layouts/15/appinv.aspx
**NOTE: Replace <sharepoint-site> with the SharePoint site domain and <sharepoint-tenant> with the SharePoint site tenant name.
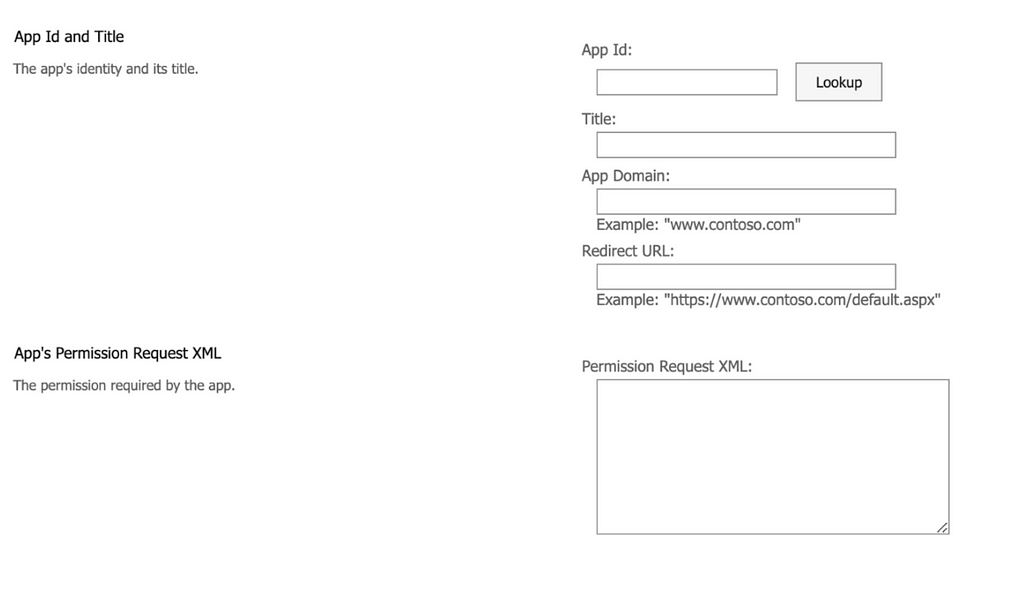 Sharepoint Site UI when navigated to _layouts/15/appinv.aspx
Step 4: Enter the below in permission request xml:
<AppPermissionRequests AllowAppOnlyPolicy="true">
<AppPermissionRequest Scope="http://sharepoint/content/sitecollection/web" Right="FullControl" />
</AppPermissionRequests>
This allows binding between the share-point and the client-id/secret of the azure application and allows us to connect via client-based authentication.
**NOTE: The xml provided is for reference. Check the scope of permission required for your use-case. Reference can be found here.
Now that the app has been registered and authorized by SharePoint, we would need to create subscription to the SharePoint tenant so that it will let us know whenever a file has been added/modified in the directory.
Steps for creating a Subscription to the SharePoint:
- Step 1: Generate authentication token using the below curl command:
curl --location -request POST "https://accounts.accesscontrol.windows.net/<tenant-id>/tokens/OAuth/2" \
--header "Content-Type: application/x-www-form-urlencoded" \
--data "grant_type=client_credentials&client_id=<client-id>@<tenant-id>&client_secret=<client-secret>&resource=00000003-0000-0ff1-ce00-000000000000/<sharepoint-site-domain>
- Step 2: Get the folder-id in SharePoint for which you are planning to create a trigger using the below command:
curl --location --request GET "https://<sharepoint_site>/sites/<tenant-id> /_api/web/lists/getbytitle(<sharepoint-folder>)?$select=Title,Id" \
--header "Authorization: Bearer <authentication-token>
- Step 3: Create a subscription to the above folder id using the below curl command:
curl --location --request POST "https://<sharepoint_site>/sites/<sharepoint_tenant>/_api/web/lists('<folder-id>')/subscriptions" \
--header "Authorization: Bearer <authentication-token> \
--header "Accept: application/json;odata=nometadata" \
--header "Content-Type: application/json" \
--data "{
\"resource\": \"https://<sharepoint-site> /sites/<sharepoint_tenant>/_api/web/lists('<folder-id>')\",
\"notificationUrl\": "<webhook-url>",
\"expirationDateTime\": \"2099-12-31T16:17:57+00:00\",
\"clientState\": \"A0A354EC-97D4-4D83-9DDB-144077ADB449\"
}"
The clientState value is the value for SharePoint webhook which remains constant. expirationDateTime should be defined by the use-case as to when the webhook needs to be expired.
The <webhook-url> is the end point where you will keep receiving the notifications and you can write your custom logic in the end point to move files. Based on the trigger, it will move the files from sharepoint to azure and push a Kafka message to the topic.
This service would be native to the cloud deployment, listens to the SharePoint events and routes them to the required event-handling service.
** NOTE: When using the above code, please do update all the placeholder values with actual values.
Limitations we had in this setup:
There is a constraint in this approach, where SharePoint can send notifications only to the public URLs. The SharePoint webhook service being internal to the organisation can be accessed only via proxy service and it would not be able to communicate directly with SharePoint.
With this, we will be able to receive the triggers and move files whenever there is a new/updated file in the SharePoint directory for which we have created the subscription for. In our case, we would need to externalise the URL which would need various security approvals based on the organisation’s policies.
Hence, we created a pipeline to fetch the files in a scheduled way.
Batch Processing Approach:
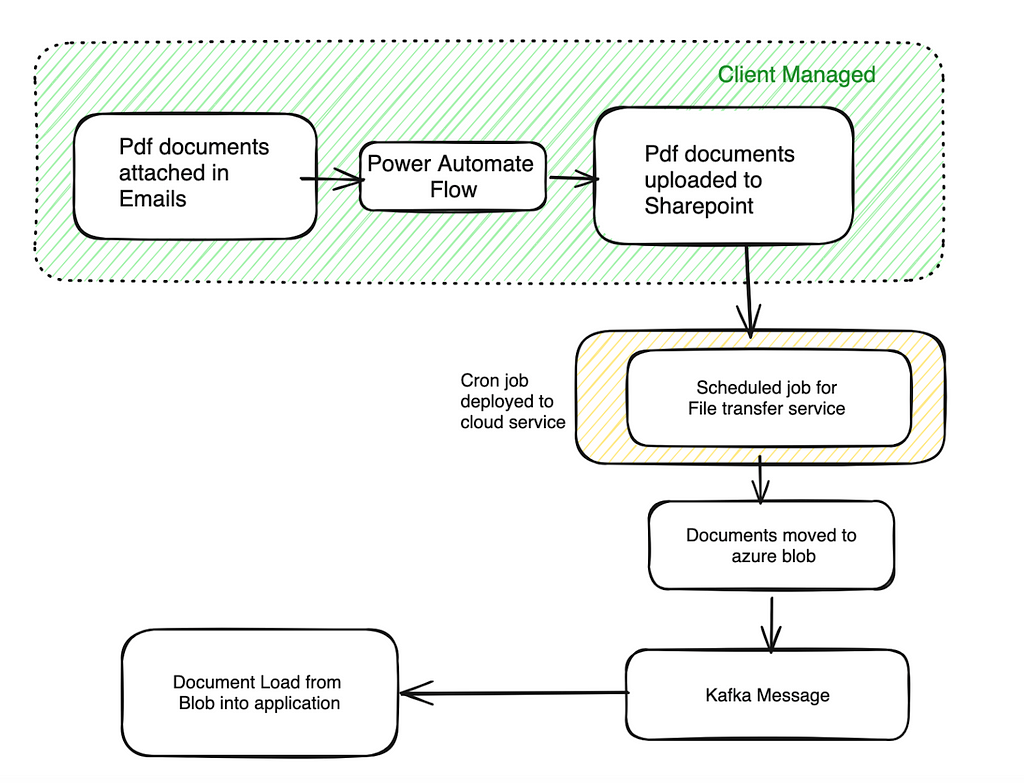 Flow Chart for the batch job
For this approach too, we would initially need to authorise the azure application created in the SharePoint site as mentioned for the web-hooks. Once the app is registered and we have authorized client-id, client-secret generated, we can connect to the SharePoint using Client Context.
In our case, we have leveraged Office365-REST-Python-Client python library to work with SharePoint. We have written our scripts which does the below:
- connect to the SharePoint
- list the files in the required directory
- move the files with latest last_modified or created time to azure blob directory
Azure connections are supported via fsspec library. Once the service is built and tested, we deployed it in our cloud native platform and scheduled it to run every few hours so that we can keep loading all the files that get added into SharePoint to the azure directory.
This approach worked for us and we were able to successfully deploy the same to production seamlessly picking and processing files in a streamlined manner.
Ways to do a Share-Point Bulk File Transfer — Reactive and Batch Job was originally published in Walmart Global Tech Blog on Medium, where people are continuing the conversation by highlighting and responding to this story.