Do you have an older rooted Android phone sitting unused in a drawer? Instead of leaving it there, you can turn it into a practical NFC reader and USB keyboard for your computer.
Introduction to Malware Binary Triage (IMBT) Course
Looking to level up your skills? Get 10% off using coupon code: MWNEWS10 for any flavor.
Enroll Now and Save 10%: Coupon Code MWNEWS10
Note: Affiliate link – your enrollment helps support this platform at no extra cost to you.
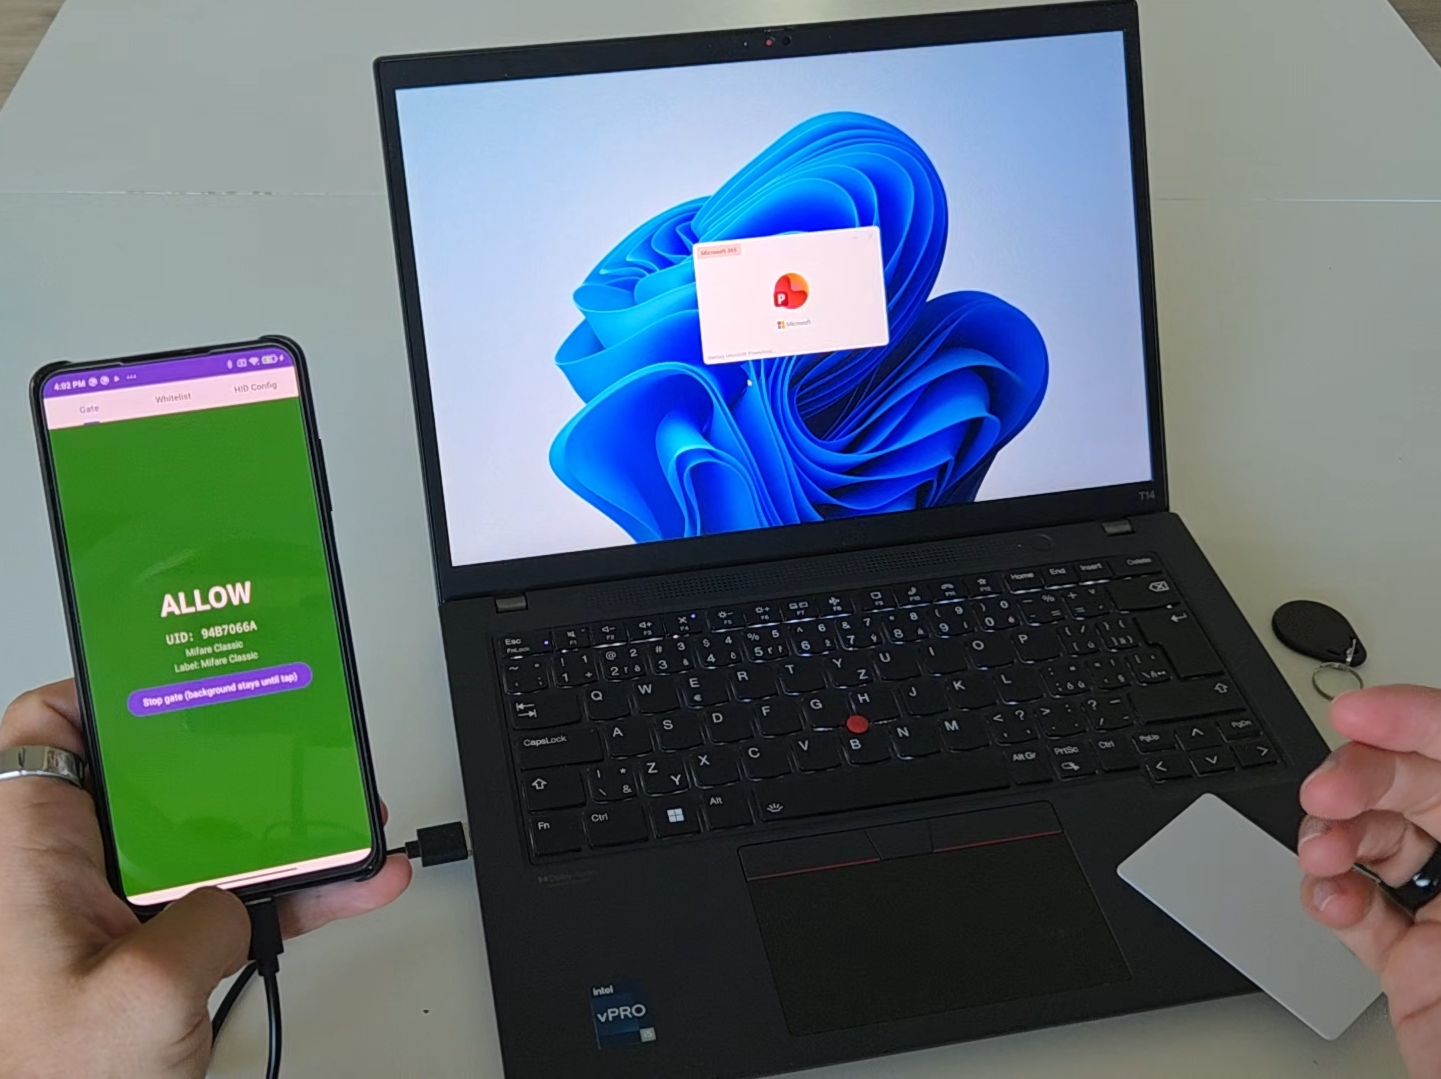
With a custom Android app (NFC to HID), your phone can read the unique indentation (UID) of an NFC card, key fob, ring, implant, or test token. If the UID is on your approved list, the phone sends a predefined sequence of keyboard commands to the connected computer.
This allows you to trigger actions such as:
- Signing in to your personal computer
- Opening a website, starting an application or tool
- Launching a predefined workflow
The phone communicates with the computer as a USB HID device. In simple terms, the computer sees it as a regular physical keyboard. No special PC software or driver should be necessary because standard USB keyboards are already supported by common operating systems.
In this guide, I will show you two ways to set it up:
- Using a rooted Android phone running Kali NetHunter
- Using a rooted Android phone without NetHunter
I will also explain how to configure the companion app and optionally allow NFC scanning while the phone is locked and its screen is off.
Important: Only use HID commands on computers and devices that you own or are explicitly authorized to test. A computer treats HID input as trusted keyboard input, so an incorrect or malicious payload can cause unwanted changes.
How the setup works
The complete flow is relatively simple:
- An Android phone is connected to a computer through USB.
- The phone presents itself as a USB HID keyboard.
- You place an NFC token near the lockscreen protected phone.
- The Android app reads the token’s UID.
- The app checks whether that UID is on the whitelist.
- If the UID is approved, the app executes the configured HID payload.
- The computer receives the payload as ordinary keyboard input.
The interesting part is that the computer does not need a dedicated NFC reader. Your Android phone handles the NFC interaction and translates the approved scan into keyboard actions.

What you will need
Before starting, you will need:
- A rooted Android phone with NFC
- A data USB cable
- A compatible Android kernel with USB gadget and HID support
- An NFC card, sticker, key fob, ring, or another token
- My NFC-to-HID Android app
- A computer
You can use either a rooted NetHunter installation or a rooted Android system with a separate USB gadget management application.
Compatibility depends heavily on the phone, kernel, Android version, USB controller, and installed ROM. Root access alone does not guarantee that USB HID gadget mode will work.
Before you begin: understand the risks of rooting
Rooting gives applications privileged access to Android. That extra control is what makes this project possible, but it also changes the security model of the phone.
Possible consequences include:
- Erasing all data while unlocking the bootloader
- Breaking banking, payment, DRM, or corporate applications
- Interfering with verified boot and device attestation
- Introducing boot loops or making the phone temporarily unusable
- Affecting warranty or manufacturer support, depending on the device and region
For this reason, I recommend using a spare phone rather than rooting your main everyday device solely for this project.
Back up all important data before making system-level changes. Keep the phone encrypted, use a strong lock-screen PIN or password, and install root applications or Magisk modules only from repositories you have checked carefully.
Important security limitation: an NFC UID is not a secret
Before using the setup for PC sign-in, it is important to understand what the app verifies.
The current design reads the NFC token’s UID and compares it with a locally stored whitelist. The UID identifies a token, but it should not automatically be considered proof that the original token is present.
A UID may be readable by any nearby compatible reader. Some NFC technologies and emulators can also reproduce or spoof specific UIDs. Systems that blindly trust only the UID can therefore be vulnerable to cloning or impersonation.
For that reason, UID-based triggering is best suited to:
- Personal convenience
- Home automation
- Launching non-sensitive workflows
- Opening websites or applications
- Low-risk actions on your own devices
It should not be treated as strong authentication for:
- Corporate systems
- Financial services
- Password managers
- Privileged administration
- Highly sensitive data
If the configured payload simply types your Windows, Linux, or macOS password, this is not true cryptographic passwordless authentication. It is password automation because the password still exists and is entered as simulated keyboard input.
For stronger authentication, consider a FIDO2 security key, platform passkey, smart card, or another solution that performs cryptographic challenge-response authentication.
Option 1: Configure a rooted Kali NetHunter phone
Kali NetHunter is a mobile penetration-testing platform for supported Android devices. A rooted NetHunter installation with a compatible custom kernel can provide USB gadget functionality, including HID keyboard support.
NetHunter’s USB Arsenal is the control center for enabling different USB gadget modes. Depending on the device and kernel, these modes can include HID, mass storage, and USB networking functions.
Kali also documents HID keyboard functionality that allows a compatible NetHunter device to appear as a programmable USB keyboard and type predefined commands into a connected computer.
You can find more information about installing and using NetHunter in my other guides on mobile–hacker.com.
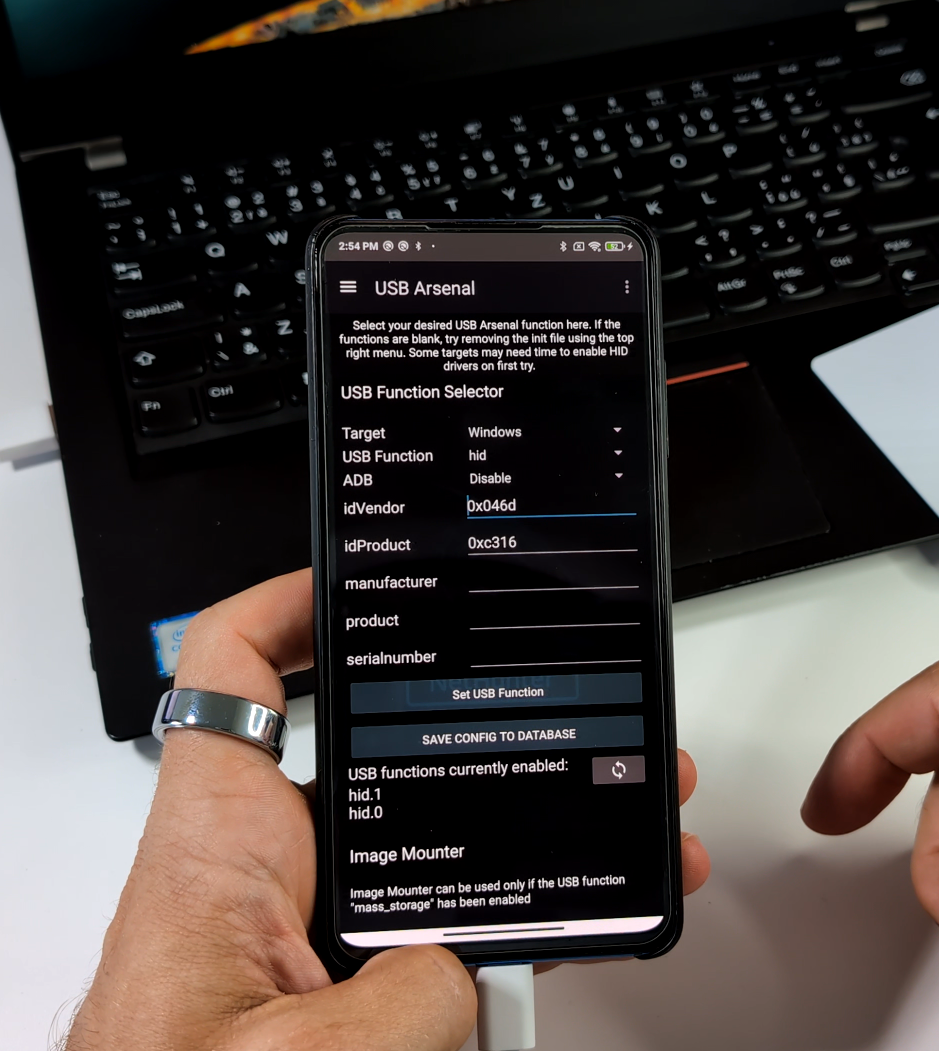
Step 1: Open USB Arsenal
On your rooted NetHunter phone:
- Open the NetHunter application.
- Go to USB Arsenal.
- Locate the USB Functions or USB function selector.
- Enable the HID or keyboard function.
- Disable ADB if your specific setup requires a persistent HID-only configuration.
Disabling ADB can help prevent Android from returning to an ADB-oriented USB profile after reconnecting the cable or connecting the phone to another computer.
Step 2: Connect the phone to your PC
Attach the phone to your computer using a USB data cable.
If everything is working, the operating system should detect an additional USB keyboard. You might not see an obvious notification because HID keyboards normally use built-in operating-system drivers.
At this stage, the phone has the USB function required to send keyboard input, but it still needs an application to write the appropriate HID reports. That is the role of the NFC-to-HID app described later in this guide.
Step 3: Test harmless input first
Before configuring passwords or commands, test the connection with harmless text:
- Open a blank text editor on the computer.
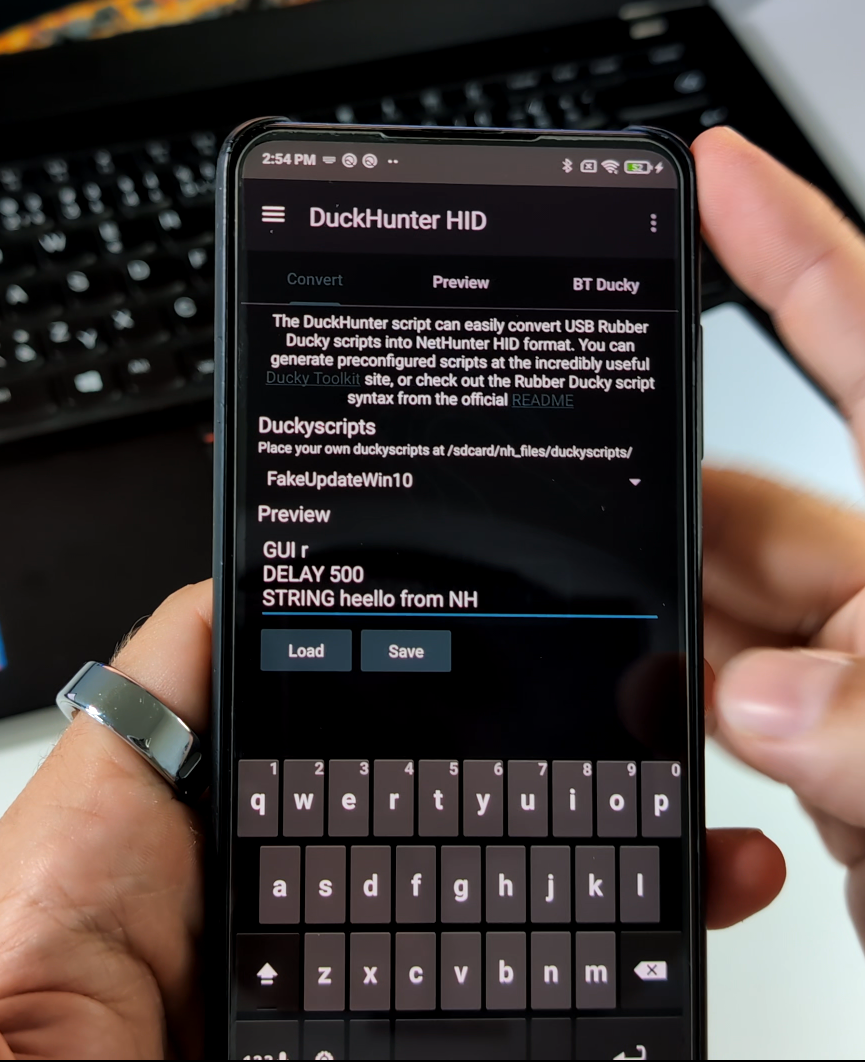
- Configure a payload that type text from DuckHunter HID menu.
Testing in a text editor prevents an incorrect payload from accidentally running commands or changing settings.
If HID becomes unresponsive, I would recommend using the Reset USB function to refresh the USB stack.
Option 2: Configure a rooted Android phone without NetHunter
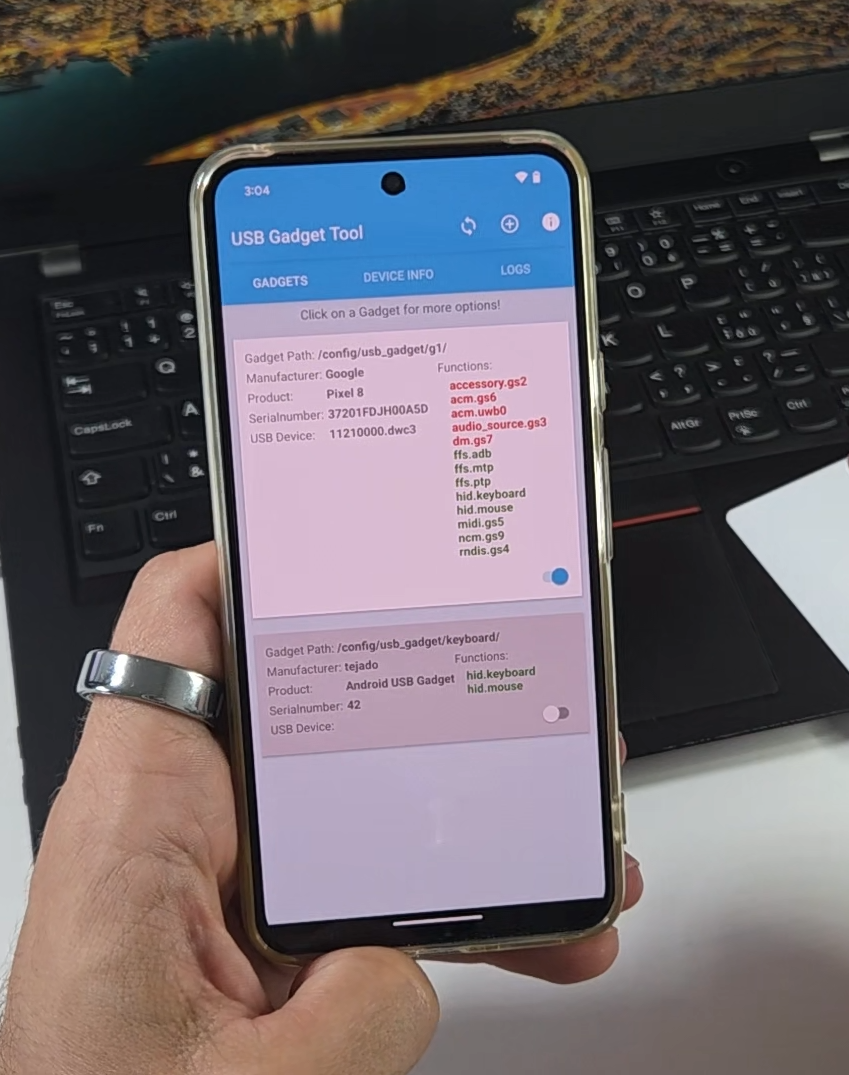
You do not necessarily need NetHunter. A rooted Android phone may also be configured using USBGadgetTool, provided that its kernel supports the required functionality.
USB Gadget Tool uses the Linux ConfigFS interface to create and activate USB gadget roles. It supports keyboard and mouse HID endpoints, but it requires root access and a kernel compiled with ConfigFS support. The tool enables the gadget itself, while another application is still needed to use the resulting HID endpoint.
Step 1: Download USB Gadget Tool
Download USB Gadget Tool from its official repository: USB Gadget Tool on GitHub
Step 2: Grant root access
Open USB Gadget Tool and grant it root access when requested.
If the application cannot detect the necessary gadget capabilities, your phone’s kernel may not include ConfigFS or HID gadget support. In that case, the application alone cannot add the missing kernel functionality.
Step 3: Add a keyboard function
Inside USB Gadget Tool:
- Create or select a USB gadget profile.
- Choose Add Function.
- Add the Keyboard HID function.
- Activate the gadget or profile.
- Reconnect the USB cable if necessary.
The project documents keyboard and mouse endpoints such as /dev/hidg0 and /dev/hidg1. The precise device node may differ according to the kernel and gadget configuration.
Once enabled, the computer should recognize your Android phone as a USB keyboard.
Install and configure the NFC-to-HID app
Once the phone can operate as a USB HID keyboard, the next step is installing the Android app that links NFC scans with HID payloads.
You can download the app from my GitHub repository:
Download: https://github.com/androidmalware/NFC-to-HID
The project is open source, so users can inspect the code, build the application themselves, and see how NFC identifiers and HID payloads are handled.
I built the first version with assistance from AI. However, AI-generated code should not automatically be considered secure or error-free. Review the source, test it on a non-critical device, and avoid storing sensitive information until you understand how and where the application stores its configuration.
The app contains three tabs: Gate, Whitelist, and HID Config.

1. Gate
The Gate tab is the main scanning interface.
When you place an NFC token against the phone, the app:
- Detects the NFC token.
- Reads its UID.
- Converts the UID into the format used by the app.
- Compares it with the whitelist.
- Shows whether the token is allowed or denied.
- Executes the configured HID payload if the UID is approved.
The Gate tab is also useful when you want to identify the UID of a new card or test whether an existing token is being read correctly.
Remember that the app is reading the token’s public UID. It is not necessarily authenticating protected data or performing a cryptographic exchange with the token.

2. Whitelist
The Whitelist tab contains the NFC UIDs that are allowed to trigger the configured action.
You can use the field at the bottom of the screen to add a UID manually. Depending on your implementation, you may also be able to add a UID immediately after reading it in the Gate tab.
Only UIDs that you personally recognize should be added.

3. HID Config
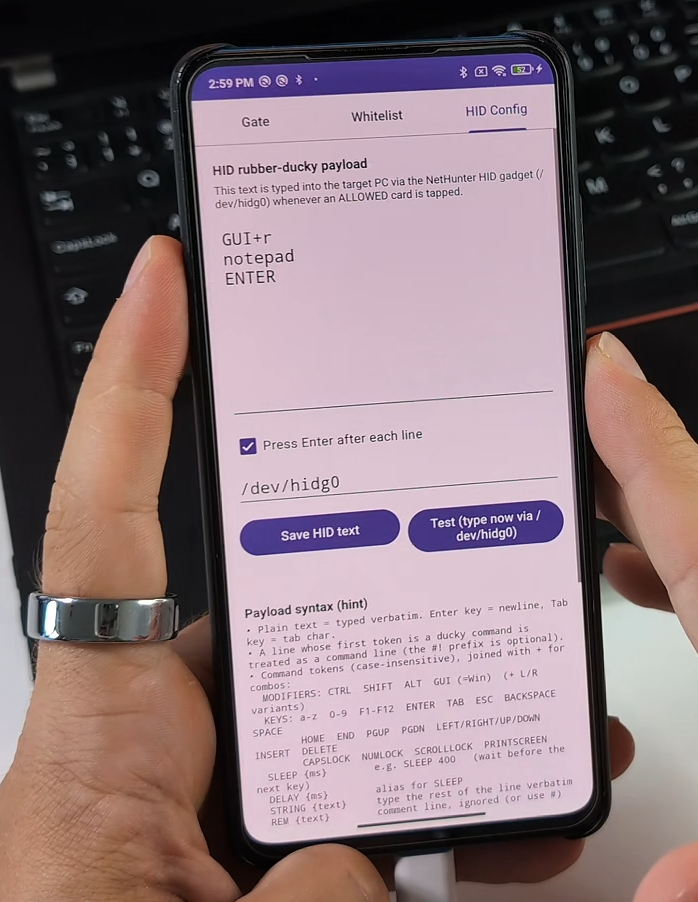
The HID Config tab defines what the phone sends to the computer after an allowed NFC token is detected.
The payload can contain ordinary text, key combinations, delays, and commands. The app supports Rubber Ducky-style syntax, with usage hints displayed near the bottom of the activity.
Depending on the implemented syntax, a simple payload might conceptually follow this structure:
| 1 DELAY 1000 2 GUI r 3 DELAY 500 4 STRING https://mobile-hacker.com 5 ENTER |
This example waits briefly, opens the operating system’s Run interface, enters a website address, and presses Enter.
Exact keyboard shortcuts vary between Windows, Linux, and macOS. Keyboard layouts also matter. A payload created for a US keyboard layout may type incorrect characters on a Slovak, German, French, or other layout.
Start with a harmless test such as:
| 1 DELAY 1000 2 STRING NFC HID test successful 3 ENTER |
Open a blank text editor, scan an approved token, and verify the output.
Only after this succeeds should you build more complicated workflows.
Practical payload ideas
Here are several legitimate uses for your own computer:
Open a frequently used website
Configure the payload to open a browser and navigate to your dashboard, documentation, news site, or internal development environment.
Launch a tool
Use a keyboard shortcut or operating-system launcher to start a frequently used application.
Open a terminal in a lab environment
A token could open a terminal and prepare your authorized test environment.
Enter repetitive non-sensitive text
The phone can enter a predefined template, device identifier, test string, or other information you use regularly.
Start a presentation or demo
An NFC token can launch the content you need for a presentation without searching through folders.
Convenience-based computer sign-in
The payload can technically enter a password into the active sign-in screen. However, this stores a reusable secret on the Android device and then transmits it as keyboard input. Treat this as a convenience experiment, not as strong passwordless authentication.
Protect sensitive HID payloads
If your payload contains a password, API token, command, username, or another sensitive value, assume that it could potentially be recovered from the rooted phone.
At a minimum:
- Protect the phone with a strong PIN or password
- Do not store administrator credentials in HID scripts
- Add an application-level lock if the app supports it
A lock screen helps protect the device during normal use, but it does not eliminate every risk associated with an unlocked bootloader, root access.
Use NFC while the phone is locked or the screen is off
By default, many Android devices limit NFC scanning when the screen is off or the phone is locked. This behavior saves power and reduces the chance of unwanted NFC interactions.
If you want the NFC-to-HID app to detect a token while the phone is locked, you can experiment with the NFC Screen Off Magisk module.
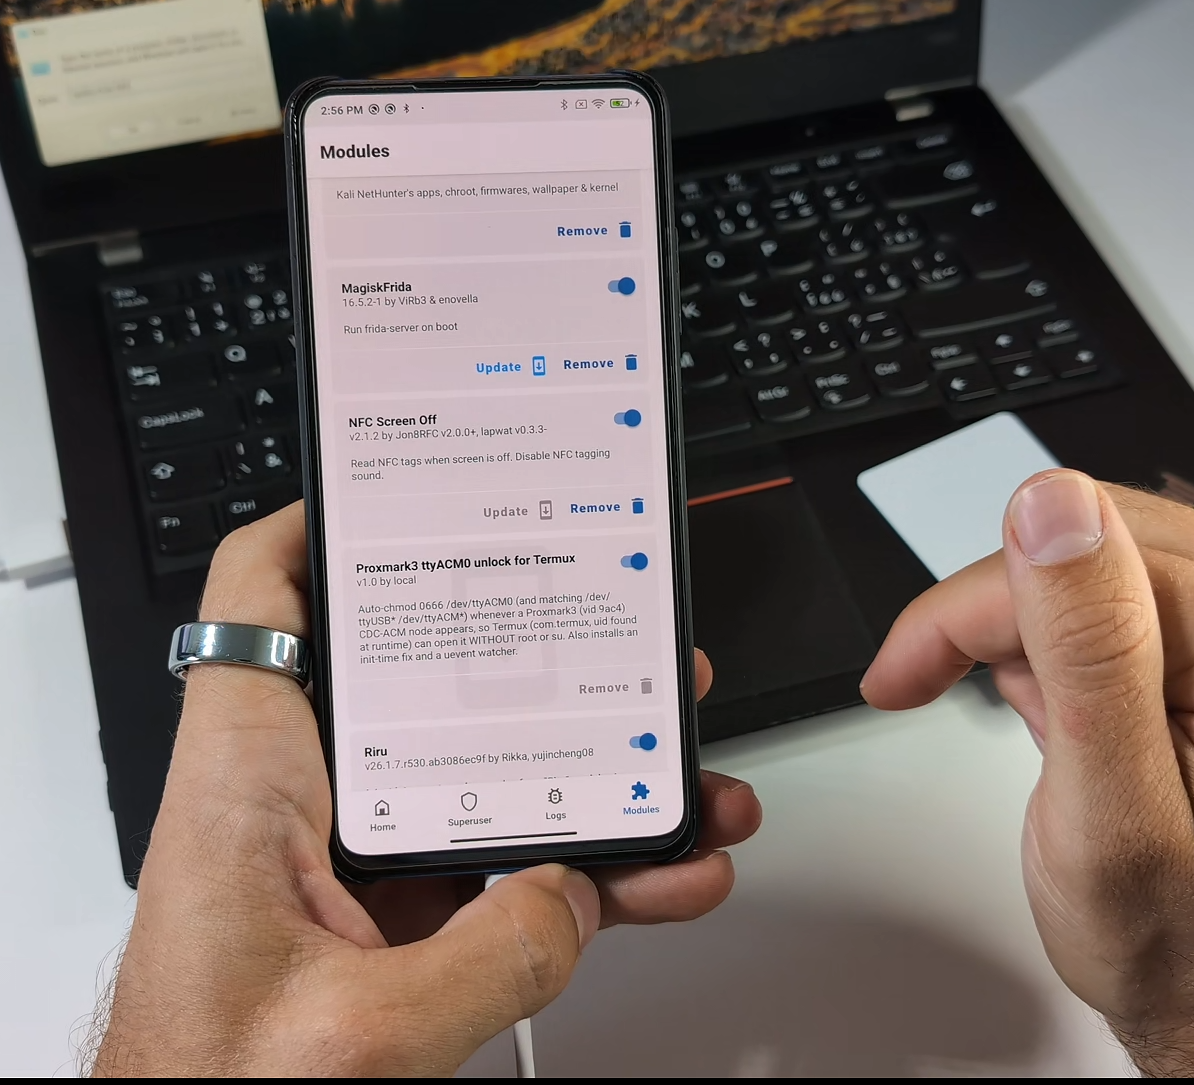
The module is intended to permit NFC scanning while the screen is locked or off. Its installation process modifies or patches the device’s NFC service behavior, and compatibility varies across Android implementations and devices. The documented installation process includes installing the module through Magisk, rebooting, unlocking the phone after startup, and waiting briefly for the module’s script to execute.
Installation overview
- Download the latest release from the project’s GitHub repository.
- Open Magisk.
- Go to Modules.
- Select Install from storage.
- Choose the downloaded module.
- Allow the installation or patching process to complete.
- Reboot the phone.
- Lock the phone and test NFC reading.
The module can also disable the normal NFC tag-scanning sound, that beep sound that follows when paying with smartphone.
Security implications of screen-off scanning
Allowing NFC scans while the device is locked makes the setup more convenient, but it also removes an important interaction barrier.
Someone with physical access to the phone may be able to present an approved or cloned token while the screen is off. If the phone is already connected to a computer and the payload runs without confirmation, the configured keyboard sequence could be triggered without unlocking the phone.
NFC Screen Off module can be in anytime disabled in Magisk, so smartphone would first requires owner authentication with passcode.
Conclusion
A spare rooted Android phone can become much more than an old device gathering dust. With NFC, USB HID functionality, and a custom Android app, it can work as a flexible bridge between physical NFC tokens and actions on your computer.
The post Turn a Rooted Android Phone into an NFC Authenticator and Automation Tool for Your PC appeared first on Mobile Hacker.
Article Link: Turn a Rooted Android Phone into an NFC Authenticator and Automation Tool for Your PC - Mobile Hacker