Note: A video walkthrough of the packing process that corresponds with this blog post can be found here.
As I learn more and more about both developing and dissecting malware, one thing I’ve found extremely interesting and exceedingly common is the various packing/unpacking methods built into many samples. In this blog post, I want to discuss what packing is, the basics of why malware developers pack their samples and how they go about doing so. Since this is an introductory post, and I myself am still learning all this stuff, we’re going to be manually unpacking a UPX-packed binary, which is one of the simplest packers out there.
I also want to disclaim that I am far from an expert and I’m still learning this stuff everyday. If you notice any inaccuracies or inconsistencies within this post, please let me know so I can fix it; the last thing I want to do is spread misinformation.
What is packing?
Before diving into the “how and why,” it’s obviously important to understand the “what.” So what is packing? Well, packing is a means of distributing an executable in a compressed or obfuscated state, making it more difficult to detect, statically analyze and reverse engineer. In the context of malware, since the primary malicious payload is compressed or obfuscated in a packed sample, security products that perform automated static analysis may have issues flagging the binary as malicious, which is obviously a major advantage for malware developers. Additionally, well-designed packing algorithms (referred to as packers) can greatly slow down the manual analysis process of a malware analyst, potentially allowing the sample to have a longer dwell time.
As you would probably expect, different packers behave quite differently, and serve different purposes. In most cases, you can loosely categorized packers as either compressing packers or encrypting packers. Compressing packers’ primary purpose is to distribute the executable in a compressed format, primarily to reduce the size of the file being distributed. Alternatively, encrypting packers’ primary purpose is to encrypt or obfuscate the distributed executable to prevent end users from reverse engineering the application. Encrypting packers are sometimes defined as a completely separate thing called a crypter, but for the sake of this post I will be referring to them as packers. As I said, these categories are loosely defined; some packers are going to do some combination of both. In the case of UPX, compression is the exclusive purpose, and no encryption is performed. It’s important to note that packing is not something exclusively found in the world of malware; there is an uncountable number of benign vendors that pack their products to either reduce the size of their product or protect their product from being reverse engineered and re-distributed.
How does packing work?
Because various packers utilize different methods, answering the question of “how packers work” is much too broad to be discussed in a short blog post. For the sake of brevity, I will be touching on the generic “stub-payload” packing architecture, which is one of the most common mechanisms used by packers, including UPX.
In a “stub-payload” architecture, a new executable is created that contains two primary components: the compressed/encrypted contents of the original executable, and a short piece of code responsible for decompressing/decrypting the original executable and executing it. This short piece of code is often referred to as a stub. In essence, the original executable is compressed/encrypted, then wrapped in a new executable which contains code to bring it back to it’s original state:

The stub will be the entry point of the new executable, and once it performs the necessary decompression or decryption processes, it will pass control flow to the original executable, which would then be in its original state. At this point, the original executable carries on its execution as if it were never packed to begin with:

Now, as I already mentioned, this explanation is very generic and does not encompass everything that has to be done during the unpacking process. For example, some stubs may need to perform some dynamic import resolution or anti-VM/anti-sandbox checks. Additionally, the fourth step of passing control to the original executable can come in numerous forms, such as process hollowing. Nonetheless, hopefully this explanation helps conceptualize the packing and unpacking process, without getting too deep into the technical specifics.
Indications of Packing
The last thing I want to touch on before diving into the manual unpacking process is to explain what attributes of an executable could hint that the executable is packed in some way. The list below is not in any way all-inclusive; these are just things I tend to immediately look for to hint towards a packed sample:
- Lack of Imports in Import Address Table (IAT): In order for an executable to interact in any meaningful way with the underlying operating system, it is required that the executable imports functions built into system libraries such as kernel32.dll and user32.dll. When looking at a fully unpacked sample, you’re often going to see a large number of imports, since malware is obviously going to want to interact quite heavily with the operating system. However, since the stub of a packed sample doesn’t have much functionality outside of unpacking and executing the real payload, packed samples often have a suspiciously low number of imports comparative to a standard executable.
- Non-standard Section Names: In a traditional executable, you’re often going to have the same sections every time (.text, .data, .rsrc, etc). However, many packers define their own custom sections, which indicates that the executable is non-standard and may be packed. For example, the UPX packer ships it’s final executable with the non-standard section names of UPX0 and UPX1.
- Sections with a small raw size but a large virtual size: When you see a section with a small raw size (sometimes 0), that indicates that the actual executable does not contain any raw data in that specific section. However, when the executable is loaded into memory, the raw size is no longer relevant, and instead the virtual size of each specific section is allocated in memory. If a section is being allocated a large amount of virtual space, yet contains no actual raw data, that indicates a potential cave in which unpacked code may eventually be written to, which is commonly done by unpacking algorithms.
- Sections with very high entropy: The word entropy refers to the variance and “randomness” of a piece of data. Things like the English language, assembly code, and other well-defined structures of communication usually have low entropy since language tends to follow predictable patterns. However, things like encrypted data and compressed data have no such sense of predictability, and hence have much higher entropy. If a section of data has high entropy, its likely the section contains either compressed or encrypted data that will eventually be unpacked.
- Low number of discernible strings: In a fully unpacked executable, you should be able to notice a decent number of readable strings, since most applications (including malware) use protocols that implement human language (for example, HTTP uses POST, HEAD, GET, etc). These sorts of strings, which should exist in a standard executable, will not exist in packed executables, since the strings will be encrypted or compressed. If you analyze the strings of a binary and cannot interpret any readable strings, you could be dealing with a packed sample.
- Sections with RWX privileges: In standard executables, it is uncommon for a section to be marked as both writable and executable, since you rarely want to write over the executable code contained in your application. Additionally, you rarely dynamic write additional executable code in a standard application. Because of this, there’s never really any reason for a section to be both writable and executable, except in the case of a packer, in which data will be unpacked into a section (write), then passed execution (execute).
- jmp or call Instructions to registers/strange memory addresses: For many packers, the address to the location of where data is being unpacked to is stored in a register (such as eax), and that memory address is often in an entirely different section. Very long jumps like this are relatively uncommon, since all the executable code in a binary is usually contained in a single section. If you see a jmp/call to a memory address that 1) isn’t in the current section or 2) isn’t in the address space of a loaded library, it’s likely that jump is to unpacked code.
Again, this list is not in any way all inclusive, but if you have multiple of these characteristics in a sample, you’re probably dealing with something packed.
Taking a look at our UPX sample
To poke at our UPX sample, and get to the original portable executable for further analysis, the generic steps we need to take are as follows:
- Look at the PE header and verify our sample is in fact packed by UPX.
- Figure out where the unpacked data is going to be written to by looking at memory allocation, etc.
- Look for any jmp or call references to either a register or to the memory space of where the unpacked data is likely being written to within the stub code.
- Set a breakpoint on that jmp or call instruction.
- Dump the data contained in that memory space, fix it’s import resolutions, then export it as a new executable.
First, let’s take a look at our packed sample and look for a few of the indicators mentioned earlier. Throwing the executable into Ghidra, I can immediately start to see hints of packing. Firstly, notice that the executable has a suspiciously low number of imported functions:
 Imported functions of the original packed executable
Furthermore, the extremely small number of defined strings raises suspicion:
 Defined strings in original packed executable.
Finally, and by far the most potent indicator, are the strange section names of UPX0, UPX1 and UPX2:
 Section names indicate we’re dealing with UPX.
With just these indicators alone, we can almost guarantee that the executable we’re dealing with is packed by UPX. With that knowledge, let’s dive deeper into the header information to try and figure out where we may be able to extract the payload from.
Taking a deeper look into these sections in PEBear, notice that one of the sections, UPX0, contains no actual raw data in it, but nonetheless is allocated a large amount of virtual memory:
 A raw size of 0 bytes and a virtual size of 13000 indicates a potential “code cave.”
Jumping into this section in Ghidra, we indeed see that there is absolutely no data allocated in it:
 The 0x00401000 memory region has absolutely no data in it.
Given that this large empty cave exists within memory, we can take a good guess that this may be where our payload will eventually be loaded into. Furthermore, if we look at the section header information in PEStudio, we can see that the section is marked as readable and executable, which is very suspect:
 The ability to both write and execute in a memory region is very suspect.
Also, take note of that virtual address 0x00401000; it will come into play later.
Another question we may want to ask ourselves is, where exactly is the compressed version of the payload located? Looking at our sections more closely, notice the extremely high entropy in the UPX1 section:
 An entropy of 7.827 heavily indicates the presence of compressed data.
An entropy of 7.827 is a strong indication of compressed or encrypted data. Briefly looking at the UPX1 section, we can see a jumble of data Ghidra is unable to analyze as opcode. This is probably our compressed data:
 The 0x00414000 region looks to contain the compressed payload.
Also notice that UPX1 contains the entry point for the executable. This means that, in addition to holding the compressed data, the UPX1 section also contains the stub code responsible for unpacking.
Okay, so now that we have our bearings, let’s throw the executable into OllyDBG and start doing some debugging. Recall that our stub code (and compressed data) are located in the UPX1 section, which has a base address of 0x00417000. We see that this is in fact the case, given that our entry into the execution is in this address space:
 The 0x00417D60 address is the entry point of the stub code.
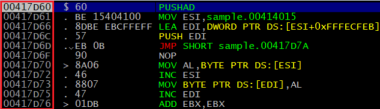
Cool, so we know that any jumps, calls or references to the 0x00417000 space is probably involved in the execution of the decompression algorithm. What we actually care about is the point in time in which the full payload is decompressed, stored in memory and execution is being passed to it. Recall that our working hypothesis is that the UPX0 section, which was allocated a large amount of memory but contained no actual data, is probably where our payload is loaded into. Remember that the base address 0x00401000 is where this UPX0 section is located. What we need to do is poke around the stub code and find any references to this address space, since it may be the jumping point into the decompressed payload. After a bit of hunting, I find a jmp instruction that may fit the bill:
 Why are we jumping to the 000401000 memory region?
This is a very suspicious jump; the address 0x00412D0 is outside of the address space of the stub code; in fact, if we follow the address in OllyDBG, we can see that the address is completely empty:
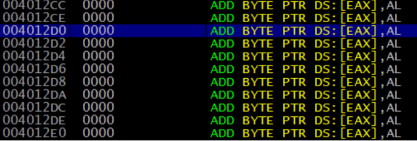 The region we will eventually jump to is completely empty.
So, why are we jumping here? How does jumping to a null memory space accomplish anything? Well, it’s likely that, once we start running the stub code, this memory space will eventually become occupied with the decompressed payload as it’s decompressed and stored. Let’s set a breakpoint on this strange jmp instruction, and let the stub code do it’s thing. I simply set a breakpoint on the instruction with F2, then run the application.
Now that the stub code has run, let’s take a look again at that memory region we’re jumping into. As expected, the memory region is no longer empty; there’s magically new code occupying it:
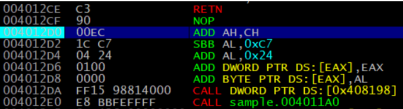 0x004101000 memory region is now filled with legitimate code.
This is more likely than not the entry point to our final payload. One subtle hint that increases my confidence in this is a reference an ASCII string further down in the code that we previously did not see, but is likely part of the final payload:
![]()
Now that we have what we believe to be the payload directly in memory, let’s dump this code into a new executable, and see if we get a working, independent payload. To do so, OllyDBG has a plugin called OllyDump. This utility also conveniently fixes the import table, re-adjusts section headers, and sets the entry point of the new executable to be wherever we specify. Let’s specify the 0x004012D0 address, since that looks to be the true entry into the executable:
 OllyDump can fix and dump a memory region into an independent executable.
Now that the payload has been dumped to a new executable, let’s run it and see what happens. Indeed, it runs successfully, and mirrors the execution of the packed version:
 Output of the packed executable.
 Output of the extracted (payload) executable.
This means that we have successfully pulled out a readable, unobfuscated and uncompressed payload which can be further analyzed to determine a sample’s functionality.
Article Link: https://kindredsec.com/2020/01/07/the-basics-of-packed-malware-manually-unpacking-upx-executables/