This release sees changes in several different places. Let’s start with the main Registry parser.
New in this release is the ability to expand a path with wildcards to all matching paths. We will see this in use when we talk about RECmd and what’s new there.
Also, the parser, when recovering deleted values, checks to see if the non-resident value data record has been reallocated to something else. We will see what this looks like when we talk about Registry Explorer changes below.
Let’s take a closer look at both tools
Registry Explorer
The general changelog looks like:NEW: Updated controls and nuget packages
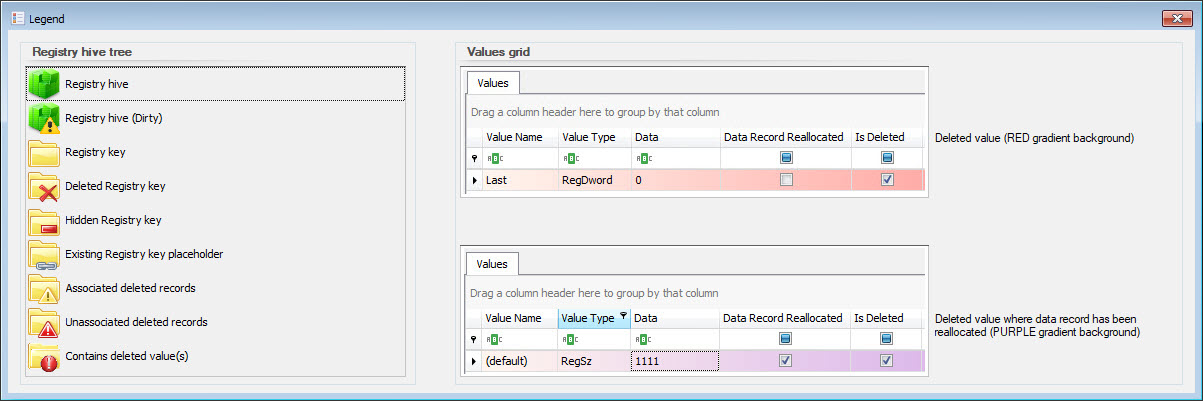
NEW: Display deleted values with red gradient in values list
NEW: Display deleted values with non-resident data with purple gradient when the data record that value points to has been reallocated to another cell somewhere else.
FIX: Handle fringe errors related to save paths, loading bookmarks, etc
The biggest changes in this release came about from work Dave Cowen was doing as it related to having Maxim Suhanov on the Forensic Lunch. Maxim showed that in certain situations the list that tracks values in a key can still hold a reference to a deleted value. Registry Explorer now checks for this and displays the recovered value differently than the active ones.
When this happens. you also get a new key icon. Both the new icon and an example of what this will look like is shown below.

The other situation that I mentioned above was when a recovered value that has non-resident data points to a data record that has been reused elsewhere. This situation is shown using a purple gradient, like this:
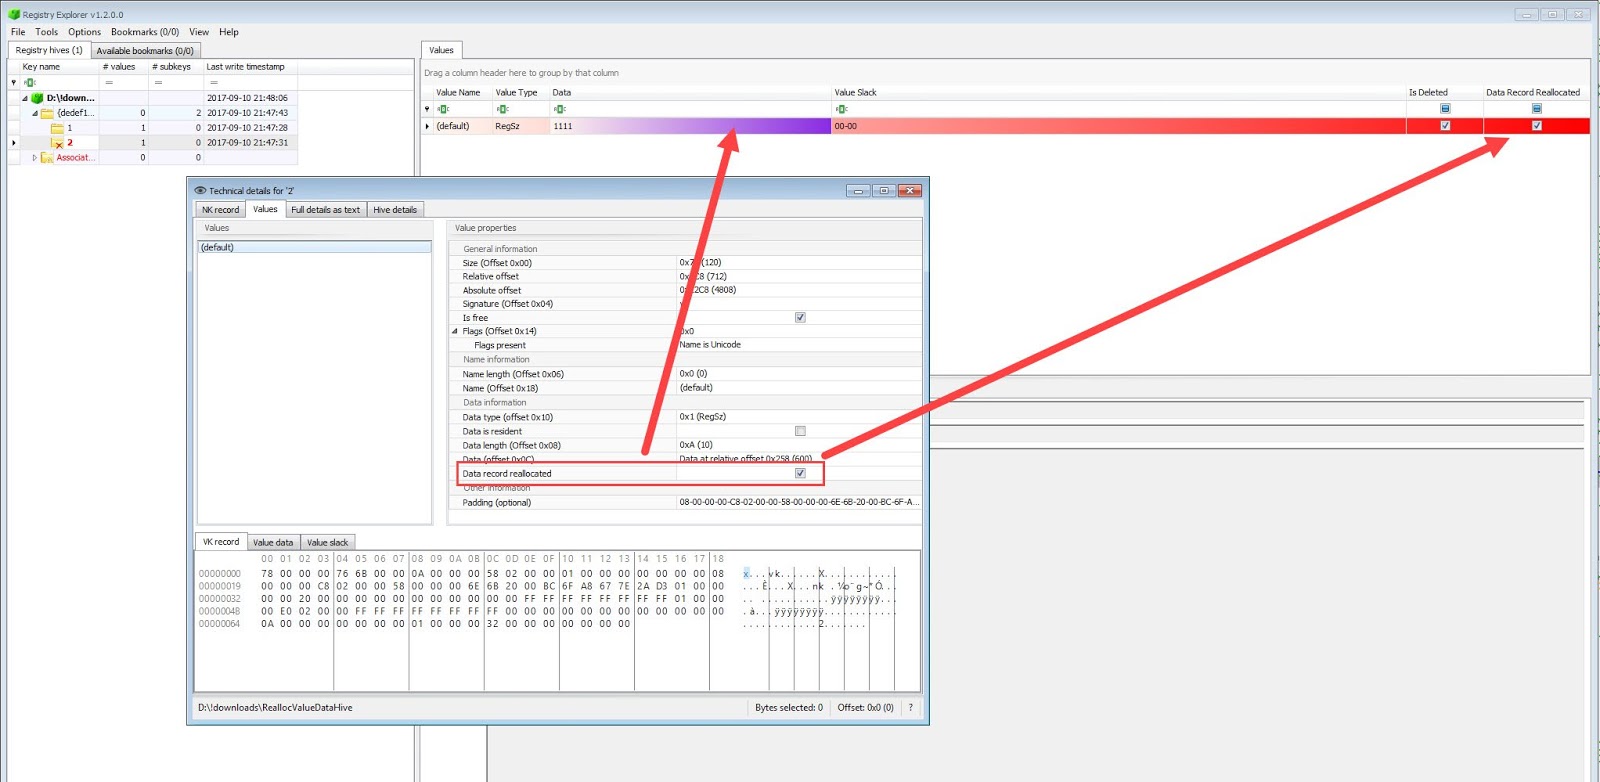
Note that the value has both the “deleted” and “data record reallocated” booleans set to true here. While some tools will not show you any data at all when this happens, Registry Explorer shows you what data the value points to so YOU get to make the decision if it is relevant. Also unlike other tools, Registry Explorer is actually available for use by anyone, for free, forever, and is open source. =)
The Technical Details view has also been updated to add the “Data record allocated” condition.
The Legend has been updated to show this new information as well.
RECmd
Finally, let’s talk about RECmd. In short, RECmd has essentially been completely rewritten, adding support for plugins and an all-new batch mode.
The new options for RECmd look like this:
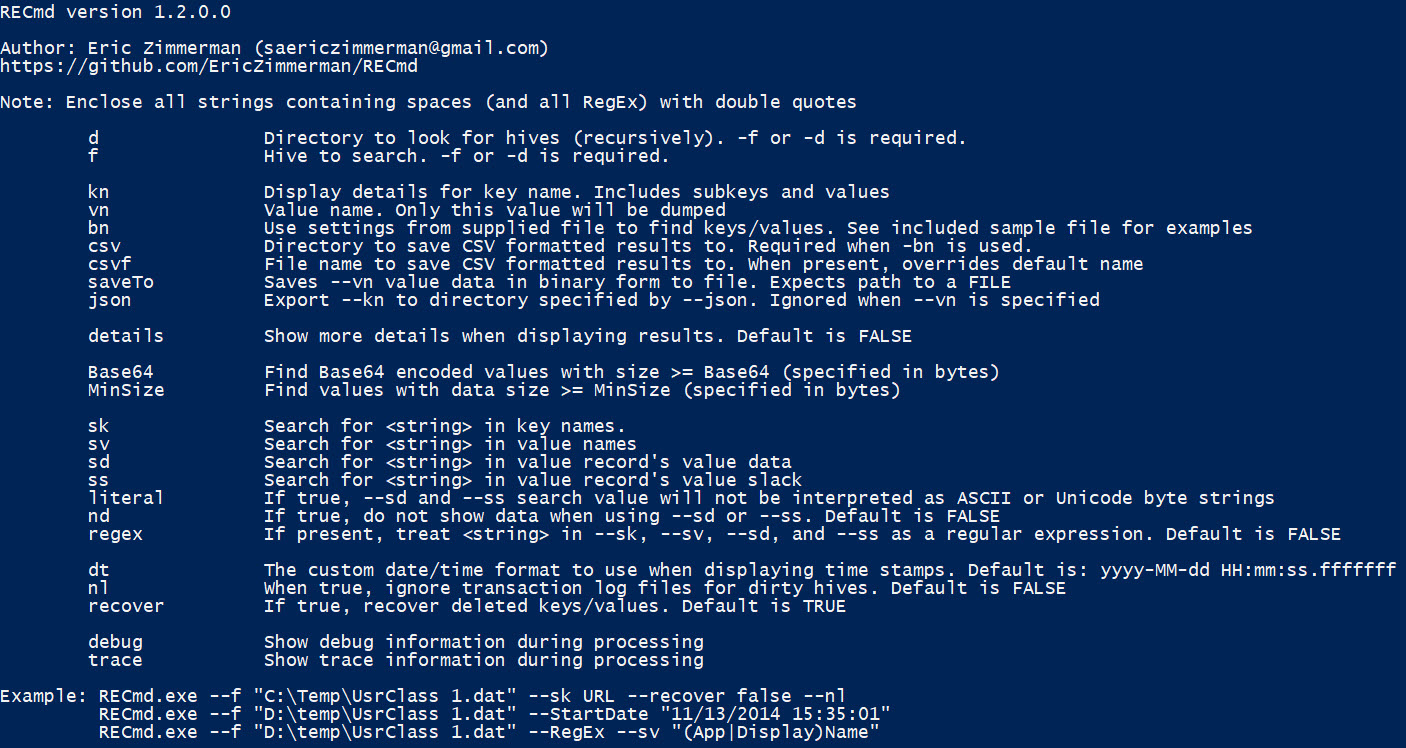
This brings RECmd in line with my other software with common switches, recursion, and so on. Note that, like my other Registry based command line tools, there is an --nl switch which disables transaction log support if you do not have them (or just do not want to use them).
The searching stuff has not been changed (the “s*” options), nor has the other find related stuff (base64 and size).
Note there is now a --debug and --trace switch. The --debug switch can help with troubleshooting and seeing a bit of what is going on under the hood. --trace on the other hand is a firehose of super granular information that can help diagnose problems. I would stick with --debug!
And now, batch mode!
The BIG change is the --bn switch. This is used for “batch mode” which we will see here in a moment.
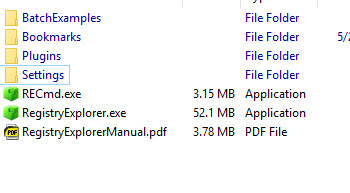
Before we get into that though, let’s look at where RECmd.exe lives now. It has been moved to the same directory as RegistryExplorer.exe because the two programs share the same plugins now.
If you have ever used a plugin in Registry Explorer you have seen how nice they can make the analytical process. While Registry Explorer allows for exporting plugin data out to Excel, this can be tedious when doing the same thing over and over (just ask Dave Cowen!).
But exactly how are plugins leveraged in RECmd? The answer is via batch mode!
Batch mode is essentially a way to automate RECmd to parse hives, search for keys, and export to a common format.
Let’s take a closer look at how we define a batch file. A batch file uses YAML configuration to define the rules. Here is an example:
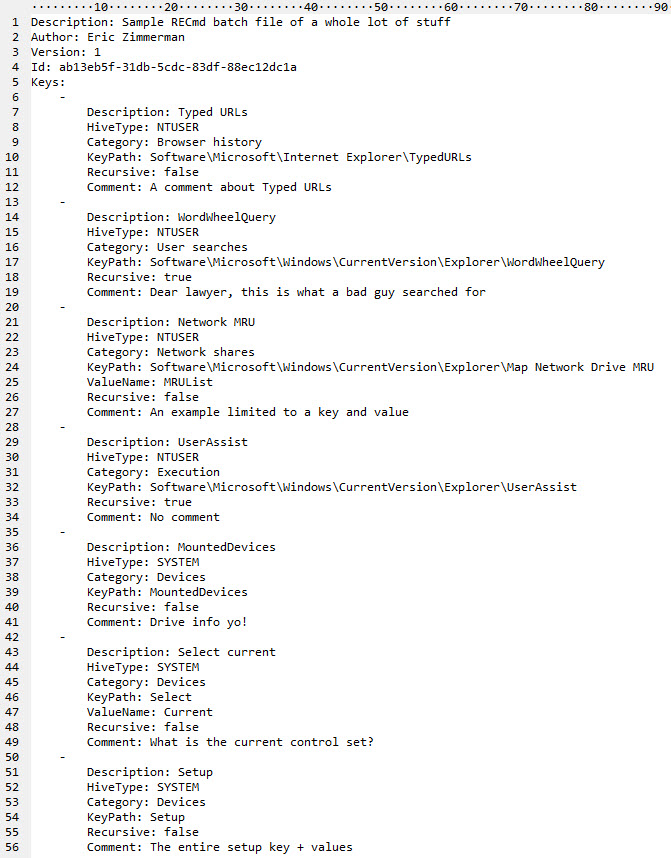
So what is going on here?
The specification for a batch file is as follows:
Header
• Description: A general description of what this batch file is going to find
• Author: Name of made this batch file (can me more too, like contact info)
• Version: A version number that should be incremented as changes happen
• Id: A unique (across all other batch files) GUID that identifies this batch file
• Keys: A list of things to look for
Keys collection
Each entry consists of:
• Description: A user-friendly description of what this key will find. Can be anything from the key name to a friendlier description of what it means, etc.
• HiveType: The type of hive this entry corresponds to. Valid choices are: NTUSER, SAM, SECURITY, SOFTWARE, SYSTEM, USRCLASS, COMPONENTS, BCD, DRIVERS, AMCACHE, SYSCACHE
• KeyPath: The path to the key to look for
• ValueName: OPTIONAL value that, when present, is looked for under KeyPath
• Recursive: Whether to process KeyPath recursively or not
• Comment: Like Description in that you can add various things here that end up in the CSV
HiveType determines which kind of hive the entry corresponds to. This saves time in that RECmd wont search a SOFTWARE hive for keys that won’t ever exist (because they are NTUSER specific for example).
For the KeyPath, wildcards are supported. For example, “ControlSet00*\Services” would expand to “ControlSet001\Services” and “ControlSet002\Services”, assuming there were two ControlSet keys of course. This can be extended as much as you like, so this works fine too:
SOFTWARE\Microsoft\Office**\User MRU*
RECmd would see those wildcards and determine which keys actually exist. These keys are then processed and extracted out to CSV. See the sample files for more examples, but it really is that easy!
This can save you not only time, but will actually find results you couldn’t possibly have a way to know even existed without searching beforehand to find all possible key paths, updating the config, and so on. It is a HUGE time saver!
RECmd comes with several example batch files that you can use, including a really comprehensive one from Mike Cary (RECmd_Batch_MC.reb). Mike’s batch file contains over 40 key/value pairs and includes examples of wild card usage, recursion, and so on.
With a batch file created, you then tell RECmd where to find it. Here is an example:
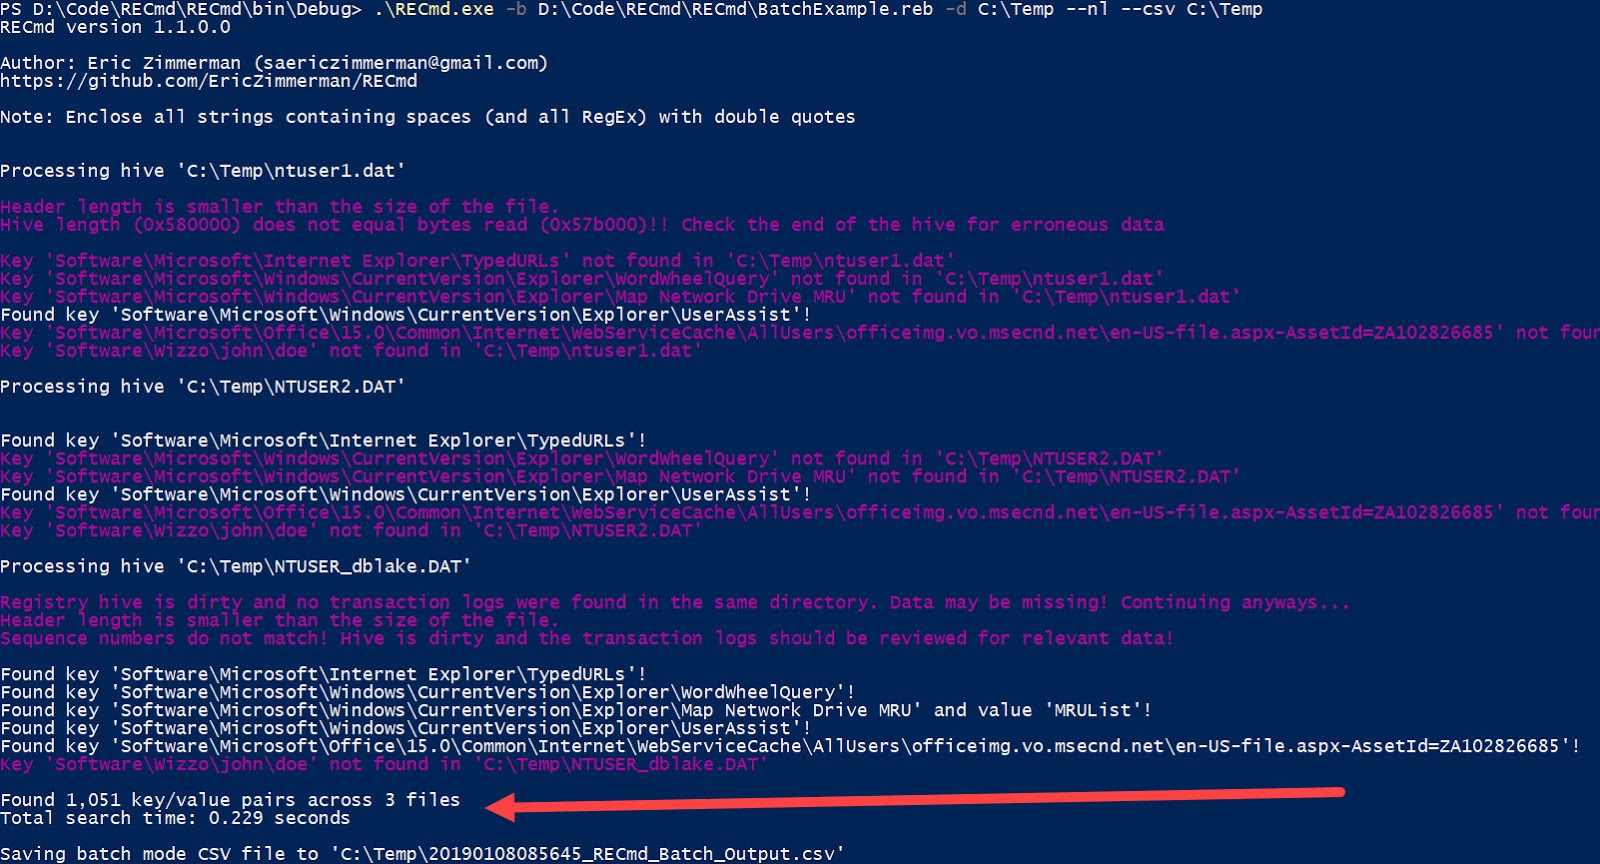
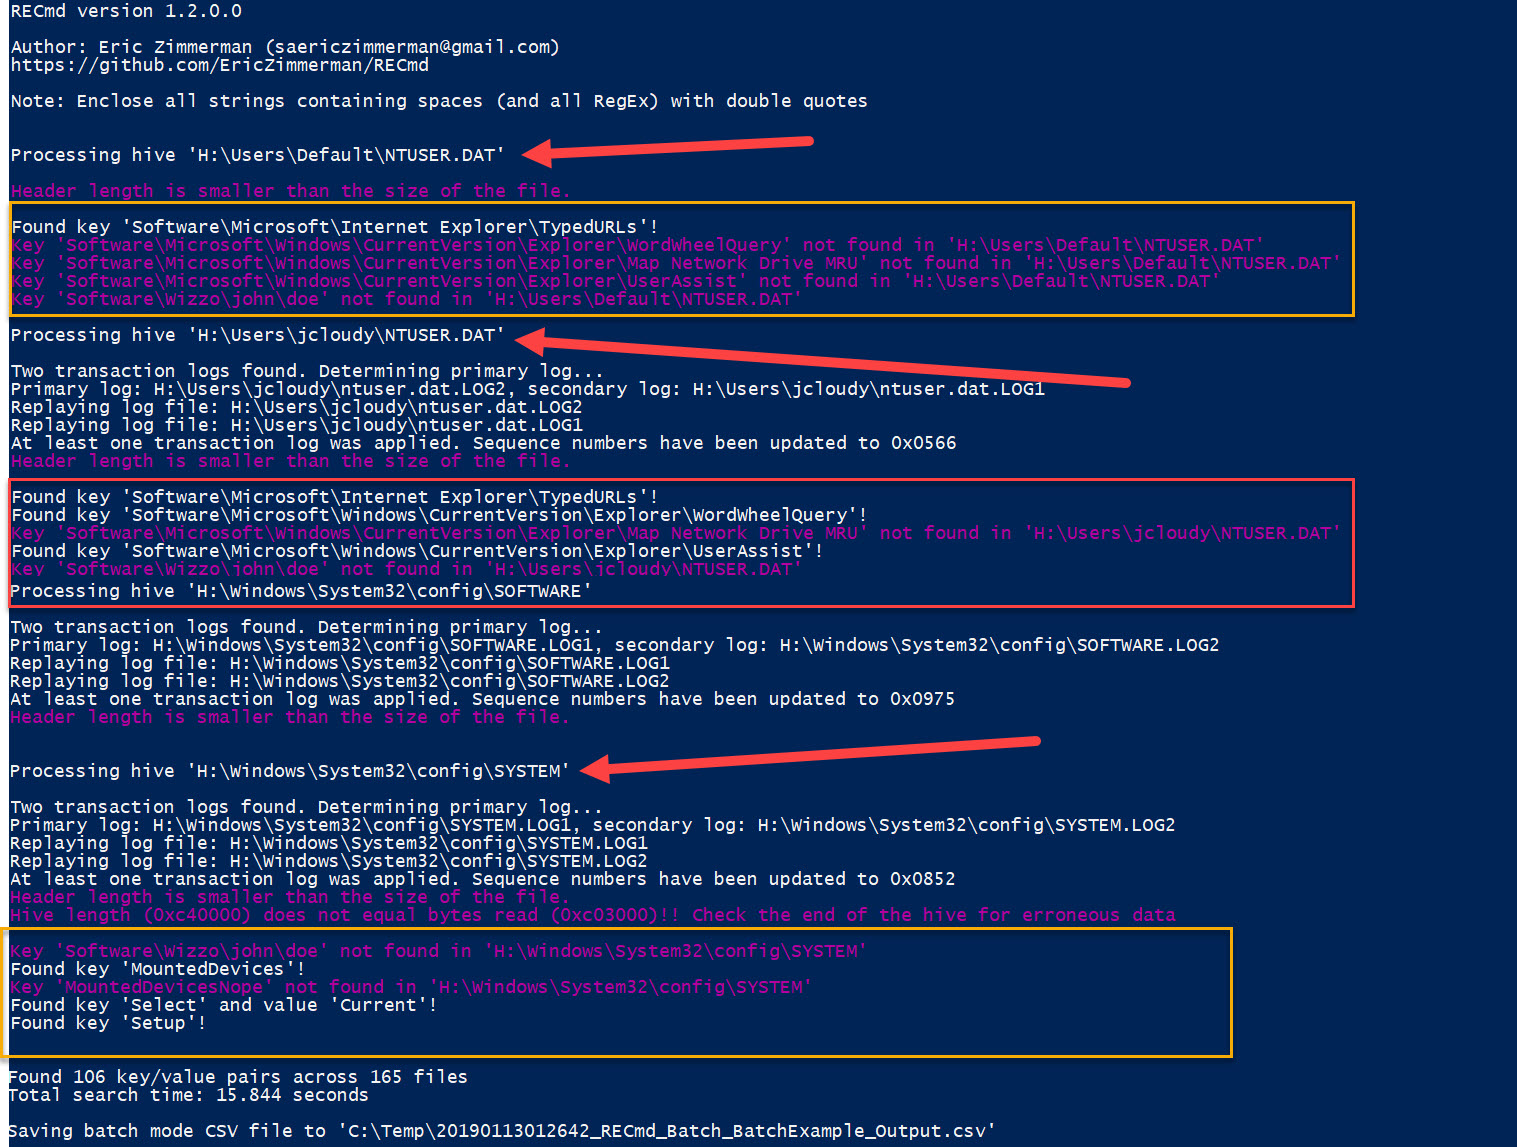
Now this particular example only NTUSER hives existed in the -d directory, but because we can have any type of hive defined in a batch file (SYSTEM or SOFTWARE, etc.), if we pointed it to a different location, say, an E01 file mounted via Arsenal Image Mounter, it might look like this:
As RECmd runs in batch mode, several things are happening. First, every key and value that is found is added to a “normalized” CSV file. What this means is that you will be able to look at keys and values across hives in a consistent manner using a tool like Timeline Explorer. The challenge here is finding a balance between too little and too much data to put in such a normalized file.
As an example, one of these files might look like what we see below. The next two images are from the same file, but split across two images because of the overall width.
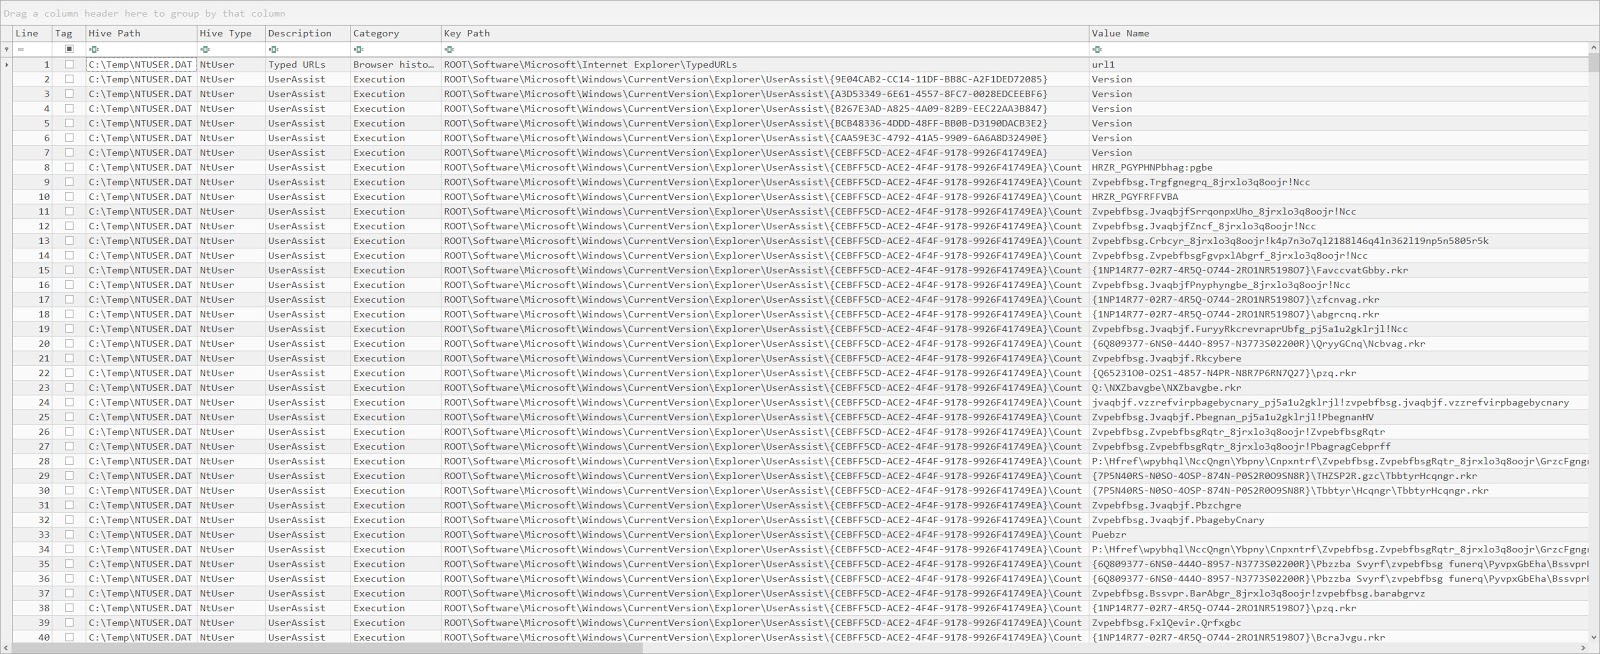

First, we see that we get the full path to the hive where the data came from.
The next few fields come from the batch config. Hive Type lets you quickly group by a particular hive. Description lets you document things as needed. Category allows you to group different keys and values into the same category (UserAssist and AppCompatCache being “Execution” related for example).
Next, we get the Key Path and Value Name. In the second screenshot, we continue with Value Type. Value Type is going to reflect the actual value type (if its a straight up key/value) or “(plugin)” which tells us that a plugin was used to populate those entries.
Next, we see Value Data, Value Data2, and Value Data 3 columns. These are the “normalized” columns that come from each plugin. Now some plugins have 10 things of interest, some have less. This is where the balance comes into play. Each plugin takes the data from each of its row and “maps” it into one of these three fields. This might include paths, run count, focus time, execution times, and so on. In those cases, you will see the description in the data itself (as can be seen above for UserAssist plugin).
Continuing along, we then have the Comment from the batch config, whether the key was processed recursively, and if the key is deleted. Next is the key’s last write timestamp, and finally, when a plugin is used, the full path to the plugin details file.
To make this last part easier to understand, let’s take a step back.
When RECmd runs in batch mode, several files will get generated in the --csv directory. Here is an example:
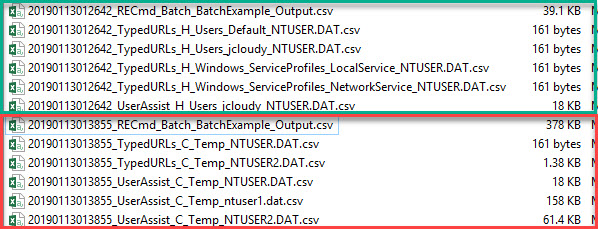
Now in this particular example, we see data from TWO executions of RECmd in batch mode. Let’s break them down.
Let’s do the green box first. Notice all of the files begin with the same timestamp. this lets you group things by the overall RECmd run. The first file in the list then references “RECmd” and “Batch” along with the batch file that was used for the run (BatchExample). This file is the normalized view we just discussed.
Notice also, however, that we have four files for TypedURLs and one for UserAssist. Notice how this is right after the timestamp, again, to group them together. Finally, after the key name, we see the full path to the Registry hive where this data came from.
Looking at the second one, in red, it is very similar, but we see the summary along with two TypedURLs and three UserAssist keys, along with the filename where that data came from. Depending on your batch file you may end up with dozens of plugin CSV files being generated.
Going back to our normalized CSV output, as you scan through the data, you will more than likely have what you need in the normalized view to determine what is going on. Recall though that some plugins might have 10 fields, whereas you may only get 3-4 of them in the normalized view.
What if you wanted to drill down into the details, exactly as the plugin generated them? This is where the “Plugin Detail File” comes into play. If you open this file in Timeline Explorer you will see exactly the same data that you would if you loaded the hive in Registry Explorer and went to the same key and reviewing the plugin generated data.
Here is an example of what one of the TypedURLs CSVs might look like:
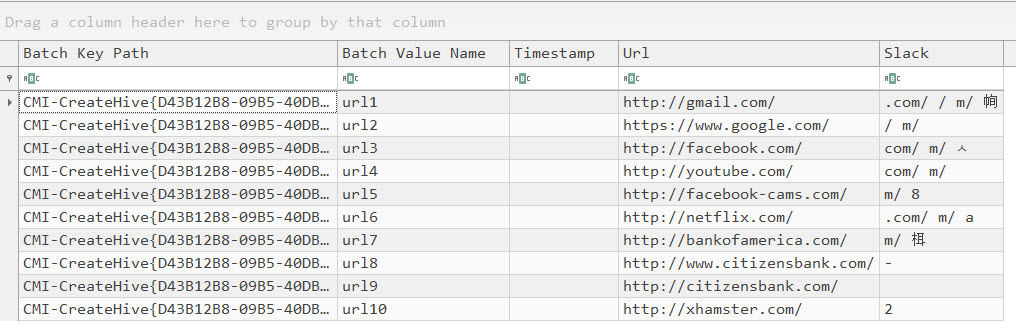
By giving you both a normalized view AND quick and easy access to the details, you can get to the answers that much faster.
Consider this capability from a research standpoint. If you are always looking at, say, the syscache.hve file over and over after making changes, a simple batch config that hits the key in the hive (which therefore calls the Syscache plugin) will not only generate the summary but also extract out the exact, full details that the plugin generates, right to a CSV! This file can then be ingested or massaged as needed.
The use cases for this kind of thing are limitless in that I do not have to have anything to do with your use of RECmd. You can create as many batch files as you like. You can make new plugins (or ask me to. I will be happy to help), and the plugin DLLs can go right into the Plugins folder. This lets Registry Explorer and RECmd benefit from the plugin.
RECmd and batch mode opens up a massive amount of possibilities from an automated analysis perspective in addition to the more common use case of just looking at a lot of Registry keys in a single place.
With that said, RECmd really shines because of its standardization of the output, which lets you use tools like Timeline Explorer to filter, the ability to pivot to plugin data, and so on.
I really hope you get a lot of good answers in your cases from these changes.
If anything is unclear, please feel free to reach out and as always, if you run into any issues, please let me know and I will get them fixed as soon as possible.
Enjoy! You can get the updates at the usual place.
Article Link: https://binaryforay.blogspot.com/2019/01/registry-explorer-and-recmd-1200.html