In part 1 of this series, we warmed up and aligned with basic computing terminologies. We learned the basics of assembly and how to use disassemblers. All of these tools and techniques are very important for reversing malware samples. Different sorts of malware have different capabilities and implementations. As reverse engineers, we need to be familiar with them and be able to identify and understand them.
Often, malware targeting Windows will be packed and delivered as a second stage. There are different ways to “deliver” malware to the endpoint. This blog will cover key concepts and examples regarding how malware is packed, obfuscated, delivered, and executed on the endpoint.
Here’s what we’ll cover:
- Basic terms that explain how malware is delivered to endpoints.
- A deep dive on packers – what they are, how they work and how to identify packed samples.
- Following the technical information, we will demonstrate two hands-on analyses of packed malware.
Basic Terminology for Reverse Engineers to Know
An executable file can conceal its true code through either encryption or compression. When the file is executed, some initial code usually called a stub, decrypts or decompresses the real code so it can be executed. These tools, that we will describe in this section, can be used by legitimate vendors that want to protect their software from piracy and copyright violations but threat actors also use these tools to evade detection and make the reversing engineering and analysis process harder.
Now, let’s look at these four tools: a packer, crypter, protector, and a loader.
What’s a Packer?
Packers are often used to compress the payload so it will take less space on disk. While packers can be used for legitimate purposes, malware developers utilize packers to make the malicious payload smaller and avoid detection based on static malware analysis techniques.
Examples:
- UPX is an open-source packing algorithm.
- MPRESS is a free packer.
- Andromeda is a custom packer that makes reverse-engineering more difficult.
What’s a Crypter?
Some security tools use signatures or keywords to detect malware. To avoid detection by these tools, malware developers can use crypters. A crypter encrypts the payload, so it will be harder for signature-based and standard anti-viruses to detect the malicious payload.
Examples:
- PEUNION
- EXECryptor
What’s a Protector?
For most threat actors, one of the goals they want to achieve is to evade detection, and if the malware is detected then make the analysis process harder for researchers. That’s where protectors come into the picture – they offer many features that can make static and dynamic analysis tedious and time-consuming. Having said that, legitimate organizations can use protectors to protect their software from being cracked and manipulated.
Usually, protectors will encrypt the payload, remove and obfuscate imports, implement anti-debugging and anti-reversing techniques, and much more.
Examples:
- Themida
- Enigma Protector
- VMProtect
What’s a Loader?
Packed malware samples are compressed and stored inside the final executable, which will extract and execute the malware. On the other hand, there are loaders that serve as the first stage of the attack, the payload of the malware can be part of the loader’s file or it can be downloaded from a remote location (by the loader, also known as a Downloader). In addition, loaders can be used to set persistence and additional components needed for the execution of the malware. For example, Bazarloader is a sophisticated loader with multiple techniques that is used in attacks against high-profile organizations. Bazarloader delivers all sorts of threats, from spam to ransomware like Conti or Ryuk.
In many cases, malware is delivered by tools that implement some (or all) of the functionalities of packers, crypters, protects, and loaders –- all to make the analysis harder. For example, Morphine has its loader and can encrypt the original file.
Deep Dive Into How Packers Work and Detection
Now let’s focus on packers, how they work, how to identify packed files, and how to extract the packed payload that can contain malicious code.
How do packers work?
The packed file contains three main components: packed content, a new PE header, and a stub, as seen in the image below:
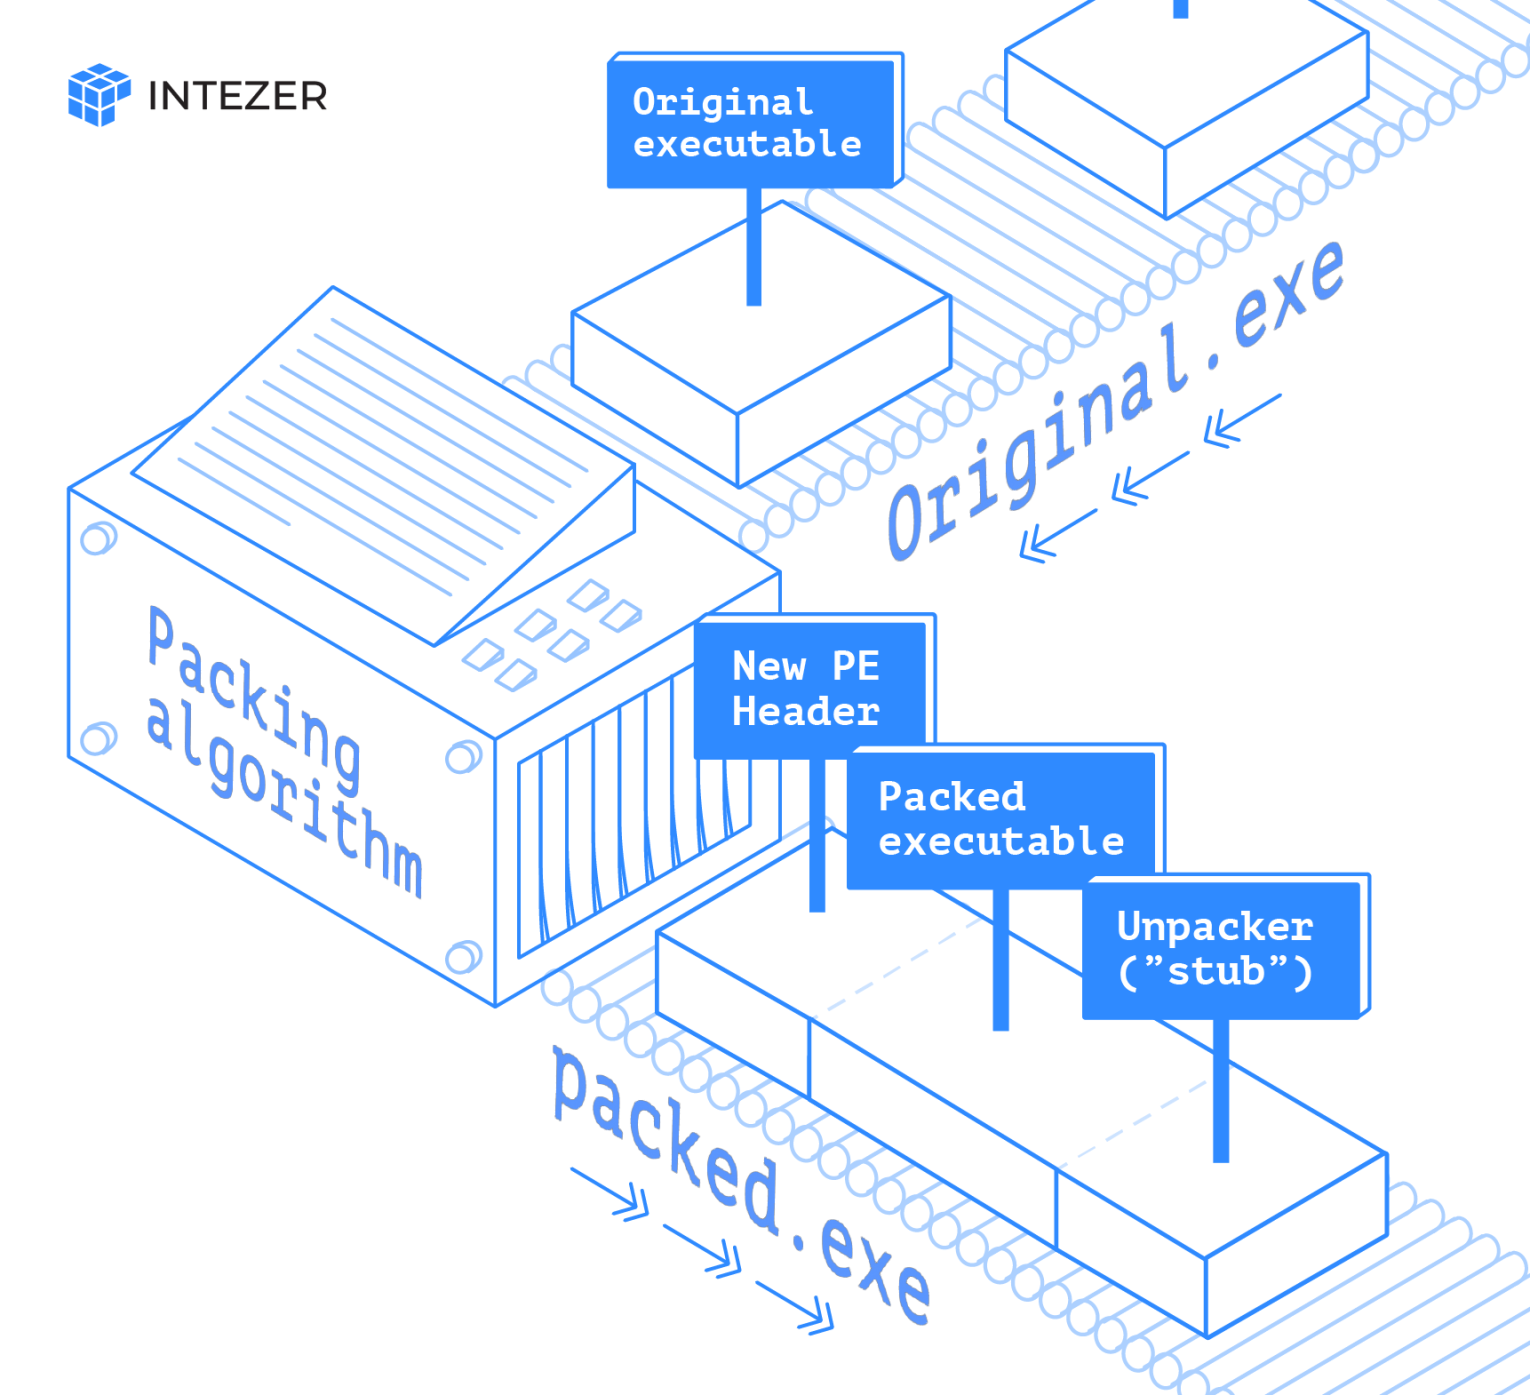 Packed sample view.
The packers compress (and if it has the functionality of a crypter also encrypts) the original executable, which is saved in one of the sections of the final packed file. The entry point of the original file is relocated, and so is the Import Address Table (IAT). The stub is a small part of code that implements the decompression (and decryption) of the originally packed file. A new PE header is prepended to the packed file or modifies the existing header so it will be a valid executable.
How to detect packed files
1. Static detection
When data is being compressed or encrypted, the output is not structured and resembles more random data, resulting in high entropy. In information theory, entropy is a measure of disorder/randomness. The calculation is done using logarithm with base 2, also known as Shannon entropy, the result is in units of bits, hence the range of entropy level for binary files is 0 to 8.
We can check the entropy of the file sections, and if one of them has a value of 7 or higher, there is a high probability that the file is packed.
Packers may change the final payload’s section names, as seen in the screenshot below. But in most cases, malware authors will rename the sections to more commonly used names that will not give away the fact that the file is packed.
Multiple tools can be used to detect indicators of a sample being packed:
PEstudio, DiE (Detect it Easy), CFF explorer, and more. There are many examples and tutorials that use these tools, so we will show another free tool that can be handy in this and later stages: radare2.
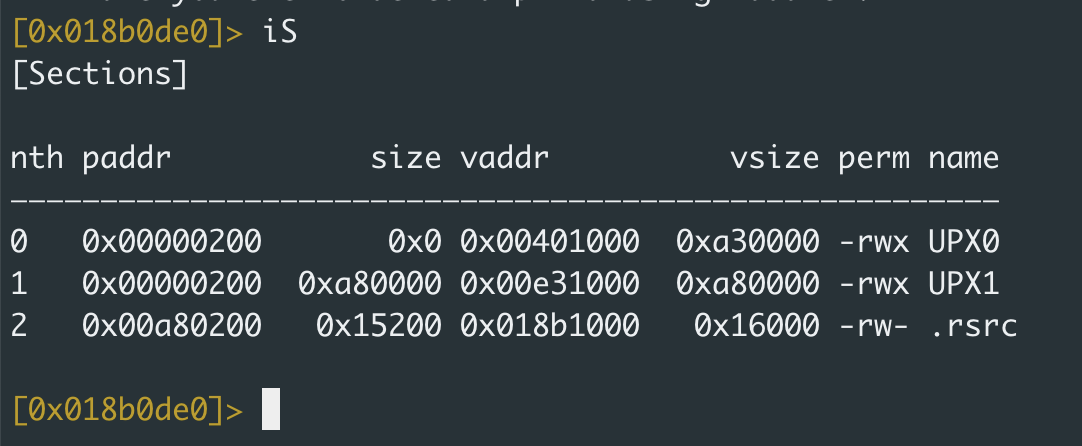 Viewing the section of a file (see technical analysis on this packer here).
Packed samples usually have very few imports as they don’t rely on external libraries like other programs. When a file has a low number of imports, it strongly indicates that it contains another component that is dropped/loaded. However, malware developers can add “dummy” imports to mislead researchers.
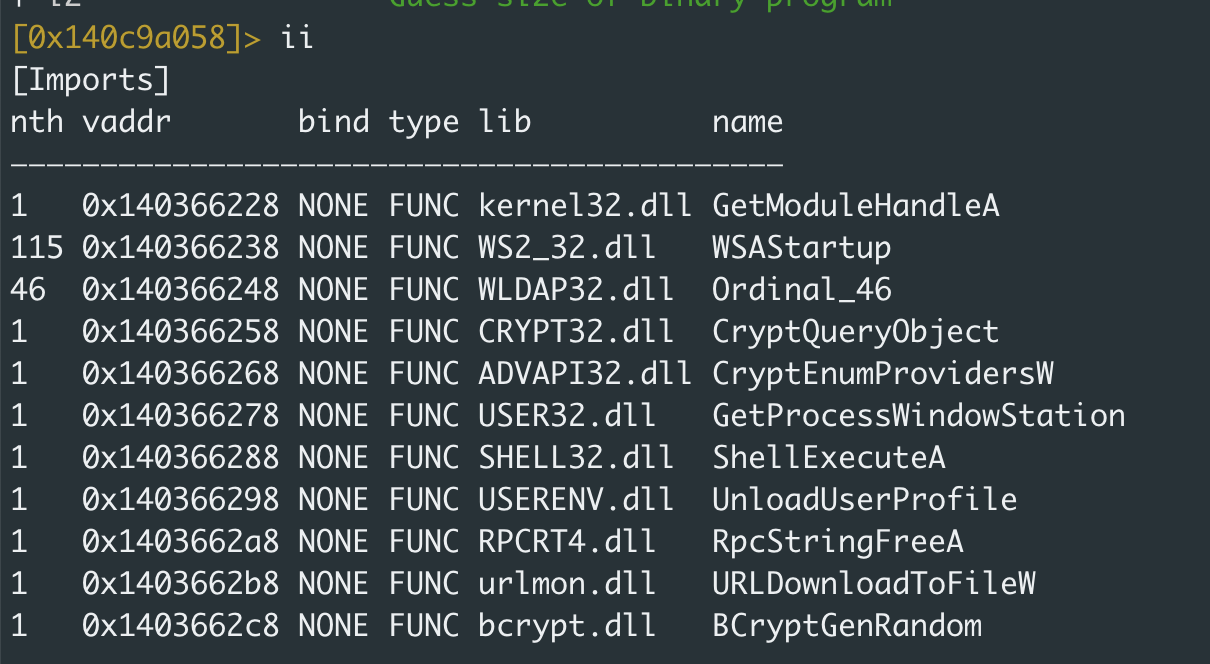 Viewing the imports for a packed file; full analysis results here.
Reverse Engineering Example: Static Unpacking of UPX Packed Samples
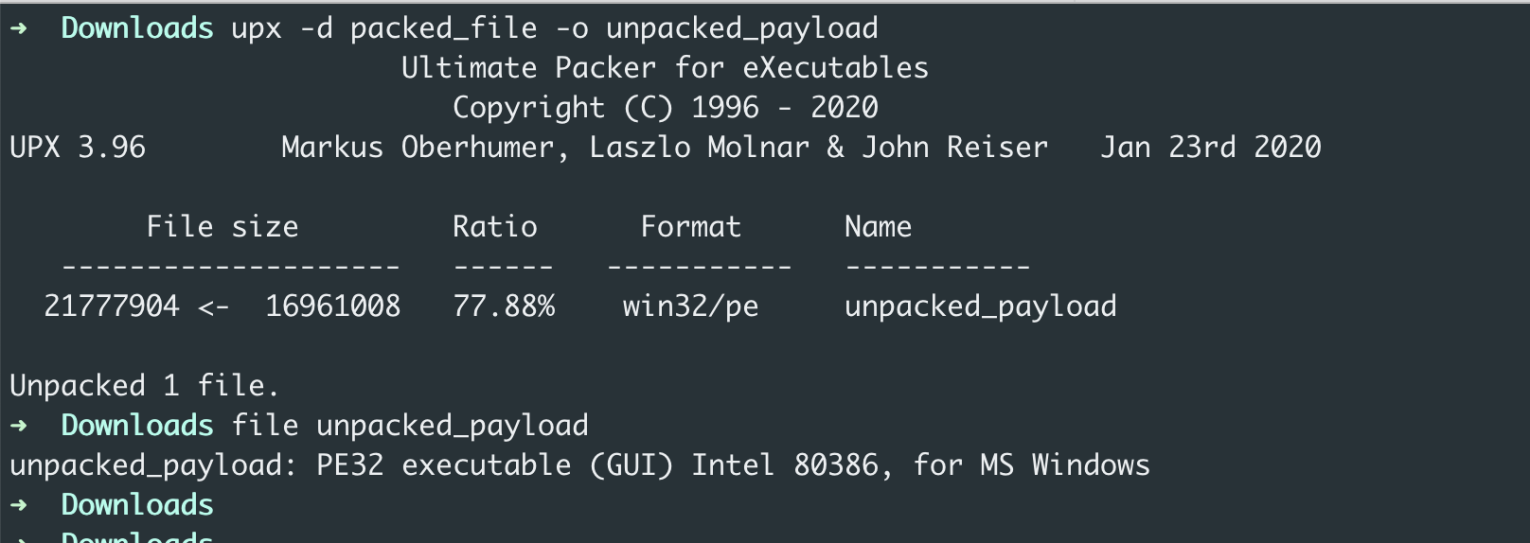
Standard UPX packed samples can be identified by the section names, as long as they were not modified by the attackers. Let’s take a look at a sample with MD5 5598febfbf00839c9f7047d9fe3205e3.
The section names of the files contain the UPX string, as seen in the screenshot below:

We can use the UPX command line utility to extract the packed payload. The command to decompress a packed file is as follows:
upx -d <packed> -o <extracted payload>You can run the command on the sample and verify that the extracted file has MD5 6d13f5d287fd735a9bbc261aafb49006.
2. Dynamic detection
When we dynamically analyze a packed file, we aim to extract the payload. Several functions can be a good place for putting a breakpoint and attempting to fetch the extraction process. Let’s look at API calls and debuggers.
API Calls
Essentially, all packers need to perform the following operations: allocate memory, change permissions, read the encrypted/packed chunk of code, decrypt it, load it to the allocated memory space and execute it. To make all of these actions, the program must use system calls because these actions require interaction with the kernel.
The relevant system calls are
- VirtualAlloc used for allocating memory in the current process. The memory is automatically initialized to zero. One of the arguments is dwSize – that’s the size in bytes. Knowing the size can help identify when a program allocates big memory space, possibly for the unpacked payload.
- VirtualProtect changes the permissions of the given virtual address. When malware wants to grant write or execute permissions flNewProtect argument will be set to PAGE_EXECUTE_READWRITE (0x40) or PAGE_EXECUTE_READ (0x20).
- RtlDecompressBuffer decompresses the provided buffer.
- CreateProcessInternalW creates a new process. In the context of malware execution, it can create a new threat with the malicious unpacked payload.
We can look for these system calls in the list of imported functions. However, malware authors usually try to hide these system calls. For instance, we will not see them in the imported function list, and they not even be part of the strings in the sample. In this case, the function and the corresponding library are dynamically loaded at runtime – also known as explicit linking.
In this case, dynamic debugging can be very helpful – debuggers like x64dbg let you put a breakpoint on function calls, even if the function is not imported. The breakpoint will be triggered if the system call is executed.
Debugger
A debugger is a powerful tool that allows developers and researchers to follow and control the execution of a program. When debugging an executable, you can view the registers, stack, and memory and see how each instruction affects the stored data.
Debugging malware can reveal code executed only in runtime (meaning that you will not see it in standard static analysis). Debuggers also allow you to see how strings and payloads are deobfuscated and constructed – making it easier to find the interesting patterns of the malware.
Different debuggers can be used to debug Windows executables and DLLs:
- OllyDbg – not maintained anymore
- Windbg – powerful kernel-mode and user-mode debugger created by Microsoft.
- x64dbg – reliable and user-friendly. For 32-bit executables, it’s x32dbg.
The main difference between these debuggers is the implementation, which may result in certain behaviors, but for the most part, it’s up to you to choose which debugger you prefer.
There are more tools for debugging (and analyzing) .NET executables and other Windows executables, but that’s not covered in this blog.
Reverse Engineering Example: Extracting Packed Locky Payload
In this section, we will present a guide on extracting packed malware from 2 popular malware: CobaltStrike and Locky. Make sure to run (and debug) the following examples in an isolated Windows virtual machine.
You can watch the video of the hands-on unpacking process of Cobalt Strike. The video shows generation of a Cobalt Strike payload, analysis of the assembly, dynamic execution of the stager to fetch payload, scanning the endpoint for in memory genetic analysis, and parsing the Beacon configuration.
The analysis of the Locky ransomware is covered in the section below.
Reverse engineering tools that will be used in these analyses:
- Windows virtual machine
- x32 debugger
- Radare2
- Command line commands: file, strings, shasum
In this example, we will inspect a packed sample of Locky ransomware. While Intezer automatically identifies that the file is packed and extracts the payload for us, we will show how you can manually extract the payload here.
Static analysis
First, we will check the entropy of the section. We will use radare2. As seen in the screenshot below, the .rdata section has an entropy level higher than 7, and it’s very unusual for this section to have randomized data. We can run the strings command on the sample. The output contains lots of strings that look like a random collection of characters. At this point, we can assume that the sample is packed, so we will move to dynamic analysis using the x32dbg debugger.

Dynamic analysis
We will use the API calls we covered in the previous section. Put breakpoints on VirtualAlloc and VirtualProtect.
bp VirtualAlloc
bp VirtualProtect
Now, let’s run the file. It will first stop at the entrypoint, we will hit F9 (continue until next breakpoint – BP), and we will get to the first call to VirtualAlloc. As seen in the screenshot below, the BP stopped on the call to VirtualAlloc, which is in the Kernel32.dll, and in the stack view (right low corner) we can see the arguments passed to the function. We can see that the required allocated space is relatively small, so it’s probably not called by the unpacking routine. So we will continue running the program – hit F9 again.
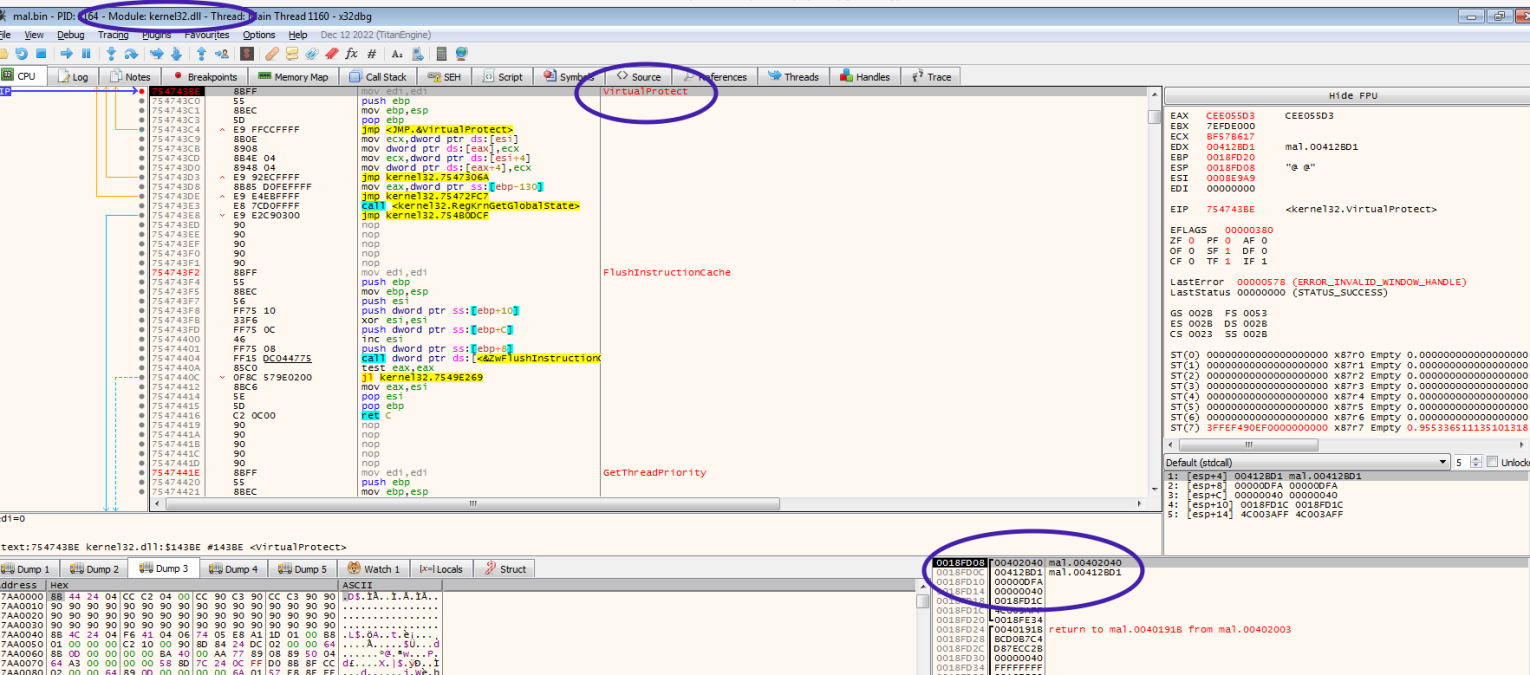
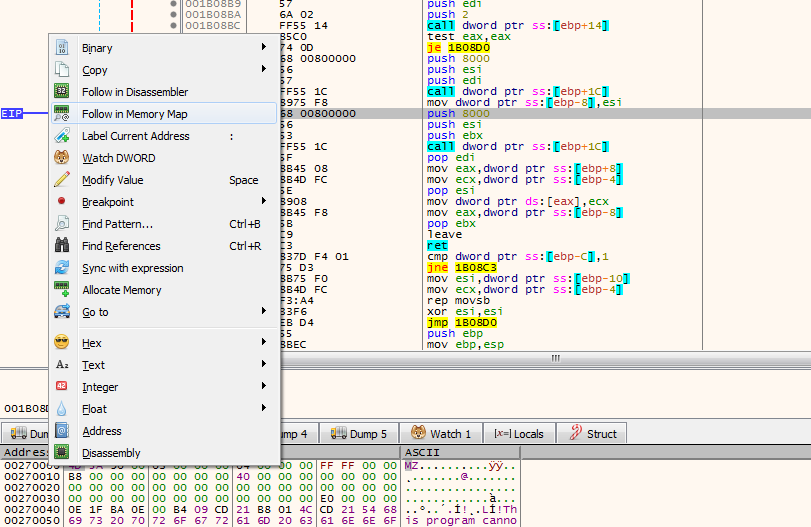
It might take a few more hits on the call to VirtualAlloc before we get to a call with the size 0xF41D. At this point, we want to see where VirtualAlloc was called and what will be stored in the allocated spaces. So, as shown below, we will ask x32dbg to run to user mode. We will get to the instruction “ret 10” at this point. We need to grab the value stored in EAX, which stores the return value of VirtualAlloc.
In my case, EAX is 0x240000. We will hit right-click and follow in the dump. The memory is zeroed out but if we follow the execution of the code (hitting F8 several times), we will see that the memory contains some values, but they look random. We can continue running the program until the next hit on the VirtualAlloc call.
Continue running the program until VirtualAlloc is called with the size: 0x17400 – which is even bigger than the previously allocated buffer. Then again, hit “run to user code,” or “execute till return” and follow EAX in the dump and step through the use code until you see the allocated memory filled with data that looks like this:
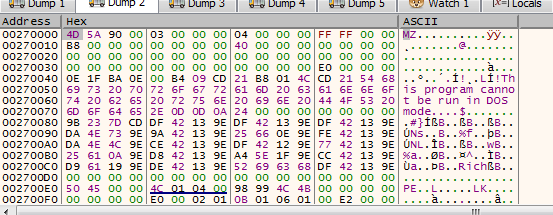
The dump contains the unpacked executable – we can identify it by the 0x4D5A (MZ) magic. In the memory map, right-click the section and hit “Dump memory to file.”
The MD5 of the extracted payload is e96dad009437ca774035ffd73708bd3e. We can see in Analyze that, indeed, it’s Locky ransomware malware. Mazal tov! You have successfully extracted the Locky payload.
Automating Unpacking for Every File
Learning the foundations of reverse engineering is important if it is a skill that you are trying to develop in your career. But for many security teams, even at large companies, you may not have the time to manually unpack and reverse engineer files on a regular basis. If you have automated tools that can unpack files and conduct reverse engineering-level analysis, those can ensure that you’re using your time efficiently to focus on threats that require your attention. Since reverse engineering can be time intensive, you’ll want to only use manual methods for tasks like unpacking after you’ve exhausted your other tools and options.
Don’t have the time or skills for reverse engineering the volume of packed and obfuscated files your SOC team handles?
Intezer’s automated alert triage and response process collects files from your endpoint security solution (like CrowdStrike, Microsoft Defender, or SentinelOne) to identify packed files, extract the payload, and then respond autonomously or with the results Intezer provides for remediation.
To see how Intezer handles reverse engineering tasks for every alert, book a demo here.
The post Malware Reverse Engineering for Beginners – Part 2 appeared first on Intezer.
Article Link: Malware Reverse Engineering for Beginners - Part 2 - Intezer