Introduction
In this guide we’ll go over the Falcon Data Replicator at a high level and how it can be used within your organization. The support guide provides heavier technical details related to implementation and can be found in the Falcon Console in the Support App:
https://falcon.crowdstrike.com/support/documentation/9/falcon-data-replicator-feature-guide
What is the Falcon Data Replicator?
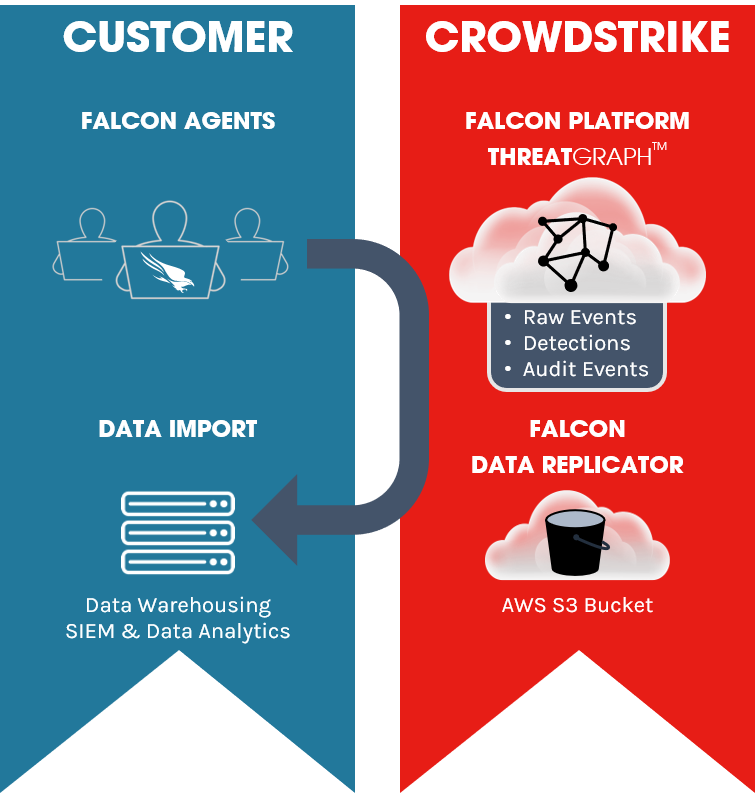
The Falcon Data Replicator is a means to pull your raw event data from Threat Graph (aka the Falcon Platform). Once the data is pulled it can be ingested, transformed, and analyzed as your organization requires. Most organizations will ingest the data into their own data warehouse, perform custom analytics & investigations, and define an event retention policy based on the storage available.
Below is a high level overview of the Falcon Data Replicator data flow. In essence, endpoints generate raw event data which is ingested into ThreatGraph, we hand off your raw event data by placing it in a AWS S3 bucket, you can then pull your data, and manage it from there.
Who needs the Falcon Data Replicator?
The Falcon Data Replicator is most used by teams who have data warehousing capabilities, in-house analytics tools, and a need to retain raw event data beyond their “Falcon Platform” retention period.
How does it work?
Support Creates S3 Bucket
To start, contact CrowdStrike support. At your request they will create a CrowdStrike managed Amazon Web Services (AWS) S3 bucket for short term storage purposes as well as a SQS (simple queue service) account for monitoring changes to the S3 bucket. This S3 bucket has a 7 day retention policy by default, because data is intended to be pulled out of it for longer term retention.
You Pull & Process Event Data
Once the raw event data is flowing, you are responsible for pulling the data from the S3 bucket. The Simple Queue Service (SQS) simplifies this process by publishing any file changes to the S3 bucket. You can leverage a script to monitor the SQS account for published changes, thus removing the tedious need to scan for directory and files changes.
Important: Review the sample script given in the Falcon Data Replicator Feature Guide.
How do I enable it?
Before enabling the Falcon Data Replicator be sure to review the technical support feature guide to gain a fuller understanding of the requirements. Once you have the fuller understanding, work with CrowdStrike support as mentioned above to enable the Falcon Data Replicator for your organization.
More resources
- CrowdStrike 15-Day Free Trial
- CrowdStrike Tech Center
- Sign up for a weekly Falcon demo
- Request a 1:1 Demo
- Guide to AV Replacement
- CrowdStrike Products
- Falcon OverWatch
How to Contain an Infected System
Hi, there. My name’s Peter Ingebrigtsen. And today, we’ve logged into the falcon.crowdstrike.com, or the Falcon User Interface.
And what we’re going to do is take a look at some of our systems and recognize that some of them are either currently under attack or recently been under attack, and may have been compromised. And we’d like to contain that system until we can further get to it, get our hands on it, and get a little bit more information out of it, or just prevent it from doing any more damage than it’s already done.
In order to do that, you need to be on your Detections app. You can do that by going to the radar here on the left-hand side. If you’re not already, or if your user interface doesn’t open that when you first log in, head there. And then just select the Recent Detections.
When that opens, you’ll notice that you can filter by any number of criteria, but we’re looking at some of the more recent events or situations that are going on. And you’ll notice that the same single machine has noticed a lot of different scenarios with privilege escalation or web exploits. And these severities are high to critical.
And we’d like to log in there, maybe do a little something, take a little closer look, and see if there’s something we should do. Obviously, we should do something. And as we start to dig through here, we see that there’s a lot of detection patterns, whether that be known malware, credential theft, or web exploits. We can see in the process tree a lot of different commands that were issued that look at that privilege escalation that we noticed earlier– or start to set that up.
So, we know that there’s something bad going on, and we’d like to take action right away. So, what we want to do is network contain this machine. But what I want to show you, as well, is that as we do this– I’m going to go to the machine itself. And I’d like to start a continuous ping so that you can watch the behavior and how long it takes to respond to this network containment.
Now, while we contain this– or take this machine off the network– we don’t kill the connection to the CrowdStrike Cloud. So, that as we get our hands on it– we clean it up, we feel comfortable putting it back on to the network– we can still operate or control that machine through the user interface that we have here.
The other thing I’d like to do is start a large download, so that we initiate with a single TCP connection– and there happens to be one in process– as opposed to the ping, where there may be multiple TCP resets or individual TCP threads going every time. So that you can see that as we contain this machine, it literally just knocks it off the network.
Forgive my screen, but I’ve changed the resolution for YouTube and for appearance purposes.
But as I come in here– and this will be right at the middle of the screen– this actually says Device Actions. And I’d like to contain it.
Now, as we do that, we have some options to make some notes. Contained by Peter. Multiple threats observed. Whatever notes you’d like to make– and then select Contain.
Now, the second we do this, on the left-hand side, you’ll see how quickly it takes for that to respond. So, immediately, almost in real time, you see a network failure on the download, and the ping test– or the continuous ping fail. So, we can close that.
Now, let’s say we’re a couple days later, this machine’s cleaned up, ready to go, and be put back in the network. You can go ahead and lift the network containment, again, from the user interface. We still have that connection to the machine, even though all the other network connections have been terminated.
So, as we do that, all good. Uncontain. And you’ll notice that almost immediately that ping starts to fire right back up again.
So, network containment is a powerful tool that we can use if we see something immediately taking action or if we see something recently in the past, and we’d like to get that machine off the network– almost quarantine it– so that it can’t do any more damage.
So, this has been network containment of network devices in the Falcon Sensor User Interface platform. Thanks again for watching.
The post Introduction to the Falcon Data Replicator appeared first on .
Article Link: https://www.crowdstrike.com/blog/tech-center/intro-to-falcon-data-replicator/