(From the manual, which is included, and you should read…)
What is KAPE?
Kroll Artifact Parser and Extractor (KAPE) is primarily a triage program that will target a device or storage location, find the most forensically relevant artifacts (based on your needs), and parse them within a few minutes. Because of its speed, KAPE allows investigators to find and prioritize the more critical systems to their case. Additionally, KAPE can be used to collect the most critical artifacts prior to the start of the imaging process. While the imaging completes, the data generated by KAPE can be reviewed for leads, building timelines, etc.How KAPE works
KAPE serves two primary functions: 1) collect files and 2) process collected files with one or more programs. By itself, KAPE does not do anything in relation to either of these functions; rather, they are achieved by reading configuration files on the fly and, based on the contents of these files, collecting and processing files. This makes KAPE very extensible in adding or extending functionality.KAPE uses the concepts of targets and modules to do its work. KAPE comes with a range of default targets and modules for most common operations needed in most forensic exams. These can also be used as examples to follow to make new targets and modules.
At a high level, KAPE works by adding file masks to a queue. This queue is then used to find and copy out files from a source location. For files that are locked by the operating system, a second pass takes place that bypasses the locking. At the end of the process, KAPE will make a copy and preserve metadata about all available files from a source location into a given directory.
The second (optional) stage of processing is to run one or more programs against the collected data. This works by either targeting specific file names or directories. Various programs are run against the files and the output from the programs is then saved in directories named after a category, such as EvidenceOfExecution, BrowserHistory, AccountUsage, and so on.
By grouping things by category, examiners of all levels have the means to discover relevant information regardless of the individual artifact that a piece of information came from. In other words, it is no longer necessary for an examiner to know to process prefetch, shimcache, amcache, userassist, and so on as it relates to evidence of execution artifacts. By thinking categorically and grouping output in the same way, a wider range of artifacts can be leveraged for any given requirement.
Moving on…
There is, of course, a lot more detail in the manual (it’s good, read it!), but let’s look at some usage scenarios and how to make it do something next.
KAPE can be used on a live system or against a dead box system in the form of a write-blocked hard drive or a mounted E01. In every case, usage is the same. KAPE handles in-use files and volume shadow copies as well, making it very thorough in its approach to finding and collecting data.
The takeaway here is that KAPE wants a drive letter, directory, or UNC path as its source of data. If you can point KAPE at a path, it will do its thing.
So, in the case of a live system, we would simply make KAPE available by connecting some kind of external storage for example. From there we can target any drive letter or directory for collection.
For a dead box system, once Windows recognizes the write-blocked device or you have an E01 mounted (use Arsenal Image Mounter, NOT FTK Imager) and it has been assigned a drive letter, you are ready to begin.
At this point, we are assuming you have a target drive letter available. Several examples will be shown at some point below, for both a live system as well as a mounted image (again, use Arsenal Image Mounter. FTK Imager does not expose volume shadow copies).
Targets
Targets are responsible for defining the files and directories for KAPE to copy. The full specification for a target and its properties is in the manual, but it is pretty straightforward.
Targets (and modules) are written using YAML. This is an easy to use and understand format and many examples are included in KAPE.
A target for file system artifacts looks like this:

This is a simple example in that we just have specified the full paths for each file we are interested in. In some cases, like $MFT and $SDS, we have to use an additional property, AlwaysAddToQueue, because Windows will, on a running system, lie and say that file does not exist (via normal means anyways).
Let’s look at another example:

Again we see paths specified to artifacts, but what is different here is the use of wildcards. We have no way of knowing beforehand all of the profiles on a computer, so the wildcard is automatically expanded by KAPE to find all the profiles that exist, then go get all the lnk files that exist (using a wildcard again, because we have no idea what the names will be).
Another interesting property is IsDirectory along with Recursive. These allow you to give a base directory and have all files/folders under it copied, such as jump lists in the first example.
With targets defined (and KAPE comes with close to two dozen of them, ranging from filesystem to Registry to Event logs to Recycle bin, Outlook, and more), the target you are interested in is passed into KAPE and KAPE takes care of the following:
- Expanding the target file to all matching files
- Attempting to copy the file using “regular” means
- If a file is in use, defer the copy
- At the end of regular copying, process all deferred files using raw disk reads to get a copy of the file
- Recreate any directory structure and apply full resolution timestamps from the original directory
- Copy the files to the target destination folder and reapply full resolution timestamps from the source file
- SHA-1 hash the file
- Record all of this in log files
This all happens in seconds depending on what you are targeting.
Targets inside targets inside targets (inception!)
Targets can reference other targets too, but what does this mean?
Before we get into that, let’s talk about how you should design targets and how they have been designed so far.
Targets should be specific in that they focus on a certain kind of file or files. For example, a target should be granular in that it only looks for event logs. Another target only looks for Registry hives. Yet another just looks for Chrome profiles, and so on.
Why do it this way? By keeping things granular and specific, YOU can choose to only target what YOU want. If you only want Chrome and Firefox information, you can just run those targets.
But what about the situation where you do not know what browser is in use or you want to target the file system, Registry hives, and jump lists?
This is where the concept of a compound target comes into play. Let’s look at one:

So what is going on here? Notice that, rather than file paths, wildcards, and so on, we are referencing other target files!
When KAPE runs, it will automatically expand each of the targets above using what is in that target file. In this case, the details from InternetExplorer.tkape, Chrome.tkape, and Firefox.tkape will be expanded and each of the files located and copied! If that particular browser is not installed, that data would simply not be found.
With this in mind, you can see how powerful and flexible this approach is in that YOU get to decide what to collect and when to collect it. If you just want Registry hives and event logs, use those two targets in a new target called HivesAndEventLogs.tkape, then use that target.
There is also a special target, !All, that simply locates all other targets and runs them all. While this works, it will not be as fast as using a more specific set of targets for collection.
Modules
Put simply, modules run programs. More specifically, they run a SINGLE program. This is important to understand as modules are written for a single purpose.
Let’s look at an example. In this case, a module for PECmd is shown below:
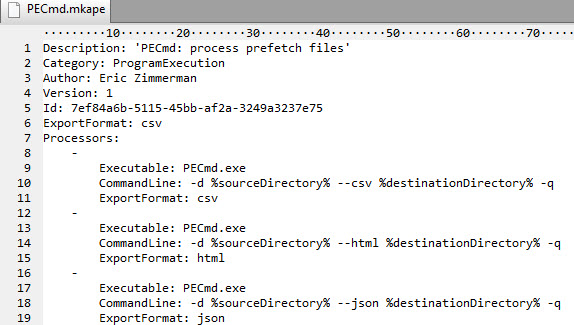
As with targets, the full spec for a module is outlined in the manual, but it is pretty simple.
The Processors group contains one or more entries for PECmd. In this case, there are three, because PECmd knows how to export data in three different formats. Looking in the header, you can see the ExportFormat is set to ‘csv’ which means the first processor in the list would be used (the one with --csv switch).
Variable names
The values surrounded by % are variables that KAPE will replace at runtime. All the available variables are specified in the manual as well as in all the included modules for reference and examples, but it is pretty straightforward.
- %sourceDirectory% will be replaced with the value of --msource.
- %destinationDirectory% will be replaced with --mdest plus the category from the module (ProgramExecution in the case of PECmd)
This allows KAPE to work regardless of source or destination directories, drive letters, UNC paths, etc.
Handling redirection
Here is another example of a module. It is somewhat similar, but notice there is an additional property under the processor, ExportFile.
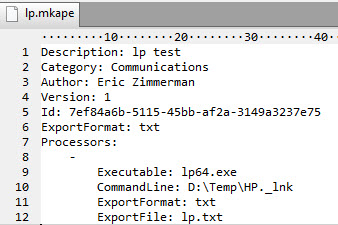
The command line is pretty specific here to just process a single file. The point here is not the commandline, but the presence of ExportFile.
ExportFile is used when a program does not know how to save its output to a file directly and relies on command line redirection (via > for example) to save results. Because of this limitation with the program, you must use the ExportFile property specify where to save the output from the program.
NOTE: YOU CANNOT USE REDIRECTION on the CommandLine! Do not try to do something like this in the CommandLine property:
D:\temp\HP._lnk > hpout.txt
as it WILL NOT WORK.
The take away here is you are covered in both situations where programs can write directly to a file, like PECmd does, or, for programs that use redirection, you just have to use ExportFile to capture the output. You can name the value for the ExportFile property any file name you like.
Running KAPE
KAPE requires administrator rights, so the first thing to do is open up an administrative level command prompt or PowerShell window. From there, running KAPE by itself shows us all available options.
Before we see it in use, let’s take a second to look at the options:

While there are quite a few options, things are generally broken down into two main categories: Targets and Modules.
Target options start with ‘t’ and module options start with ‘m’ and are grouped together as shown above.
For targets, --tsource,-- tdest, and --target are all required.
For modules, --msource, --mdest, and --module are required. There is an exception to this rule however that we will see later. When using target and module options together, you can omit --msource and KAPE will assign the value for --tdest to --msource automatically.
Seeing available targets and modules
Notice there are two sets of switches that list targets and modules:
–tlist and --tdetail
–mlist and --mdetail
The ‘list’ commands will dump out the target name and other information about each target or module. Here we see --tlist in action:

If we add –tdetail to the command, we get this:

Notice that all of the path information inside each target is also shown when using --tdetail.
–mlist and --mdetail work in the same way, except they show available modules and their details.
Target source option
The --tsource switch tells KAPE where to start looking for files. This can be a hard drive, external drive, network share, F-Response mapped remote disk, UNC path, mounted E01, and so on. As long as it can be referenced using a path notation supported by Windows, it will work.
Target destination options
The --tdest switch tells KAPE where to create copies of the directories and files it locates. This is the simplest use case.
KAPE can also, however, place copies of the files it finds inside of either a VHD or VHDX (preferred) container by using either the --vhd or --vhdx switches. In either case, you must also supply a base name for the container. This base name will be used in naming the container that KAPE creates. In other words, this is NOT the full name of the container created, but rather, only part of it.
Using this option would look like this:
kape.exe --tsource c --tdest c:\temp\tout --target evidenceofexecution --vhdx MyBaseNameExample
This would result in all of the files found being copied into a VHDX container (located under C:\temp\tout, named:
2019-02-13T172926_evidenceofexecution_MyBaseNameExample.vhdx
There are several things to notice here. One is the timestamp at the front. The second is the name of the target is included in the file name (evidenceofexecution). Finally, we see the base name before the extension.
Because we used a VHDX container, this allows us to simply double-click the container to mount it in Windows. Doing this results in a new drive letter showing up, like this:
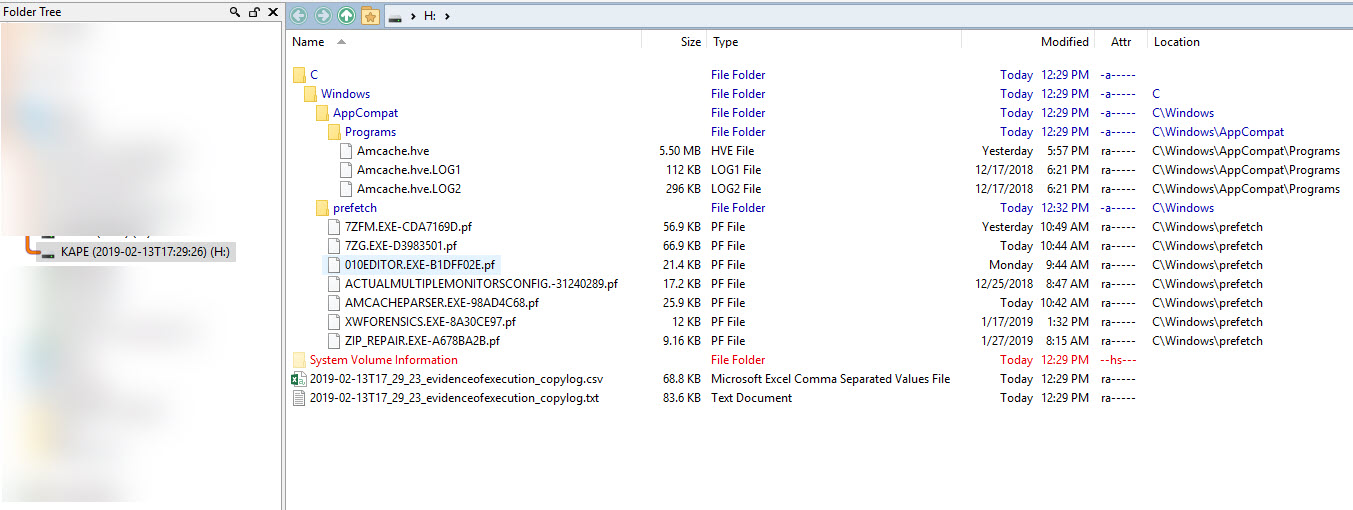
(To make things a bit easier to see, I am only showing some of the Prefetch files that exist in the VHDX in order to illustrate the layout. There are dozens more prefetch files in the actual VHDX.)
The image above is from Directory Opus (the best file manager for Windows there is!). What the image shows, however, is the directories and files that exist in the VHDX in grouped format which is easier to see what is going on than using File Explorer.
First, notice the drive label shows the date the container was made. Looking right, we see a list of files and directories in the VHDX container. The full path has been recreated from C on down because we told KAPE to process the C drive via --tsource.
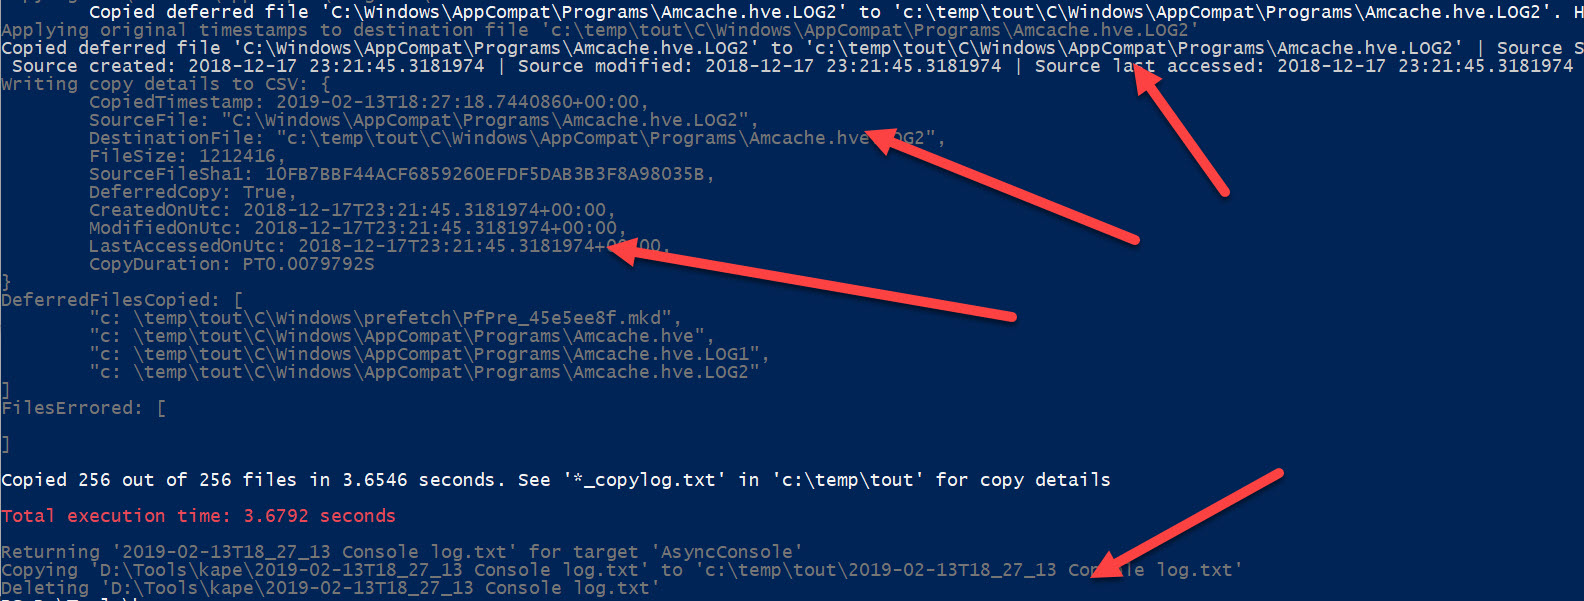
In addition to the files themselves, notice there are also two CopyLog files, one a text file, and one a CSV file. These contain full details about what KAPE did:


Notice that both include the source path, destination path, source SHA-1, and the timestamps from the source file. The CSV also adds details related to how long it took to copy files and whether the file was locked or not (DeferredCopy column).
All of the files themselves, as mentioned before, have their full timestamps applied to them. Looking at a prefetch file inside the container, the properties look like this:
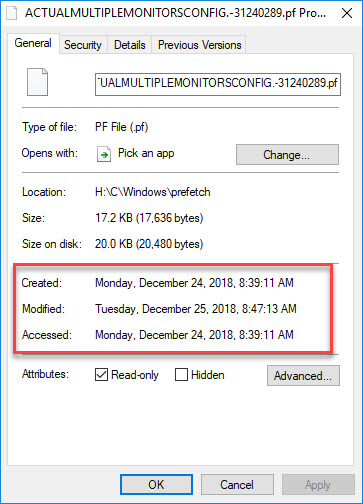
Notice the timestamps are from December and not Feb 13, which is when the container was created.
The VHD option works exactly the same way, except you end up with a VHD container.
Note: the first time you mount a container in Windows, it has to be done in read-write mode! Once it is initially mounted and unmounted, you can use PowerShell to mount the container as read-only, but it MUST be done r-w the first time or Windows will not recognize the file system. This does nothing to the data inside the container, just the VHDX file itself.
To unmount the container, right-click on the new drive letter and choose Eject.

In the images above, notice that the directory in the root of the container is the C drive. If we used the option to process volume shadow copies, we would end up with a different set of directories. If we ran this command (the same command as before, we just added --vss to the end):
kape.exe --tsource c --tdest c:\temp\tout --target evidenceofexecution --vhdx MyBaseNameExample --vss
We would see the following when we mounted the VHDX:
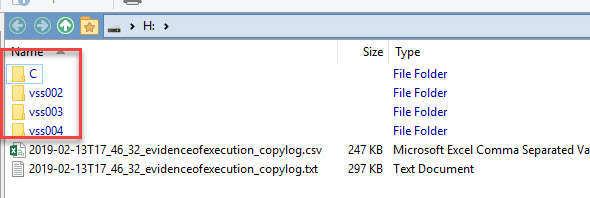
Notice we have three additional top-level directories, one for each of the VSCs that KAPE processed and found matching files. When KAPE ran, it looked like this:
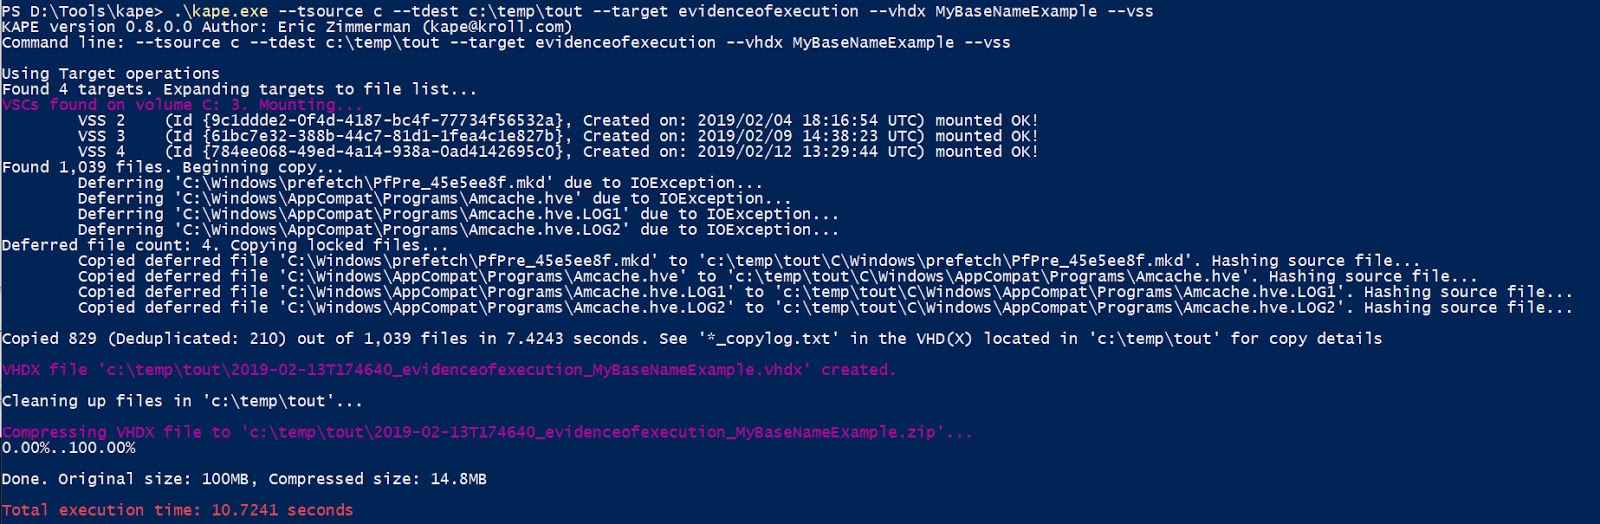
Here we can see several neat things. One is that KAPE, just by adding the --vss switch, located and mounted all the shadow copies on the C drive. It then walked the C drive and each VSC, locating files along the way. It found 1,039 files in total, but only copied out 829 because of duplicated SHA-1 hash values. THIS ENTIRE OPERATION TOOK 7.4243 SECONDS.
From here, we can see the VHDX file being created and then zipped (which makes it significantly smaller for transport).
All told, KAPE found, deduplicated, and forensically copied 829 files, placed them in a VHDX container, then zipped it in 10.7241 seconds.
The other thing to notice in the output above is there were several files that were locked. This is not an issue, however, as you can see the deferred files were copied at the end without any errors.
You can use the --zv switch to disable zipping of the container by adding –zv false to the command line.
Other target options
The --tflush option tells KAPE to delete the directory (if it exists) specified by --tdest before writing anything to it. This ensures that there are NO other files or directories in --tdest prior to KAPE placing files there (always a good thing).
Module source option
The --msource switch tells KAPE where to start looking for files for processing. This can be a hard drive, external drive, network share, F-Response mapped remote disk, UNC path, mounted E01, and so on, just like we saw with --tsource.
This does not have to be a directory that came from the target options, which means you can use KAPE to run live response on a running system or against a mounted E01 without using the Target options if you wanted to.
Module destination option
The --mdest switch tells KAPE where to instruct processors to save files to. Recall that modules run a program against files. The resulting output (a csv, json, or html file for example) would be saved to a directory underneath that specified by --mdest.
Other module options
The --mflush option tells KAPE to delete the directory (if it exists) specified by --mdest before writing anything to it. This ensures that there are NO other files or directories in --mdest prior to modules placing files there.
The --mef switch allows you to override the default processor as specificed in a module configuration. For example, if you wanted json output from the PECmd module, you can use --mef json and KAPE will select the appropriate processor from the available processors defined in the module.
Consider the following command:
kape.exe --tsource c --tdest c:\temp\tout --target evidenceofexecution --tflush --mdest C:\Temp\mout --module PECmd --mflush
This would look like:
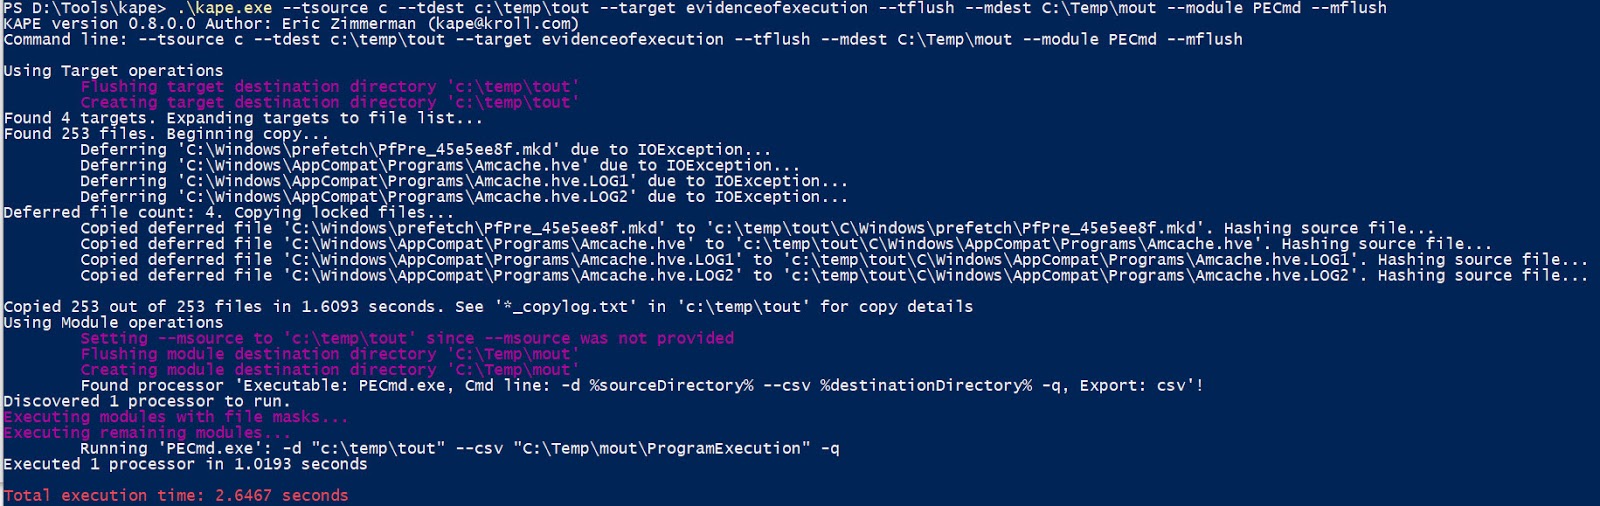
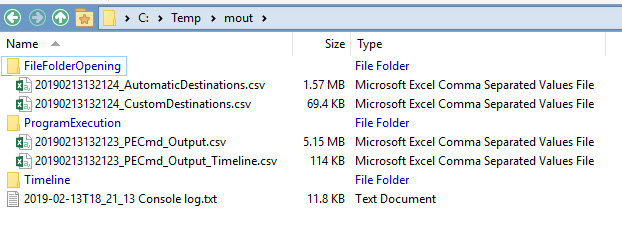
This is similar to what we saw with the target modules, but look after the copy completes. KAPE starts processing the data with the PECmd module. This would end up in the following data being created in --mdest:

Since Prefetch is related to evidence of execution, the PECmd module has a category of ProgramExecution specified in the module file. If we also ran other modules that looked at evidence of execution artifacts, like ammcompatcache or amcache, those results would end up in this same directory since those modules also use this same category.
The two CSVs shown above can be opened and analyzed in Timeline Explorer or any other program of your choice.
Notice, in this case, it took a massive 2.6467 seconds to find, copy and process all the prefetch files and get them ready for analysis.
If we add on the --vss option, it ends up looking like this:

And in this case, KAPE found and processed several hundred more prefetch files from VSCs, copied them out, and ran PECmd against them in 5.8383 seconds.
Other useful options
The --debug and --trace switches can be used when writing your own targets and modules as well as for things like progress indicators over slower links.
–debug adds information about files being found, copied, and so on.

–trace adds even more details to the output including what KAPE expanded targets and modules to, etc.
To see just how much KAPE is doing, run KAPE a few times with both --debug and --trace enabled, then review the ConsoleLog file as compared to when neither of the switches was used.
Combining Targets and Modules
As we saw above, KAPE can use Target options or Module options. One does not rely on the other. However, both options can be used at the same time. This essentially allows you to build your own “collection and processing chains” that can do whatever you want them to do.
For example, say you want to collect prefetch, Registry hives, and jump lists, then run PECmd, RECmd, JLECmd, and Plaso to generate a supertimeline. You can accomplish this very easily by building a Target that pulls the necessary files, then building a Module that calls the appropriate modules to run the aforementioned programs.
The command line might look like this:
kape.exe --tsource c: --tdest L:\collect --target QuickTimeline --mdest L:\output --module QuickTimeline
So what is going on here? Where did the “QuckTimeline” target and module come from? Quite simply, you create it! Remember that target and module configuration files are just YAML, so using your favorite text editor, make a copy of an existing target (like the WebBrowsers one), then update the new file to point to the other targets you want, like this:

Starting with one of the included module files, our new module would be handled in exactly the same way:

With the target and module in place, we would just run KAPE as shown in the example above and KAPE does the rest!
KAPE will first look for and copy all files based on the Target file, copy them all to L:\collect, then call each processor against the files in L:\collect. The output from each program will be saved to L:\output which will contain directories for each category. The CSVs in these directories can be loaded into Timeline Explorer and analyzed, all within a few seconds!
Running this command might look like this:

Alot of this we have seen before, but notice, in my case, that I do not have the binary in the right place for the plaso module to work properly. In this case, KAPE tells us this is the case, but it does not cause KAPE to not function properly.
The other thing to notice here is that several other processors were found and executed.
In this case, --mdest would look like this:
Other use cases
KAPE has special options, such as %d, that can be used on the command line for target and module destination paths, like this:
kape.exe --tsource c: --tdest L:\collect%d --target EvidenceOfExecution–mdest L:\output%d --module PECmd
First, note that we did NOT specify --msource. When --msource is not given on the command line, it is inherited from the value of --tdest. You can see why this would be necessary when using %d, because you would not know the name of the folder to use for --msource before hand. =)
So what is this one doing? When KAPE runs, it replaces %d with a timestamp in the form YYYYMMddHHmmss, so what we would really end up with is:
L:\Collect20190213113605
and
L:\Output20190213113605
Notice the timestamps match on each folder as well.
Using this approach, you can use a scheduled task to automatically copy and process any files you want over any interval you want (perhaps dumping prefetch every hour to a root directory and KAPE will handle adding the timestamp).
If you have watched Dave Cowen’s test kitchen and seen him manually locating and extracting files to different names, consider the ability to use KAPE and a Syscache target to automatically collect relevant Registry hives and other files every 15 minutes (or on demand, by repeating the command), then comparing the contents of each to find the trigger when updates happen.
This process can also be used to automatically find and package VHDX files of evidence over time by writing to a read-only Google drive or Dropbox share, and so on. In other words, you can create exemplar data sets of Registry hives, prefetch, file system data, and so on into VHDX containers for people to test their tools against, validate tools, and so on.
Another situation is needing to share Registry hives with someone. You can use the RegistryHives target along with --vhdx and in a few seconds you have a nice package to send off to whomever needs it.
The use cases are unlimited and this is really just scratching the surface on what is possible.
And last, but not least, making it even easier to use.
KAPE is a command line tool at heart, and it is not difficult to use once you see the basics.
With that said, KAPE has a secondary helper program, gkape, that wraps the command line version and makes it easier to use and get familiar with.
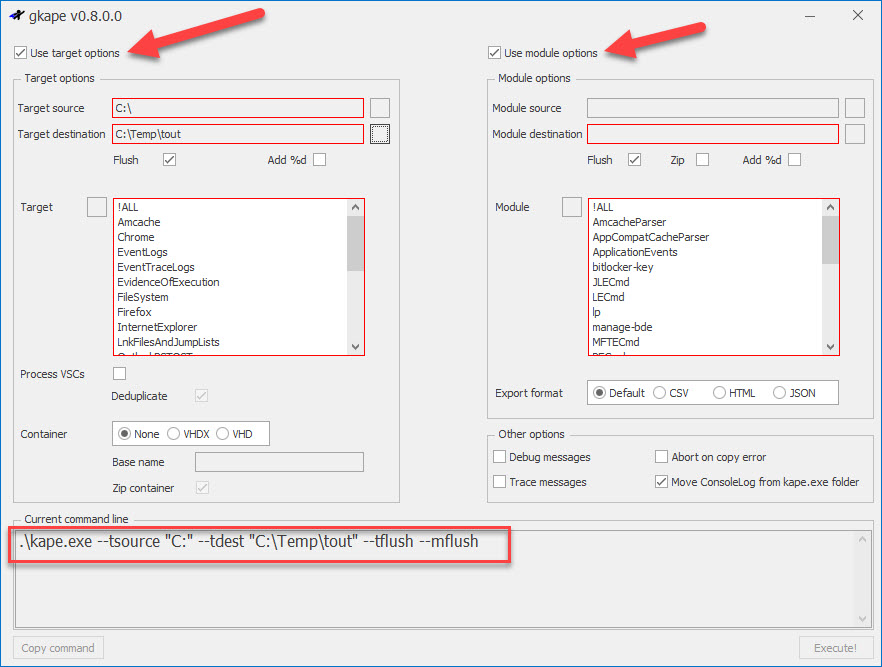
The main interface looks like this:

As options are enabled, other sections open up. Here we see how things change when the target and module options are checked and a few of the required properties (outlined in red) are populated:
As options are populated, the command line is built at the bottom. Continuing to pick the required options, we would end up with this:
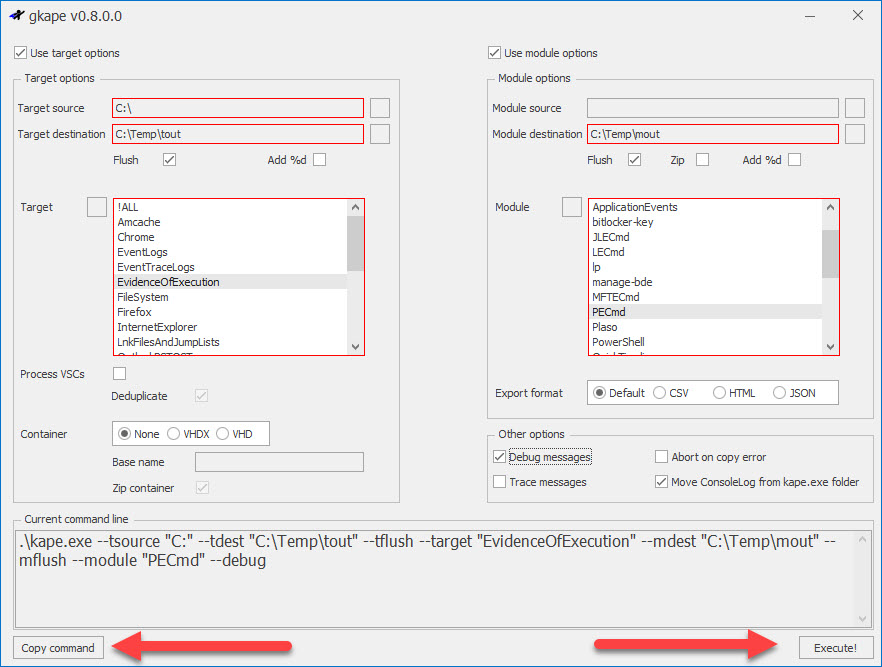
When a valid command line is built, the Execute and Copy command button are enabled.
Clicking Execute will run KAPE in a new window:
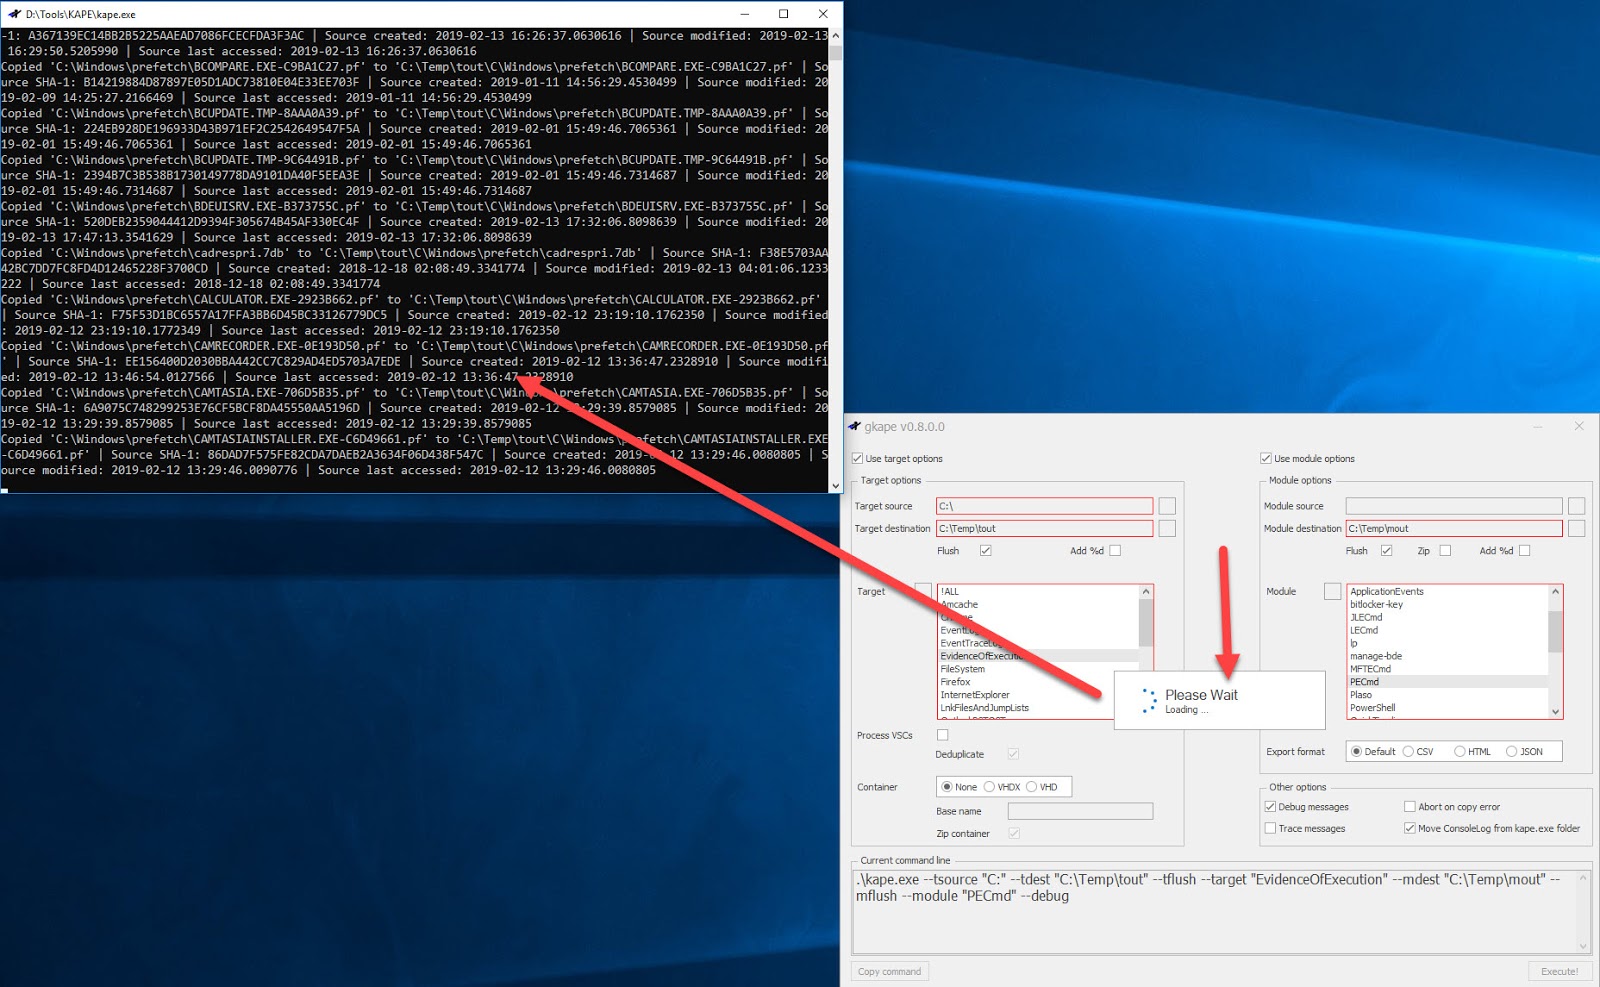
And all other aspects of KAPE work exactly the same way. Going to one or both of --tdest and --mdest would show you all of the files KAPE collected and processed.
KAPE is now available for free to everyone!
Finally, there is a public GitHub repository, located at https://github.com/EricZimmerman/KapeFiles that you can do pull requests into if you write useful targets and modules and want to share them with the community (PLEASE DO!)
You can get KAPE here. I hope you find it a useful tool for your toolbox!
Article Link: https://binaryforay.blogspot.com/2019/02/introducing-kape.html