 Image generated by DALL-E
Internationalization is the process of making your product available in different locales for targeted audiences.
The localization process should take care of translating text to respective languages, changing the date, time, and number formats, changing currencies, and many more. The first step towards any Localization is Translation.
Lingui JS
Lingui is an easy yet powerful internationalization library for global projects.
Lingui will help you to keep your code clean and readable,
Manage the whole translation workflow using Lingui CLI. It extracts messages from source code, validates messages coming from translators, and checks that all messages are translated before shipping to production.
Prerequisite
node 12+
npm 5.6 +
Getting Started
Create a React application, To do so we will use a package called create-react-app.
open the terminal and type
npx create-react-app lingui-test-app
Wait for the command to execute this may take a while to complete.
Post completion of the command move to the newly created project using the below command
cd lingui-test-app
now we need to install the lingui library and its dependencies. We will be installing the below libraries
- Lingui cli
- lingui react
- lingi macro
In addition to these libraries, we need to install a few more libraries to support older versions of babel
- babel-core
- babel bridge
npm i --save-dev @lingui/cli @lingui/macro @babel/core babel-core@bridge npm i --save @lingui/react
Now that we have successfully installed the necessary packages,let’s proceed with configuring Lingui.
Configuration
Lingui supports configuration from four different sources
- lingui section in package.json
- .linguirc
- lingui.config.js
- lingui.config.ts (since version 3.4.0)
You can also define an environment variable LINGUI_CONFIG with the path to your config file. In the case of TypeScript-based config, you can use ESM format and export default.
This configuration tells lingui about the location of the message file, format to use, default language, supported languages, etc…
Create a lingui.config.js file in the root of the application with the below content.
module.exports = {
  locales: [“en”,“en-US”],
  catalogs:[{
    path:“./src/locales/{locale}/messages”,
    include:[‘./src’]
  }],
  format: “po”,
  sourceLocale: “en”,
  orderBy: “origin”,
  fallbackLocales : {
    “en-US”: [“en”],
}
};
alternatively, you can create .lingurc config file
{
    “localeDir”: “src/locales/”,
    “srcPathDirs”: [“src/”],
    “format”: “po”,
    “sourceLocale”: “en”
}
let’s discuss what this configuration is about
FallbackLocale
Translations from fallbackLocales is used when translation for a given locale is missing.fallbackLocales object lets us configure fallback locales to each locale instance.
{
  “fallbackLocales”: {
    “zh”: [“en-US”, “en”],
    “es-MX”: “es”
     “default”: “en-US”
  }
}
In this example, if any translation isn’t found on “zh” then lingui will search on en-US, after that if not found search in en.
Also, we can configure a default one for everything above example we used en-US as the default one.
lingui js recommends .po format for message bundles.
now we need to add the necessary scripts to extract and generate the string bundles
Add scripts to package.json
{
“extract”:“lingui extract”,
“compile”:“lingui compile”,
}- Lingui extract
This command to extract messages from the source code and populate them in the messages.po file .
2. lingui compile
This command will parse through your po files and generate corresponding messages.js file
Lets use Lingui in our UI
The react app we created will come with a basic home page with few strings
let’s translate these strings using lingui to do so open the application using your favourite editor.
Update your application’s index.js with lingui configurations
import React,{useEffect, useState} from ‘react’;
import ReactDOM from ‘react-dom/client’;
import ‘./index.css’;
import App from ‘./App’;
import reportWebVitals from ‘./reportWebVitals’;
import { I18nProvider } from ‘@lingui/react’;
import { i18n } from “@lingui/core”;
export const setupI18n = async (locale=“en”) => {
  const { messages } =await import(./locales/${locale}/messages.js)
  i18n.load(locale, messages);
  i18n.activate(locale);
};
const  LinguiEnabledApp = ()=>{
  const [language,setLanguage] =useState(“en”);
  useEffect(()=>{
    console.log(language);
    setupI18n(language);
  },[language])
  return (
<React.StrictMode>
    <I18nProvider i18n={i18n}>
    <App handleLanguageUpdate={setLanguage}/>
    </I18nProvider>
  </React.StrictMode>
  )
}
setupI18n().then(()=>{
    const root = ReactDOM.createRoot(document.getElementById(‘root’));
    root.render(
      <LinguiEnabledApp />
    );
})
The app.js code will look like below
import logo from ‘./logo.svg’;
import ‘./App.css’;
import { Trans,t} from ‘@lingui/macro’;
function App({handleLanguageUpdate}) {
  return (
    <div className=“App”>
      <header className=“App-header”>
        <img src={logo} className=“App-logo” alt=“logo” />
        <label htmlFor=“favColor”><Trans>Select Language</Trans></label>
            <br />
            <select id=“favColor”   onChange={(evt)=>handleLanguageUpdate(evt.target.value)}>
                <option value=“en”>English</option>
                <option value=“zh”>Chinese</option>
            </select>
        <p>
        <Trans>  Edit  src/App.js and save to reload.</Trans>
        </p>
        <a
          className=“App-link”
          href=“https://reactjs.org”
          target=“_blank”
          rel=“noopener noreferrer”
        >
             <Trans> Learn React</Trans>
        </a>
      </header>
    </div>
  );
}
export default App;
We need to import a few macros from lingui to enable translation for this page
import { Trans} from ‘@lingui/macro’;
Now update the string usage with macro
1 <Trans> Edit src/App.js and save to reload.</Trans>
1 <Trans> Learn React</Trans>
Now we have used the Trans macro to enable translation for the strings in our default app.js
Let’s test whether lingui can identify these strings and generate the messages.po entries
Extracting the message bundles
run below command in the terminal
npm run extract
This command will give the below output
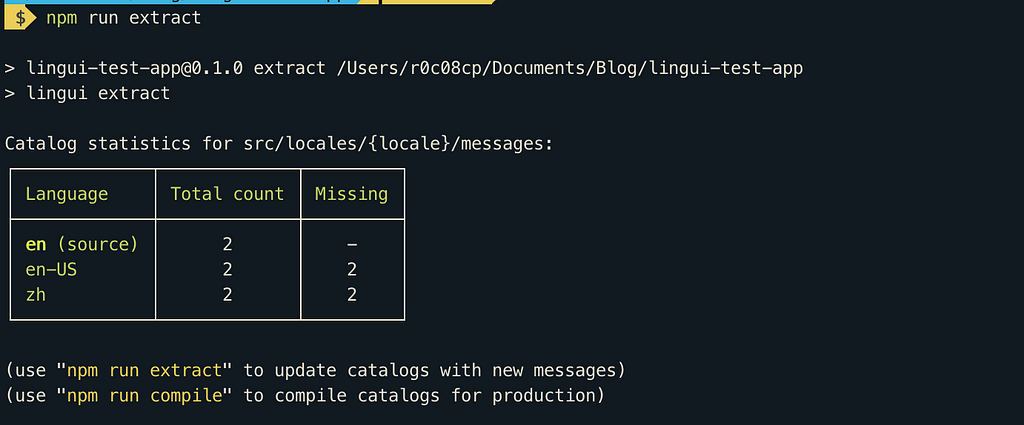
The required message bundles are created by lingui you can see them below
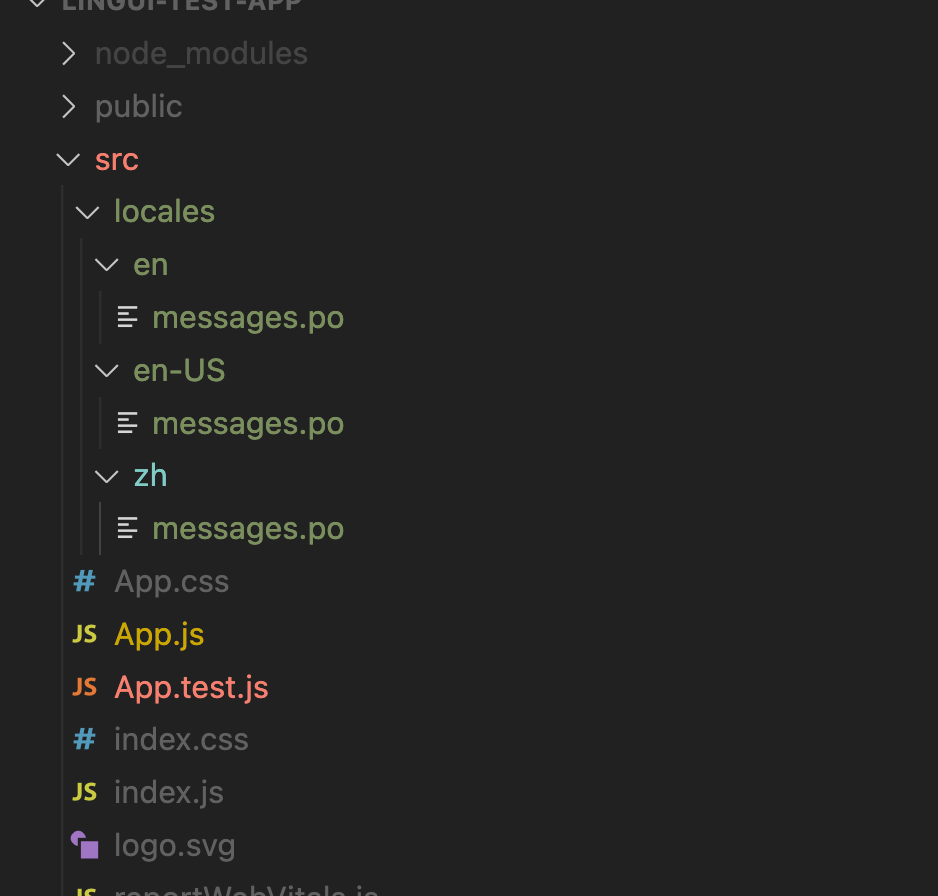
Let’s open and see the message bundle for the default language which is src/locales/en/messages.po
msgid “”
msgstr “”
“POT-Creation-Date: 2022-11-15 08:13+0530\n”
“MIME-Version: 1.0\n”
“Content-Type: text/plain; charset=utf-8\n”
“Content-Transfer-Encoding: 8bit\n”
“X-Generator: @lingui/cli\n”
“Language: en\n”
“Project-Id-Version: \n”
“Report-Msgid-Bugs-To: \n”
“PO-Revision-Date: \n”
“Last-Translator: \n”
“Language-Team: \n”
“Plural-Forms: \n”
msgid “Edit  src/App.js and save to reload.”
msgstr “Edit  src/App.js and save to reload.”
msgid “Learn React”
msgstr “Learn React”
With this step, we have successfully generated the message bundles.
Compile messages file
run below command in terminal
npm run compile
this should generate the messages.js file inside each of the locale
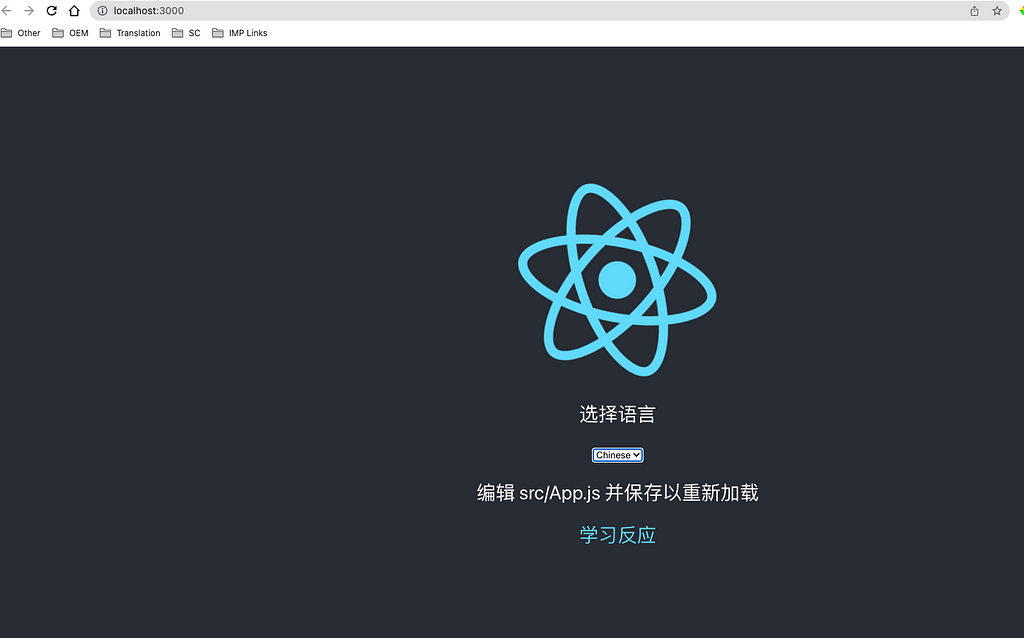
Render our UI in another language
Let’s update the Chinese message strings used in locale/zh/messages.po file, post updation of strings it should look like this.
msgid “”
msgstr “”
“POT-Creation-Date: 2022-11-15 08:13+0530\n”
“MIME-Version: 1.0\n”
“Content-Type: text/plain; charset=utf-8\n”
“Content-Transfer-Encoding: 8bit\n”
“X-Generator: @lingui/cli\n”
“Language: en\n”
“Project-Id-Version: \n”
“Report-Msgid-Bugs-To: \n”
“PO-Revision-Date: \n”
“Last-Translator: \n”
“Language-Team: \n”
“Plural-Forms: \n”
msgid “Edit  src/App.js and save to reload.”
msgstr “编辑 src/App.js 并保存以重新加载.”
msgid “Learn React”
msgstr “学习反应”
Adding a UI to switch language
Let’s add a UI controller to allow users to switch between languages, update app.js with the below snippet
import logo from ‘./logo.svg’;
import ‘./App.css’;
function App() {
  return (
    <div className=“App”>
      <header className=“App-header”>
        <img src={logo} className=“App-logo” alt=“logo” />
        <p>
        Edit  src/App.js and save to reload
        </p>
        <a
          className=“App-link”
          href=“https://reactjs.org”
          target=“_blank”
          rel=“noopener noreferrer”
        >
             Learn React
        </a>
      </header>
    </div>
  );
}
export default App;
Now you can switch between languages in the application using the drop-down
English

Chinese
Conclusion
In conclusion, implementing translation capabilities in React applications can significantly enhance user experience and widen the reach of your app to a global audience. Through the integration of Lingui.js, a powerful localization framework, developers can effortlessly manage and organize multilingual content, making the process efficient and maintainable. The tutorial presented in this blog provides a clear and comprehensive guide on how to get started with Lingui.js, from installation to implementation, and highlights its key features and benefits. By leveraging this tool, React developers can easily adapt their applications to cater to users speaking diverse languages, ensuring seamless communication and accessibility. Embracing translation in React projects not only opens up new markets and user bases but also demonstrates a commitment to inclusivity and user-centric design. So, if you’re aiming to take your React apps to the next level and engage a global audience, integrating Lingui.js is undoubtedly a valuable and worthwhile addition to your development toolkit.
References
Enabling Translation in react applications using Lingui.js was originally published in Walmart Global Tech Blog on Medium, where people are continuing the conversation by highlighting and responding to this story.
Article Link: Enabling Translation in react applications using Lingui.js | by Rahul Cv | Walmart Global Tech Blog | Jan, 2024 | Medium