Cryptomining attacks are becoming more notable in-line with the rise of blockchain and cryptocurrencies, so detecting cryptomining has become a high priority.
Security researchers have found data breaches related to various cryptominer binaries running within victims’ infrastructures. The default openness of Kubernetes clusters and the availability of the extensive compute power required for mining makes Kubernetes clusters a perfect target for cryptomining attacks.
<featured image>
That’s why it’s critical to have Kubernetes workload-level monitoring in place to better understand what is happening within the cluster. In this article, we explain how you can use open source tools, such as Falco, to detect the Indicators of Compromise (IoC) in your environment, as well as open source metric aggregation tools, such as Prometheus, to better understand the health and activity of our Cloud and Kubernetes environments.
What is a cryptominer?
Cryptocurrency is earned as the transaction fee for facilitating many decentralized transactions on a blockchain. To facilitate these transactions, the user must utilize their compute resources.
The process of earning cryptocurrency for validating transactions using computer resources is called cryptomining, and is conducted by a software known as a “cryptominer.” A popular example is xmrig, which is now containerized, and can be accessed via DockerHub and run via a single command.
Docker Pull Command:
Code language: Perl (perl)Docker pull metal3d/xmrig
Docker Run Command:
Code language: Perl (perl)docker run --name cryptominer --rm -it \ -e POOL_URL=xmr.metal3d.org:8080 \ -e POOL_USER="mine" \ -e POOL_PASS="" \ -e DONATE_LEVEL="0" \ metal3d/xmrig
Revisiting the Tesla cryptomining attacks
A cryptomining attack on Tesla’s Kubernetes cluster occurred in 2018 and was reported by Redlock.
Although the attack took place a few years ago, we can learn a lot from this high-profile incident. While newer cryptomining incidents will arise in the future, by dissecting the patterns and behaviors of this attack, we can prevent future incidents like it.
The flaw
The hacker infiltrated the Kubernetes dashboard, which was not protected by a password. It’s worth noting whether it was password protected or not. There are a bunch of documented blogs on bypassing authentication for the local Kubernetes Cluster Dashboard, and even ones on privilege escalate through the Kubernetes Dashboard. In many cases, organizations disable the Kubernetes dashboard as an additional layer of security.
In this case, the attacks gained access to the dashboard. Once they were in, they were able to exfiltrate some sensitive credentials, such as secrets to access the AWS S3 Buckets.
Evasion techniques to avoid cryptomining detection
The goal for the attacker is to evade detection within the cluster. They can perform the following behaviors to go undetected by the naked eye.
- Avoid using too many CPU cycles as part of the mining process.
In this case, the CPU usage of the pod cannot be too high, or else it would show in a resource usage graph. - Avoid connecting to any well-known mining pools.
In this case, they used their own mining server. This sat behind Cloudflare (a CDN service). - Use encryption when communicating between processes.
In this case, they encrypted communication between the mining process and their mining server
Using Falco to detect network activity
The patterns and behaviors associated with the Tesla attack could evade simple firewall solutions if only monitoring for connections made to common miner pools DNS addresses, since they were not designed to detect this attacker’s specific mining server that’s hidden behind Cloudflare.
Falco addresses this with a policy rule – Detect outbound connections to common miner pool ports – which takes a multi-layered approach to detecting cryptomining-related activity. It does this by detecting commonly used mining pool port addresses, as well as the destination DNS and IP addresses. This way, even if the destination address is not directly reached, it should detect the usual port activity.
Code language: Perl (perl)- rule: Detect outbound connections to common miner pool ports desc: >- Miners typically connect to miner pools on common ports(This rule does not work if the outbound connection is made through a proxy!). condition: net_miner_pool and not trusted_images_query_miner_domain_dns output: >- Outbound connection to IP/Port flagged as mining activity (dest=%fd.sip proc.cmdline=%proc.cmdline port=%fd.sport domain=%fd.sip.name container=%container.info evt.type=%evt.type evt.res=%evt.res proc.pid=%proc.pid proc.cwd=%proc.cwd proc.ppid=%proc.ppid proc.pcmdline=%proc.pcmdline proc.sid=%proc.sid proc.exepath=%proc.exepath user.uid=%user.uid user.loginuid=%user.loginuid user.loginname=%user.loginname user.name=%user.name group.gid=%group.gid group.name=%group.name container.id=%container.id container.name=%container.name image=%container.image.repository) priority: critical source: syscall ...
In most cases, the average attacker or insider threat would use a popular mining pool like this. Assuming we are dealing with a Tesla-style attack, check out the net_miner_pool section of the above policy. It contains additional condition sets within the original condition set.
macro: net_miner_pool
condition: (evt.type in (connect) and evt.dir=< and (fd.net != "127.0.0.0/8" and not fd.snet in (rfc_1918_addresses)) and minerpool_other)
minerpool_other condition, we can see the predefined macro for network connections to the preceding miner ports and miner domains.
list: miner_ports
items: [25, 80, 443, 3333, 3334, 3335, 3336, 3357, 4444, 5555, 5556, 5588, 5730, 6099, 6666, 7777, 7778, 8000, 8001, 8008, 8080, 8118, 8333, 8888, 8899, 9332, 9999, 14433, 14444, 45560, 45700]
We can also see the miners_ip addresses, which are updated regularly by our threat research team:
list: miners_ip
items: ["51.15.39.52", "163.172.162.51", "51.15.89.69", "213.32.74.230", "213.32.74.219", "151.80.59.84", "51.15.39.186", "144.217.14.109", "192.99.69.170", etc…]
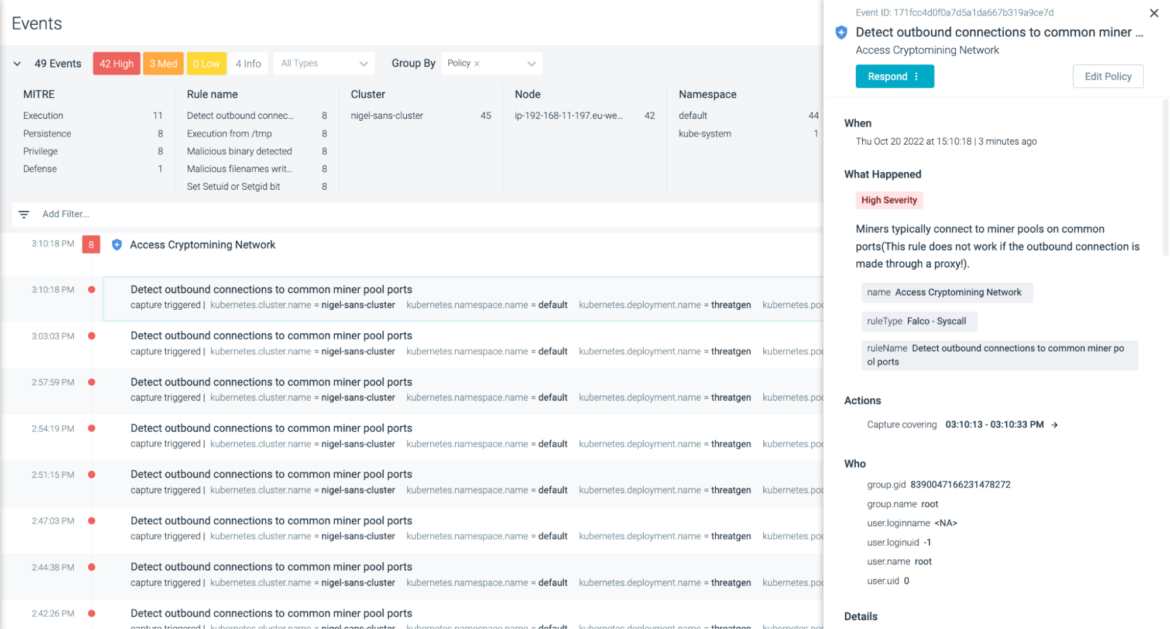
If there is a cryptomining process running and communicating to the miner IP addresses defined in the list, an alert will be triggered, as follows:
Using Falco to monitor file system changes
As stated above, the attacker will do their best to go undetected. Assuming we were unable to detect their connections to a malicious C2 server or mining pool – either because it has not yet been flagged by our threat intelligence teams, or it’s hidden behind some kind of CDN proxy like Cloudflare – we need to now focus on what the attacker is likely to do within our Kubernetes and Cloud environments.
We mentioned CVE-2018-18264, whereby the attacker is able to gain privilege escalation through the vulnerable Kubernetes dashboard. This would be the goal within a Kubernetes workload or on a Linux host. They will need escalated privileges in order to perform the necessary changes within the environment. The attack patterns would look something like these:
- Create privileged Pod
- Malicious file Nnmes are written
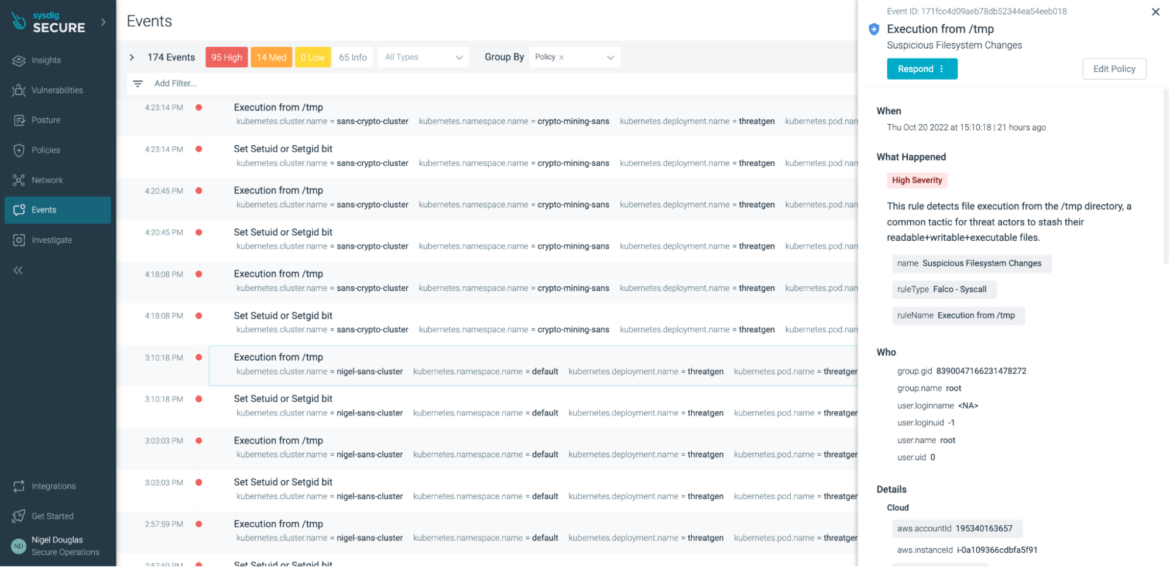
- Set Setuid or Setgid bit
- Execution from /tmp
- Malicious binary is executed
- Outbound connections are usually executed at this stage with those common miner pool ports
In this blog, we are going to detect real-world cryptomining activities in the Kubernetes cluster with some open source tools within the CNCF ecosystem. We can detect cryptomining activities based on the known patterns of most insider threats of cryptomining:
- High CPU usage
- Communicating to mining pools
- The executed command line of the miner
- The signatures of those miner binaries
Note that each individual measure has its own limitations. Combining them improves the efficiency of detection for sure. However, there are still some more advanced cryptomining techniques and attacks, such as the one that attacked Tesla.
It’s necessary for you to work with your security team to apply a comprehensive detection strategy for Kubernetes cluster and cloud hosts to cover all kinds of intrusion.
Malicious file names are written
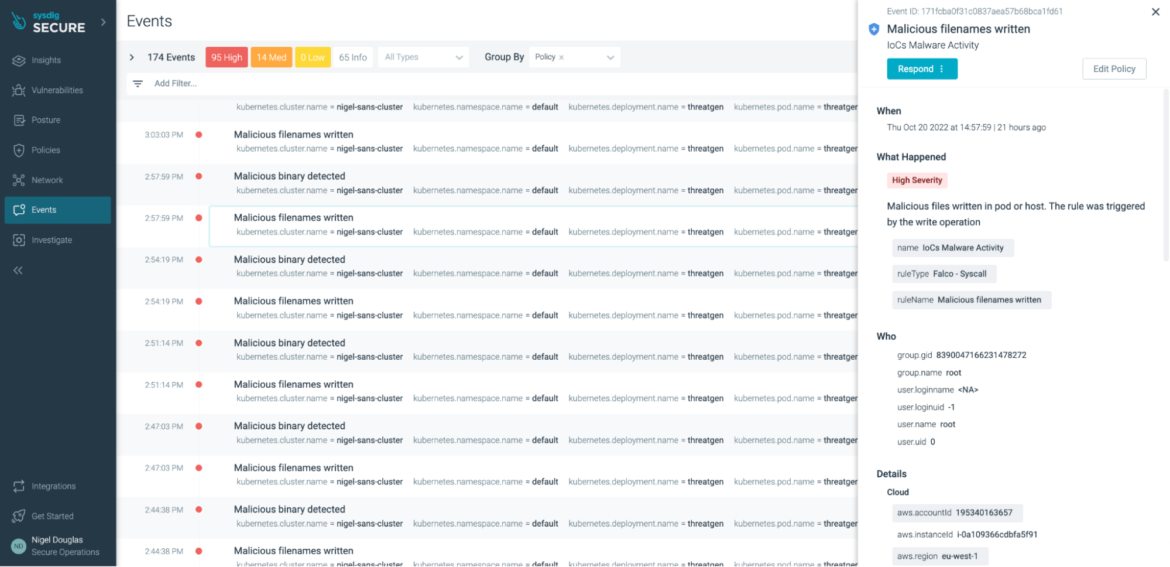
The most common IoC for malware activity is the writing of malicious files in either the pod or on the host. With Falco, we can create a rule to be triggered by those write operations:
Code language: Perl (perl)- rule: Malicious file names written desc: >- Malicious files written in pod /host. Triggers on write operations condition: | open_write and fd.filename in (malicious_filenames) output: >- Malicious files written in the pod or host. proc.cmdline=%proc.cmdline evt.type=%evt.type evt.res=%evt.res proc.name=%proc.name proc.pname=%proc.pname proc.pid=%proc.pid proc.cwd=%proc.cwd proc.ppid=%proc.ppid proc.pcmdline=%proc.pcmdline proc.sid=%proc.sid proc.exepath=%proc.exepath user.uid=%user.uid user.loginuid=%user.loginuid user.loginname=%user.loginname user.name=%user.name group.gid=%group.gid group.name=%group.name container.id=%container.id container.name=%container.name %evt.args priority: warning source: syscall ...
Again, we are not flagging write operations on the host or pod. Rather, we are focusing only when the write operations have suspect file names that are usually associated with cryptominers or cryptoworm malwares like Graboid.
However, there are some other techniques, such as compromising containers using a fileless approach, that could bypass the above ‘malicious binary detection’ rule. That’s why we need to apply a multi-layered approach for detecting cryptomining attacks, using multiple IoCs, threat feeds, and least privilege policies.
Set setuid or setgid bit
In Unix-based systems, there are two access rights flags: setuid(Set User Identity) and setgid (Set Group Identity). In some scenarios, these two flags can be considered IoCs to cryptomining. SetUID and SetGID allow users to run an executable file with the file system permissions of the executable’s owner or group, and change behavior in those file directories.
The flags setuid and setgid are needed for tasks that require different privileges than what the user is normally granted, such as the ability to alter system files or databases to change the login password. Under no circumstances should this sort of “temporary escalated privileges” go undetected. With Falco, we can run the below rule:
Code language: Perl (perl)- rule: Set Setuid or Setgid bit desc: > When the setuid or setgid bits are set for an application, this means that the application will run with the privileges of the owning user or group respectively. Detect setuid or setgid bits set via chmod condition: > consider_all_chmods and chmod and (evt.arg.mode contains "S_ISUID" or evt.arg.mode contains "S_ISGID") and not exe_running_docker_save and not user_known_set_setuid_or_setgid_bit_conditions and proc_name_exists output: > Setuid or setgid bit is set via chmod (fd=%evt.arg.fd filename=%evt.arg.filename mode=%evt.arg.mode user.name=%user.name user.loginuid=%user.loginuid process=%proc.name proc.pname=%proc.pname proc.cmdline=%proc.cmdline container.id=%container.id container_name=%container.name evt.type=%evt.type evt.res=%evt.res proc.pid=%proc.pid proc.cwd=%proc.cwd proc.ppid=%proc.ppid proc.pcmdline=%proc.pcmdline proc.sid=%proc.sid proc.exepath=%proc.exepath user.uid=%user.uid user.loginname=%user.loginname group.gid=%group.gid group.name=%group.name container.name=%container.name image=%container.image.repository:%container.image.tag) priority: notice source: syscall ...
As we covered earlier, once the setuid bit or setgid bit is set in a file, it will be executed with the owner’s privilege. We need to prevent this at all costs. It is a good practice to keep files with setuid bit or setgid bit under track.
As an example, you can check for permissions with this command manually:
Code language: Perl (perl)find . -perm /6000
But what if the file permissions change during runtime? How do you keep track of these changes?
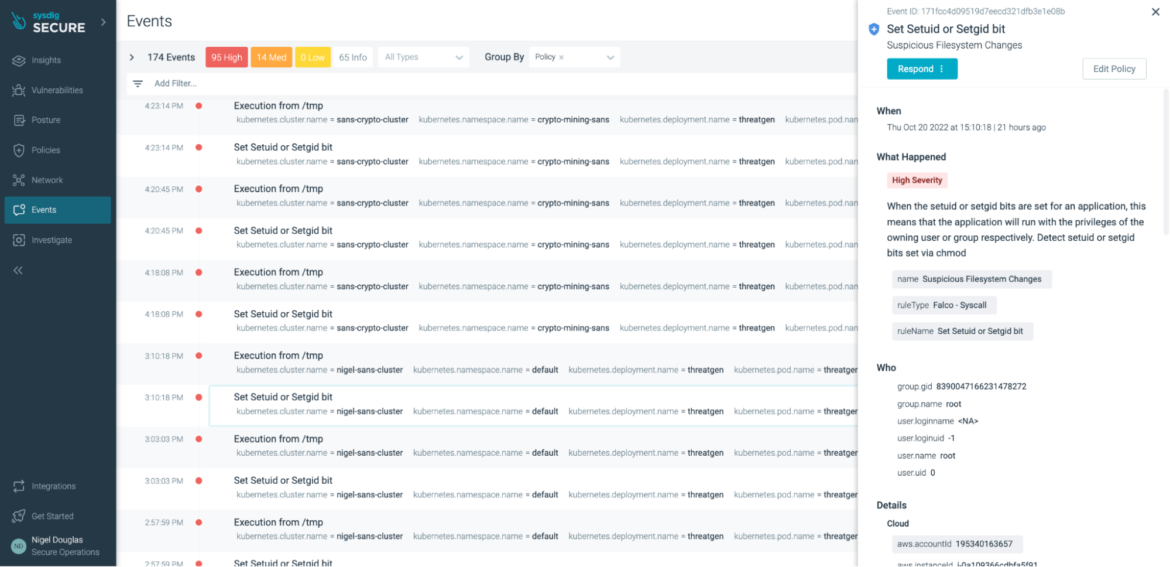
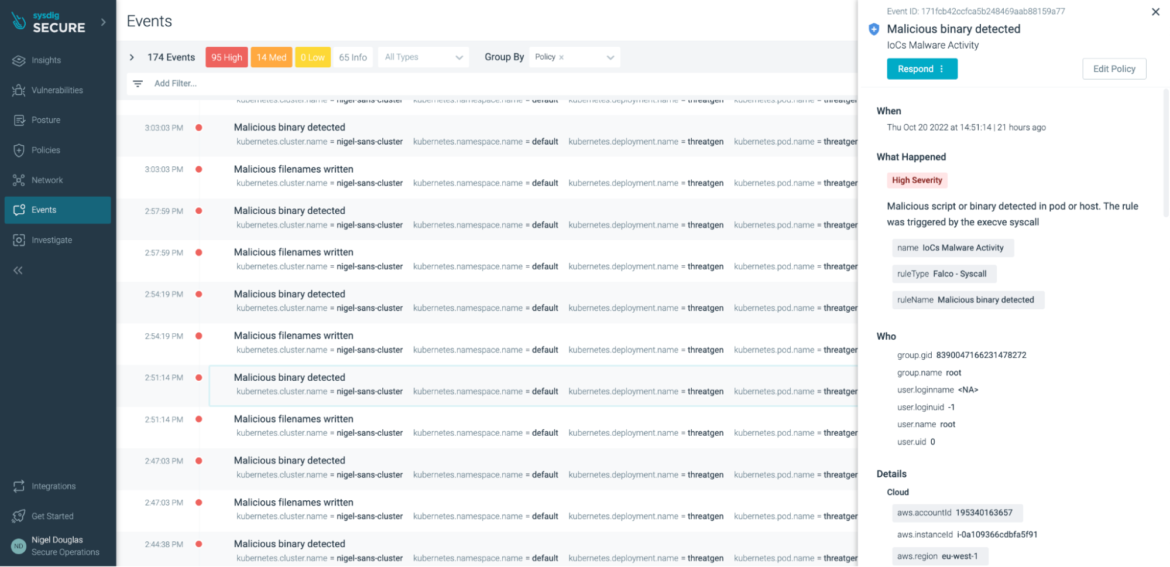
Sysdig Secure provides a managed implementation of the open source Falco ruleset to streamline this process. If the above rule is triggered in Sysdig Secure, the UI aggregates all instances across all environments.
Execution from /tmp
In order to demonstrate each tool to detect cryptomining, we simulate a victim nginx pod:kubectl create ns nginx-test
kubectl create deployment --namespace=nginx-test nginx --image=nginx
kubectl expose --namespace=nginx-test deployment nginx --port=80
The attacker would likely locate the miner binary in the /tmp directory.
In this case, we are creating the xmrig binary based on the official documentation:kubectl run --namespace=knp-test access --rm -ti --image busybox /bin/shcd /tmp
sudo apt-get install git build-essential cmake libuv1-dev libssl-dev libhwloc-dev
git clone https://github.com/xmrig/xmrig.git
mkdir xmrig/build && cd xmrig/build
cmake ..
make -j$(nproc)
The xmrig build is going to be the mining binary. We need to be conscious that the binary could either be seeded in the deployment image (in this case Nginx) or downloaded from a command and control server.
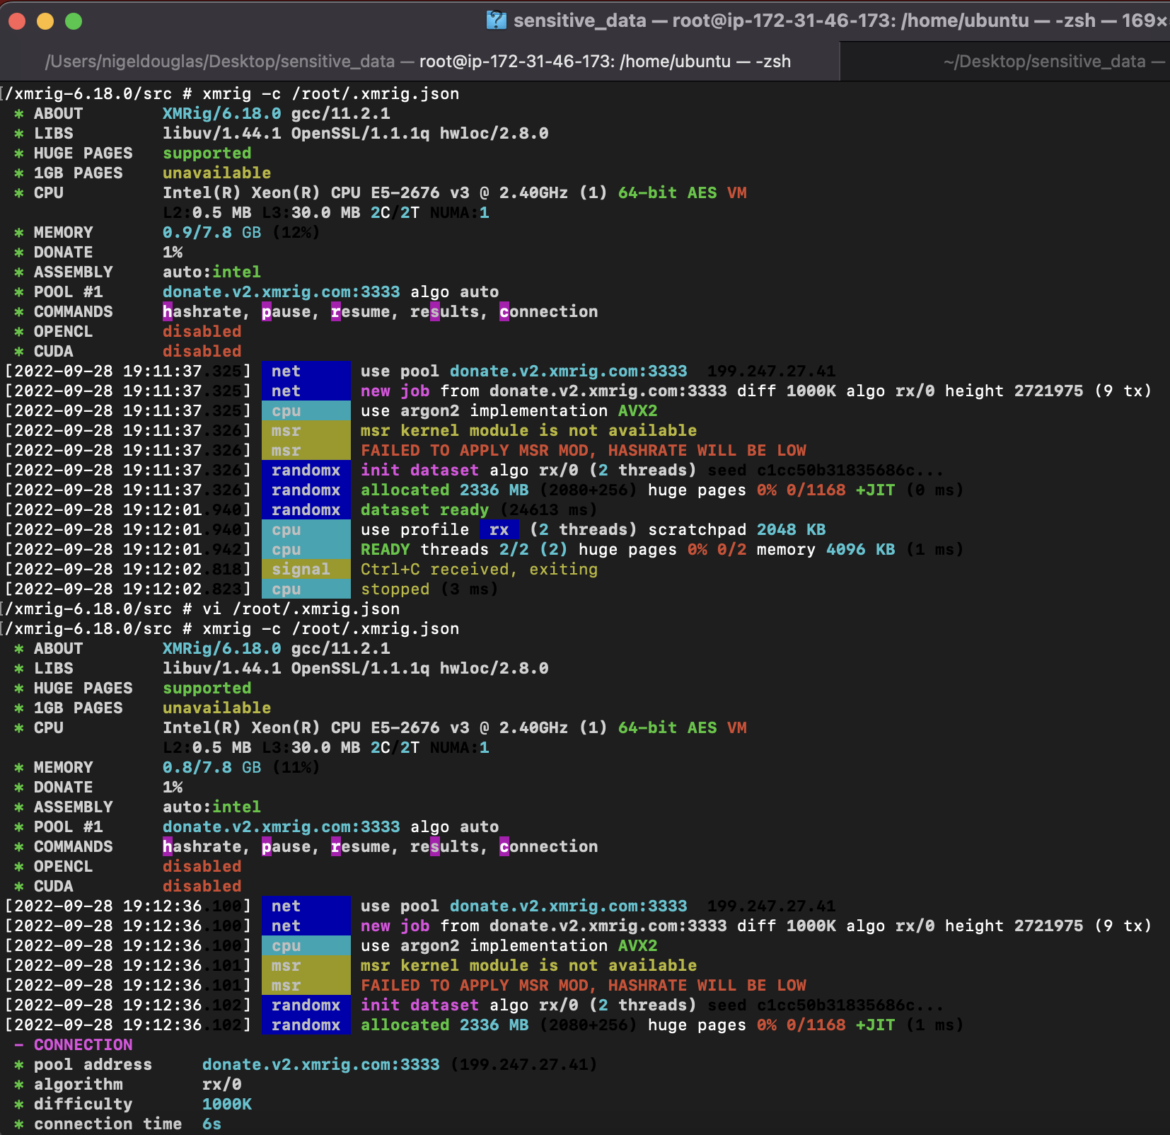
From the above screenshot, you can see the pool address used, the image used, and the xmrig-specific commands run (which we should also attempt to detect):xmrig -c /root/.xmrig.json
To avoid files being run in a temporary directory, we can run the containers with the parameter ‘read-only’ to enforce drift prevention that fends off unwanted changes from the original deployment design and/or alerts on attempted changes in the /tmp directory:
Code language: Perl (perl)<code>- rule: Execution from /tmp<br> desc: >-<br> This rule detects file execution from the /tmp directory, a common tactic<br> for threat actors to stash their readable+writable+executable files.<br> condition: >-<br> spawned_process and ((proc.exe startswith "/tmp/" or (proc.cwd startswith<br> "/tmp/" and proc.exe startswith "./" )) or (proc.cwd startswith "/tmp/" and<br> proc.args startswith "./")) and not pip_venv_tmp<br> output: >-<br> File execution detected from /tmp (proc.cmdline=%proc.cmdline<br> connection=%fd.name user.name=%user.name user.loginuid=%user.loginuid<br> container.id=%container.id evt.type=%evt.type evt.res=%evt.res<br> proc.pid=%proc.pid proc.cwd=%proc.cwd proc.ppid=%proc.ppid<br> proc.pcmdline=%proc.pcmdline proc.sid=%proc.sid proc.exepath=%proc.exepath<br> user.uid=%user.uid user.loginname=%user.loginname group.gid=%group.gid<br> group.name=%group.name container.name=%container.name<br> image=%container.image.repository)<br> priority: warning<br> source: syscall<br>...<br></code>
The attacker would likely locate the miner binary in the /tmp directory.
In this case, we are creating the xmrig binary based on the official documentation:
Code language: Perl (perl)Exceptions: - name: proc_cmdlines Comps: - startswith Fields: - proc.cmdline Values: - - chromedriver --version - - conftest - - sh -c LIVENESS_THRESHOLD_SECONDS - - bash -c fail= - - sh /tmp/apt-key-gpghome - - sh -c set -e; TMP=/var/lib/dkms/draios-agent - - cat /home/ubuntu/.cache/bazel - - touch - - 'python -u -c import io,os' - - 'python -u -c import io, os' - - 'python -c import io,os' - - 'python -c import io, os' - - python /tmp/tmp - - sh ../libtool --silent - - sh ../../../libtool --silent - - autogen.sh - - pip /tmp/venv - - docker-bench-security - - kubectl apply -f - - actions-sync sync - - bash ./configure - - rustup-init - - jq -er - - jattach
The above Falco rule detects ALL file execution from the /tmp directory, excluding those exceptions listed above.
Executing within the /tmp directory is a common tactic for threat actors who wish to stash their readable/writable or executable files safely. However, if they were aware of the exceptions in your Falco ruleset, they could evade detection. Blackberry has actually documented scenarios where the Falco rules can occasionally be bypassed, and one of these glaring examples is through exceptions in the Falco rules. It’s important to avoid adding too many exceptions within our Falco rules.
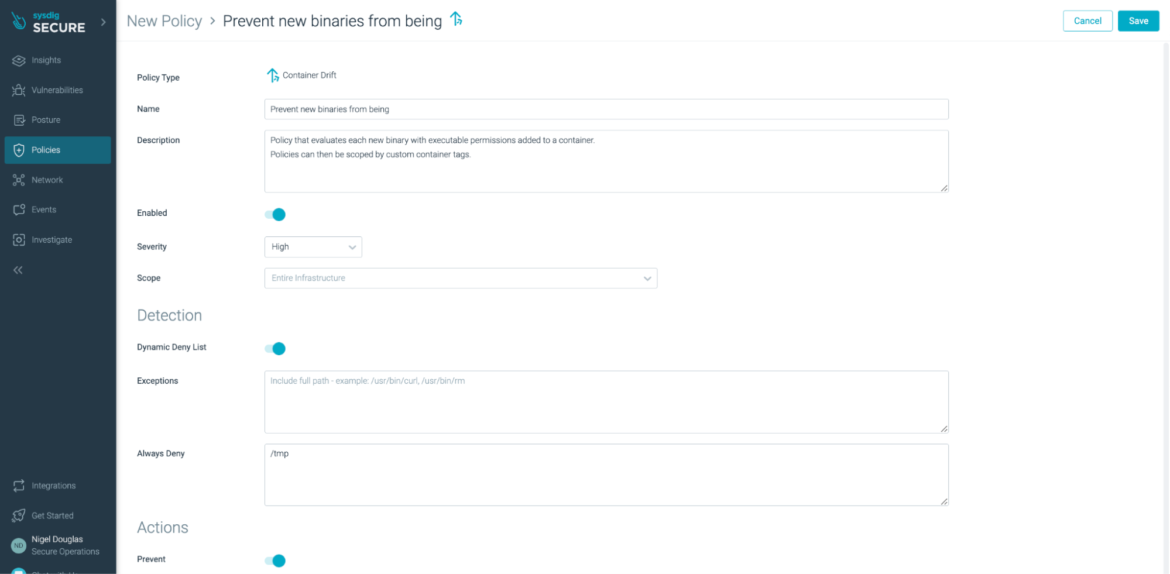
If you are unsure whether or not the adversary will stash their files in a /tmp directory, and you don’t want any files written to a directory that wasn’t specifically part of the deployment, you can enforce this via Sysdig Secure’s Drift Prevention policy.
With Sysdig Drift Control, teams have an easy way to detect, prevent, and speed incident response for containers that were modified in production to run new executables, also known as container drift. By blocking the drift, you prevent the attack.
The above Drift Prevention Policy evaluates each new binary with executable permissions added to a container. Any change from the profiled image will be considered a ‘drift’ from the intended design. The main process inside the container is sent a SIGKILL signal, which prevents the attacker early on.
If you’d like to test out the Drift Prevention feature in Sysdig Secure, simply enable the policy from the web user interface (as seen above). Once enabled, create a standard Nginx deployment.
Code language: Perl (perl)kubectl create ns nginx-test kubectl create deployment --namespace=nginx-test nginx --image=nginx
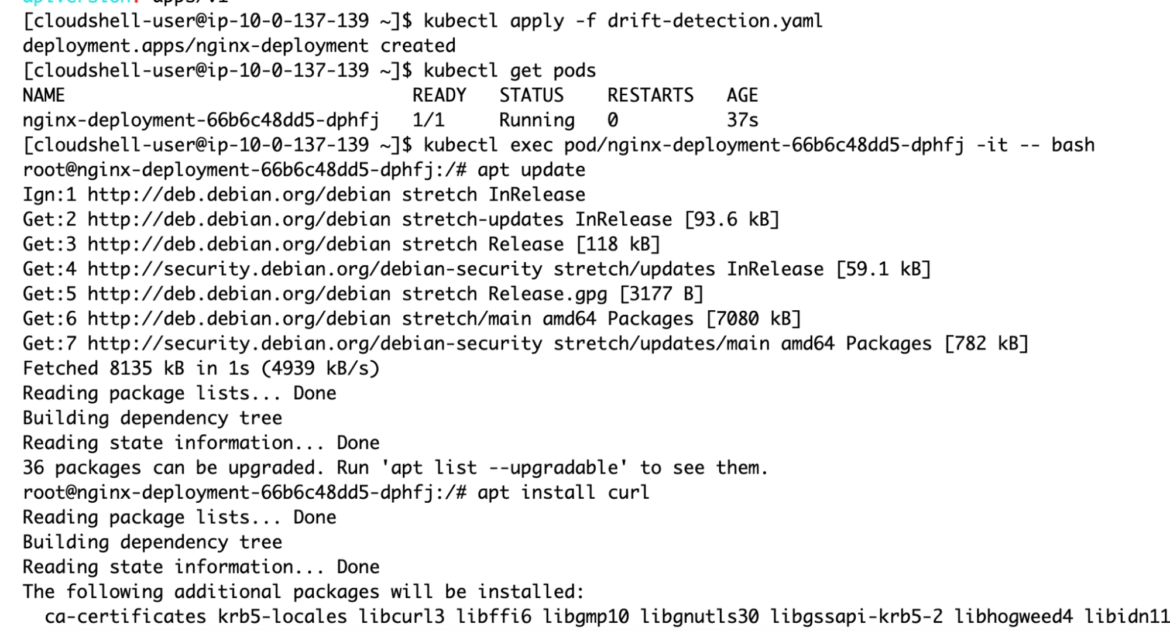
Apply the manifest file and check that the pod is now running in the default network namespace.
Once running, you can exec into the newly-created pod.
If cURL is not already installed, one option to do so is through your package manager (e.g., apt install curl). But it is complicated in a real scenario where you run containers as non-root. Another option could be to use wget, which is more likely to be installed.
Once cURL/wget is installed, we can use it to download the xmrig binary for installation locally:
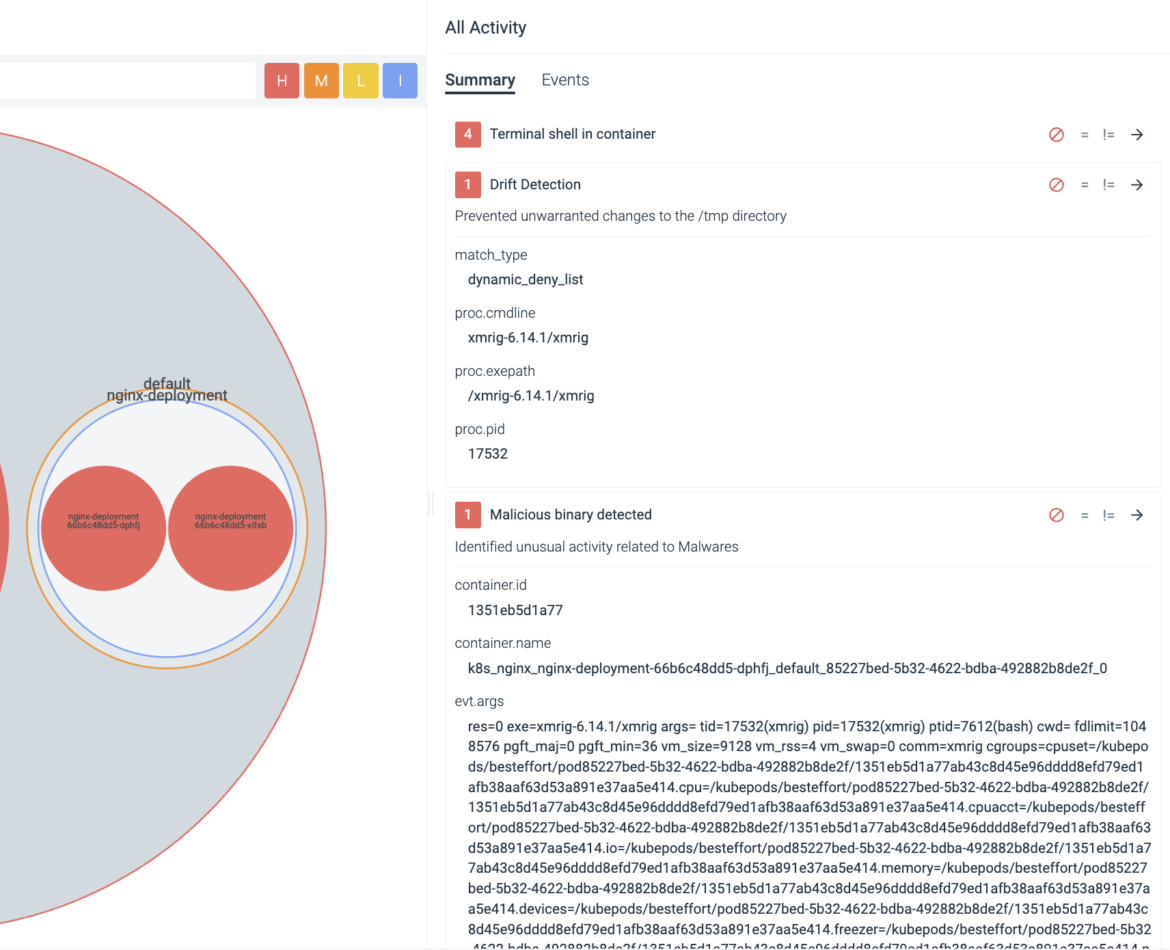
Regardless of which directory you attempt to install xmrig into, the action will fail.
Drift Prevention ensures the intended application design stays the same in runtime, and prevents potentially malicious takeover of the workload.
From the shell, we can see that the action was ‘KILLED.’ Furthermore, the Sysdig Secure user interface provides further forensics to help understand ‘what’ was the attempted change and by ‘whom.’
Malicious Binary is Executed
Assume we couldn’t detect the network connections. Let’s say they are pointing to a server and port that’s not part of our network detection rules. Also, let’s assume they don’t require elevated permissions and they don’t write something unusual that ends up getting detected within the /tmp directory. Let’s also assume this is a new deployment, and therefore drift prevention cannot detect it – we still need additional layers of security.
At minimum, we need to be able to detect the malicious binaries associated with tools like xmrig.
As stated, this is a new attack, so we are likely assuming there’s a new binary in the wild that goes undetected. Either way, we need to configure another rule as part of our multi-layered approach to security.
Code language: Perl (perl)<br><code>- rule: Malicious binary detected<br> desc: >-<br> Malicious script or binary detected in pod or host. The rule was triggered<br> by the execve syscall<br> condition: ><br> spawned_process and (in_malicious_binaries or (proc.name in (shell_binaries)<br> and scripts_in_or and not proc.args startswith "-c"))<br> output: >-<br> Malicious binary or script executed in the pod or host.<br> proc.cmdline=%proc.cmdline evt.type=%evt.type evt.res=%evt.res<br> proc.pid=%proc.pid proc.cwd=%proc.cwd proc.ppid=%proc.ppid<br> proc.pcmdline=%proc.pcmdline proc.sid=%proc.sid proc.exepath=%proc.exepath<br> user.uid=%user.uid user.loginuid=%user.loginuid<br> user.loginname=%user.loginname user.name=%user.name group.gid=%group.gid<br> group.name=%group.name container.id=%container.id<br> container.name=%container.name %evt.args<br> priority: warning<br> Tags:<br> - ioc<br> source: syscall<br> append: false<br> exceptions: []</code>
In this case, we are relying on syscalls again from the host. If the ‘execve’ syscall spawns a process listed in our malicious binaries (known bad MD5 hashes) or the process name was listed in our shell binaries, we should get a detection.
Again, we need to use every detection vector possible to stop this behavior early on. In this case, the ‘xmrig’ binary is added to the Falco ‘malicious_binaries’ macro by default:
Code language: Perl (perl)- list: malicious_binaries Sysdig 0.91.2 items: ["kinsing", "xmrig", "ldapdomaindump", "ldd2bloodhound", "0as1d5asf4as5dm4", "0as1d5asf4as5dm6", "0as1d5asf4as5dm7", "0as1d5asf4as5dx64", "0as1d5asf4as5d86", "0as1d5asf4as5d8k", "0as1d5asf4as5dsl", "0as1d5asf4as5dpc", "0as1d5asf4as5dm5", "0as1d5asf4as5dps", "0as1d5asf4as5dh4", "opa915"]
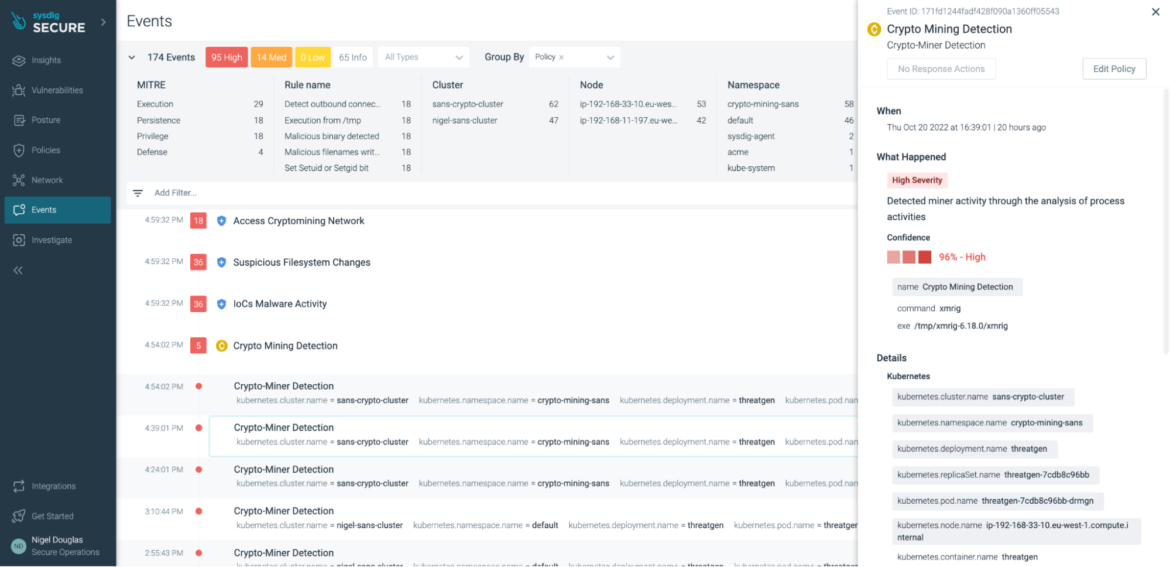
If all other rules fail, we can now rely on Sysdig to detect cryptojacking with its new high-precision machine learning (ML) policy in Sysdig Secure. By introducing ML-powered policy in Sysdig, we can now detect miner activity through the analysis of process activities. Whether the threat is known or unknown, the patterns and behaviors of a mining attack stay somewhat consistent. Feeding this data into an ML algorithm, users now receive a confidence rating as to whether or not the processes were in fact associated with cryptomining.
In our case, the result was 96% confident that the xmrig process was associated with cryptoming.
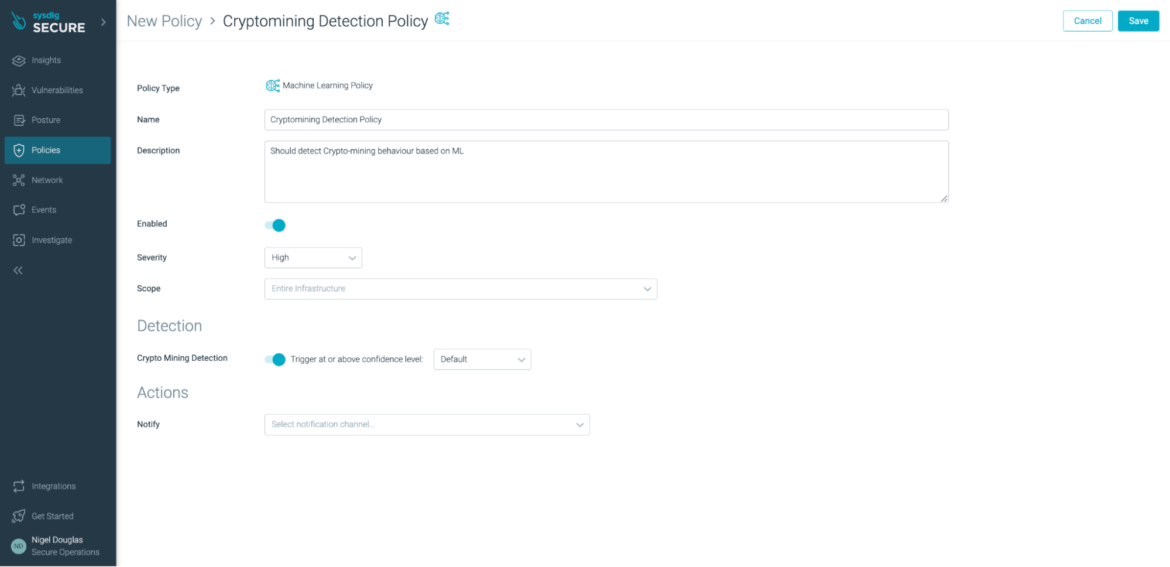
The beauty of ML-based policy is that there is nothing for the end user to configure.
Simply choose whether to enable this cryptomining detection feature or not:
The ML policy relies on an existing Image Profiling functionality within Sysdig Secure.
The fingerprint collection and aggregation starts from the agent, which observes the behavior of your workloads and periodically sends them to Sysdig Secure, aggregating them into profiles.
Once the feature is enabled, the agents start sending “fingerprints” of what happened on the containers – network activity, files and directories accessed, processes run, and system calls used – and Sysdig Secure aggregates this information per image. Thus, for multiple containers based off of the same image, running on different nodes, the system activity will be collected and combined into an image profile”.
Conclusion
According to the Sysdig 2022 Cloud-Native Threat Report, it costs $430,000 in cloud bills and resources for an attacker to generate $8,100 in cryptocurrency revenue.
With low risk and high rewards, cryptojacking remains the primary motivation for cyber-attackers, while increased activity in supply chain attacks and geopolitical hacktivism is prevalent too.
From a security standpoint, ML is a great addition to a security team’s toolset. However, as stated in this blog post, it’s not a matter of ML policy vs. traditional rule-based policies. Instead, it’s how we can use ML policy to complement the wide variety of rule-based policies created to detect the patterns and behaviors associated with a cryptomining attack.
As shown in the previous YAML manifests, we can create rules in open source Falco to detect common IoCs associated with cryptojacking. With the increasing complexity of the Kubernetes and Cloud threat landscape, this can take a toll on security incident and response teams. That’s why Sysdig Secure’s Cloud Detection & Response (CDR) platform provides a managed Falco policy ruleset with in-depth forensics to help improve the Mean Time To Response (MTTTR) of your security teams.
The post Detecting Cryptomining Attacks “in the Wild” appeared first on Sysdig.
Article Link: Detecting Cryptomining Attacks “in the Wild” – Sysdig
