
In the world of managing data & ETL workflows, Apache Airflow is a crucial tool for automating tasks. However, getting the most out of it requires more than just a basic setup. In this article, we take a deep dive into the details of Airflow performance improvement, focusing on how it’s set up and configured. Through deep dive analysis, we uncover the details that can greatly improve how DAG tasks are carried out and how the Airflow scheduler performs. By making optimization & tuning the airflow environment adjustments to Airflow Environmental Configuration settings & DAG level changes, we unleash the full power of Airflow, making workflows more productive and reliable. Join us as we uncover the secrets to orchestrating tasks with accuracy and next-level achievements.
Airflow provides custom ability to tune performance of instance . We can modify environment-level settings or DAG level changes to tune performance across all of the DAGs in your Airflow environment.
 Celery & Kubernetes Executor of Airflow Instance
Before starting on airflow performance analysis & fix, let’s first deep dive into Airflow deployment modes:
- Celery-Based Deployment: Celery is a distributed task queue system that allows you to execute tasks asynchronously in a distributed manner on the airflow instances.
- Kubernetes-Based Deployment: Kubernetes, on the other hand, is a container orchestration platform that automates the deployment, scaling, and management of containerized applications. By using Kubernetes-based deployment (pods & container), we can run the Airflow tasks using each pod/container.
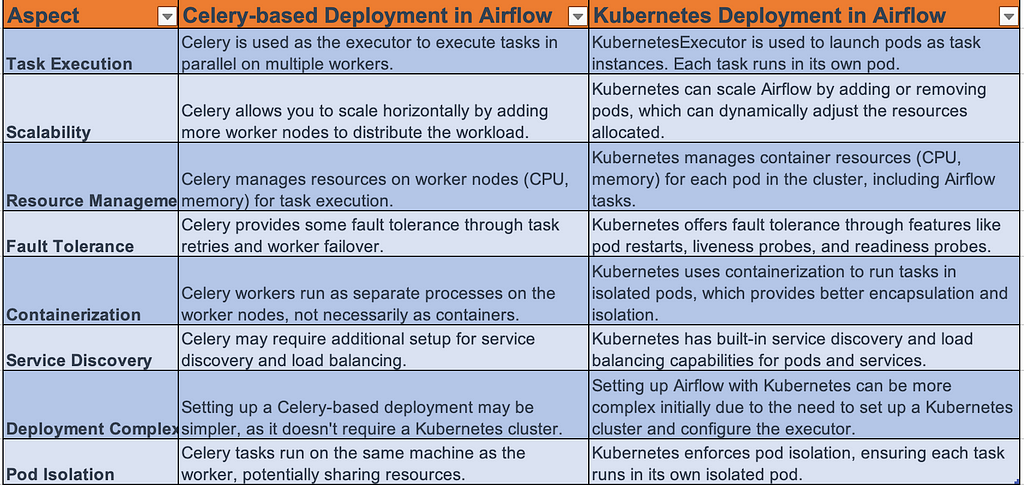 Figure 1: Difference between Celery-based deployment & Kubernetes based deployment
 Airflow Performances Issues
As we were facing performance issues in the Airflow instances which are deployed on Celery & Kubernetes (K8s) executor
![]() DAG Parsing Time and Import Timeout Error:
DAG Parsing Time and Import Timeout Error:
- The Airflow Scheduler is experiencing extended parsing times for each Airflow DAG, leading to DAG Import Timeout errors.
- Occasionally, this issue results in DAGs disappearing from the Airflow webserver UI.
![]() Task Queuing and Worker Pool Utilization:
Task Queuing and Worker Pool Utilization:
- A large number of Airflow tasks and DAG runs are getting queued.
- Despite having a default worker pool with 128 slots, these slots are not fully utilized.
![]() Config Retrieval Latency:
Config Retrieval Latency:
- Each DAG within the scheduler process takes considerable time to parse.
- This delay is primarily caused by the DAGs reading configuration data from a Google Cloud Storage (GCS) or other storage layer bucket (which is causing latency to create a connection with the external storage layer or cloud) instead of an image-based Docker container during the parsing time (Top Level Python code).
![]() Scheduler Loop and DAG Run Scheduling:
Scheduler Loop and DAG Run Scheduling:
- The scheduler is scheduling an excessive number of DAG runs during each scheduler loop interval.
![]() Scheduler causing delay due to Top Level Python Code- Scheduler Algorithm
Scheduler causing delay due to Top Level Python Code- Scheduler Algorithm
The scheduler parses the DAG file each time the dag.py is under parsing (which helps to convert the Dag file into a DAGBAG object). In our code, we see a lot of top-level Python code (code which is necessary to run whenever the parsing happens which is causing a delay in the DAG parsing time & decreases the airflow performance)
![]() Airflow Worker Termination Grace Period: Let’s suppose your task is running with the graceful termination period you set on the Airflow instances — 24 hrs. When you make the next deployment, the following steps will take place:-
Airflow Worker Termination Grace Period: Let’s suppose your task is running with the graceful termination period you set on the Airflow instances — 24 hrs. When you make the next deployment, the following steps will take place:-
- Airflow tasks that are running will continue to execute on existing Celery workers and will not be interrupted unless the task is completed within 24 hours ( Airflow Grace Termination Period) of the code deploy using the Continuous Integration (Jenkins) or Continuous Deployment(Ansible).
- One or more new worker(s) will be created alongside your existing workers and immediately start executing scheduled tasks based on your latest code.
- These new executors will execute downstream tasks of DAG runs that are in progress. For example, if you deploy to Airflow when Task I (Start) of your DAG is running, Task A will continue to run on an old Celery executor. If Task II and Task III are downstream of Task I, they will both be scheduled on new Celery executors running your latest code that you deployed on the airflow executor instance.
- If a task does not complete within the Graceful period, its worker will be terminated. Airflow will mark the task as a zombie and it will retry according to the task’s retry policy.
![]() Use of Standard Operators or Sensors Instead of Deferrable Operators- Causing Worker Resource CPU Leakage: The issue described is a common challenge in Apache Airflow. Standard Operators and Sensors occupy a worker slot for the entire duration of their execution, regardless of whether they are actively processing data. This can lead to scenarios where worker slots are tied up by idle tasks, preventing other tasks from being scheduled and executed.
Use of Standard Operators or Sensors Instead of Deferrable Operators- Causing Worker Resource CPU Leakage: The issue described is a common challenge in Apache Airflow. Standard Operators and Sensors occupy a worker slot for the entire duration of their execution, regardless of whether they are actively processing data. This can lead to scenarios where worker slots are tied up by idle tasks, preventing other tasks from being scheduled and executed.
For instance, imagine a situation where you have 500 available worker slots and 500 DAGs waiting on a Sensor. If the Sensor is running but not actively performing any meaningful work, it’s still holding onto a worker slot. As a result, the Airflow cluster has the capacity to run other tasks, but it’s unable to do so because all worker slots are occupied. This inefficiency can lead to a suboptimal use of cluster resources and cause delays in the execution of other tasks.
![]() Insufficient Management of Airflow Worker Slots & Resources: In our system, we see that Insufficient management of Airflow worker slots and resources can lead to various issues in an Apache Airflow environment.
Insufficient Management of Airflow Worker Slots & Resources: In our system, we see that Insufficient management of Airflow worker slots and resources can lead to various issues in an Apache Airflow environment.
- Underutilization of Worker Slots: If worker slots are not managed efficiently, they may be occupied by idle tasks or tasks that do not utilize the full capacity of the worker. This leads to a waste of resources and prevents other tasks from being scheduled and executed.
- Resource Bottlenecks: In scenarios where worker slots are not available due to inefficient task execution, DAGs may be delayed or fail to execute altogether. This can lead to bottlenecks in workflow execution.
- Task Starvation: If all worker slots are occupied by long-running or idle tasks, new tasks may be unable to be scheduled, leading to task starvation. This can significantly impact the overall performance of the Airflow environment
- Scheduler Restarts Frequently: We see that sometimes the scheduler restarts frequently which is causing airflow DAG scheduling.
Airflow Environmental Level Settings & Configuration Management
Before deep dive analysis & how to tune the airflow performance, let’s deep dive into the default configuration provided by Airflow (Managed airflow instances that can hosted on GCP, AWS, or Azure Cloud Environment).
- Airflow DAG Parsing: DAG parsing in Apache Airflow refers to the process of reading the Python script that defines a DAG and converting it into an internal representation that Airflow can understand and execute.
- dag_dir_list_interval: This property determines how often Airflow will scan the DAGs directory to check for new DAG files. By default, it is set to 5 minutes (300 seconds). This means Airflow will check the DAGs directory for any new files every 5 minutes.
- min_file_process_interval: This property sets the interval (in seconds) after which a DAG file will be re-parsed. The DAG file is checked for changes and parsed every min_file_process_interval seconds. The default value is 30 seconds. If a DAG file changes within this interval, it will trigger a re-parse.
- parsing_processes: This property defines how many parallel processes the scheduler can use to parse DAG files. By default, it is set to 2, meaning the scheduler can use up to 2 processes simultaneously to parse DAGs. Increasing this value allows for more concurrent parsing of DAG files, which can speed up the DAG parsing process.
- dag_file_processor_timeout: This property sets the maximum amount of time (in seconds) that the scheduler will spend processing a single DAG file. If processing a DAG file takes longer than this timeout, it will be terminated. The default value is 50 seconds.
- dagbag_import_timeout: This property sets the maximum amount of time (in seconds) that the scheduler will wait for a Python file import. If importing a Python file (e.g., a custom operator) takes longer than this timeout, it will be terminated. The default value is 30 seconds.
- Top Level Python code: Top level Python code issue in Apache Airflow refers to a problem with the Python code that exists outside of any specific task in a DAG. This could be at the beginning of the DAG file or in any section that isn’t part of a specific task.
Remember, when modifying these properties, it’s important to consider the available resources on your Airflow server. Increasing parsing_processes will consume more CPU and memory, so ensure your system can handle the additional load.
But the question arises here, how to get DAG parsing time for each dag or DAG Run Checklist on the Airflow?
We can set up each DAG to get the parsing time taken by each DAG or total parsing time (including all DAG) by Scheduler
- Using the command line interface: To get the report by running the below command on the airflow instance (backend Instances in GCP cloud, Ec2 in AWS, Pods containers in Kubernetes)
airflow dags report
For example,
airflow dags report -o json
Airflow Performance Optimisation & Scheduler Configuration Tuning
As we know the scheduler is responsible for scheduling or parsing the DAG file to get DAG visible on the airflow UI. So optimizing the airflow scheduler configurations can make a good impact on the airflow instances.
- AIRFLOW__SCHEDULER__MIN_FILE_PROCESS_INTERVAL (min_file_process_interval): Defines the minimum interval for processing existing DAG files
- AIRFLOW__SCHEDULER__DAG_DIR_LIST_INTERVAL (dag_dir_list_interval): Sets the interval for processing new DAG files.
- AIRFLOW__SCHEDULER__MAX_DAGRUNS_TO_CREATE_PER_LOOP(max_dagruns_to_create_per_loop): Specifies the maximum number of DAG runs to create per scheduler loop. This Is used to increase the number of DAG runs in each scheduler loop. The default value is 10
- AIRFLOW__SCHEDULER__MAX_DAGRUNS_PER_LOOP_TO_SCHEDULE(max_dagruns_per_loop_to_schedule): This is a number of dags to examine when scheduling a task. Increasing this number as we saw many dags in the queued state.
- AIRFLOW__CORE__PARALLELISM (parallelism): Controls the maximum number of task instances allowed to run concurrently.
- AIRFLOW__CORE__MAX_ACTIVE_RUNS_PER_DAG(max_active_runs_per_dag): Defines the maximum number of active DAG runs per DAG.
- AIRFLOW__CELERY__WORKER_CONCURRENCY (worker_concurrency): Determines the number of Celery worker processes running in parallel.
As shown below figure, the environmental configuration we have set to optimize the airflow performance
 Figure 2: Airflow Configuration — Scheduler
Note: In the case of Kubernetes executor, worker_pods_creation_batch_size (AIRFLOW__KUBERNETES__WORKER_PODS_CREATION_BATCH_SIZE) which determines how many pods can be created per scheduler loop. Changing this config, helps to increase the number of DAG runs in case of Kubernetes executor deployment
After changes the airflow default configs, we have observed the following improvements
![]() The number of queued tasks in Airflow Total Task Instances has decreased.
The number of queued tasks in Airflow Total Task Instances has decreased.
![]() The number of scheduled DAG Runs has increased in every scheduled loop and DAG runs in the queued state have decreased.
The number of scheduled DAG Runs has increased in every scheduled loop and DAG runs in the queued state have decreased.
![]() The scheduler now efficiently parses each CIA DAG, running them in separate CPU processes, resulting in significantly reduced processing time for each DAGs.
The scheduler now efficiently parses each CIA DAG, running them in separate CPU processes, resulting in significantly reduced processing time for each DAGs.
Airflow Performance Optimisation by handling Top Level Python Code
As we know that top-level Python code is the portion of your DAG code that runs during parsing time. To reduce parsing time for each DAGs, we have to handle the top-level Python code & restructure the code. This will help to reduce the DAG import error timeout & DAG will never disappear.
In order to follow the Airflow Best practices, we have restructure the code in such way when the Airflow scheduler parses each DAG, it should not parse the configs read or cloud hit every time. This helps to reduce the parsing by modifying the logic that heavy operation will run only during DAG run not during parsing time.
Airflow scheduler executes the code outside the Operator’s execute methods with the minimum interval of min_file_process_interval seconds. This is done in order to allow dynamic scheduling of the DAGs. So we should handle the DAG Top Level Python code in the DAG.
For example, in our code Figure, you can see the read_config_file is happening inside the Top Level Python code which causes parsing delay.
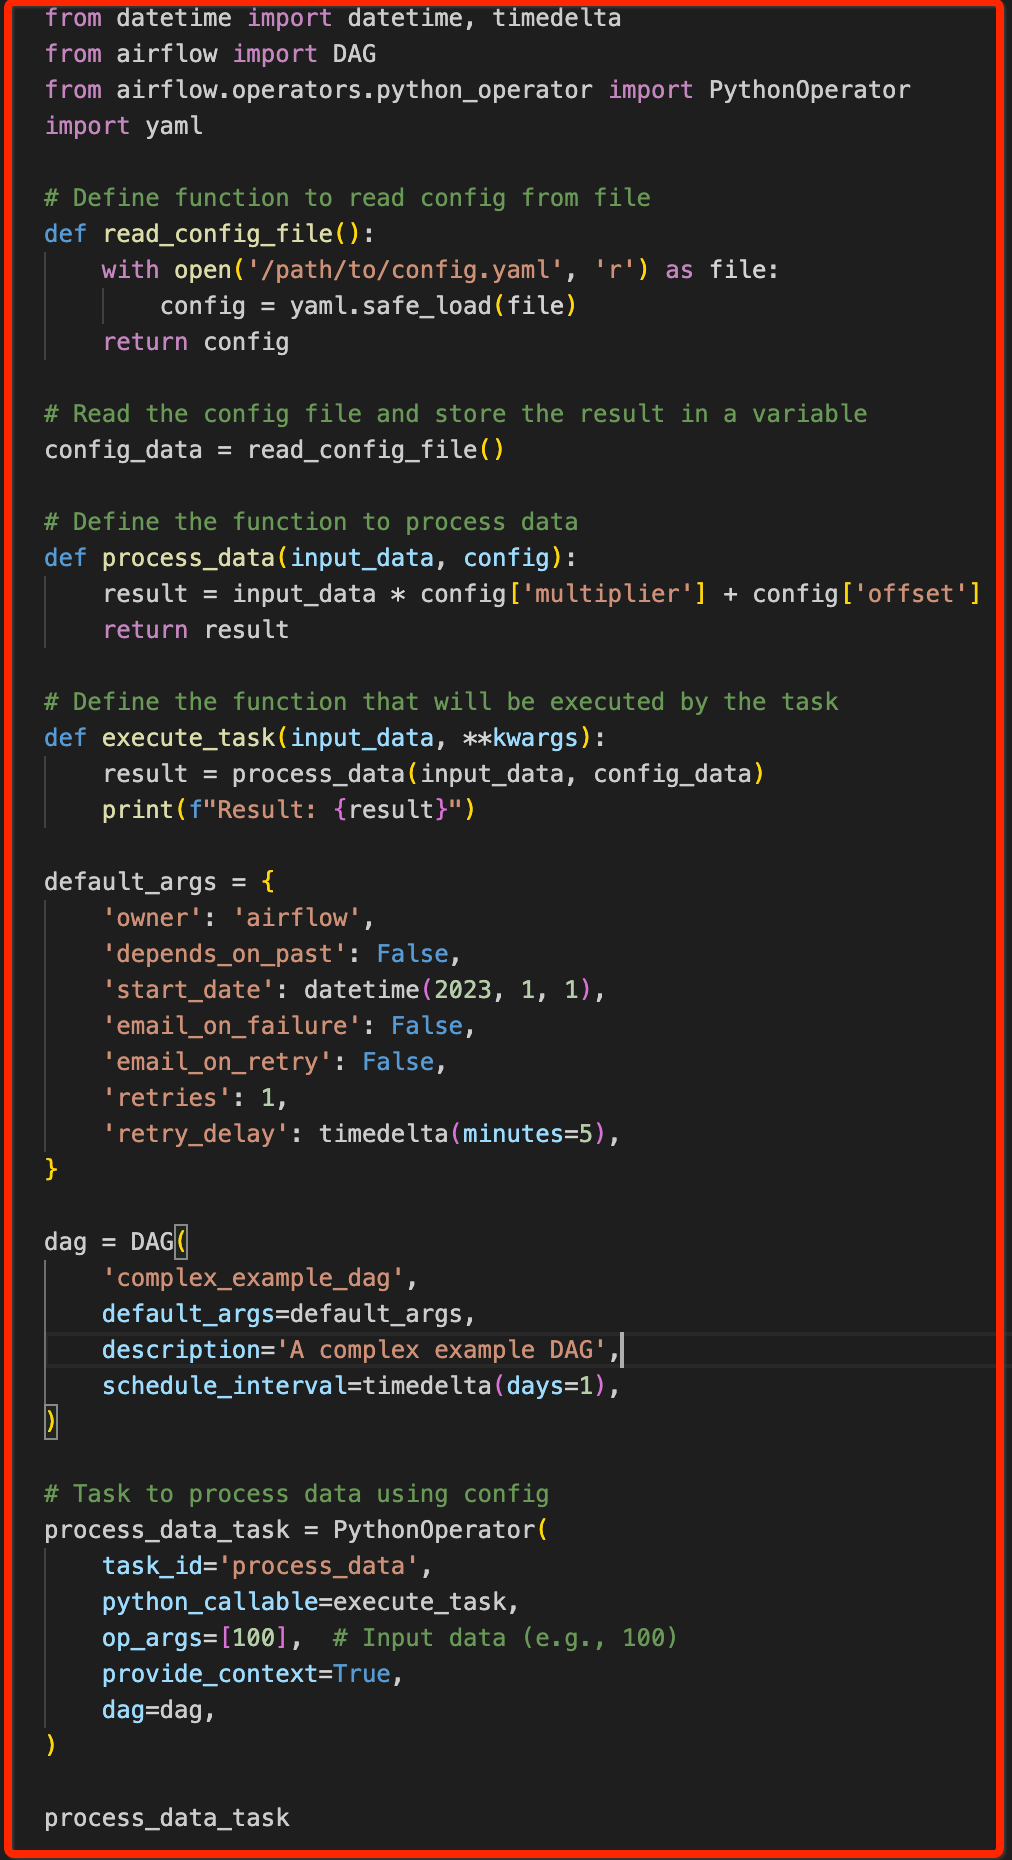 Figure 3: Top Level Python Code
By changing the logics in such way read_confg_file function get invoked only during the DAG run (by calling this function inside the Task).
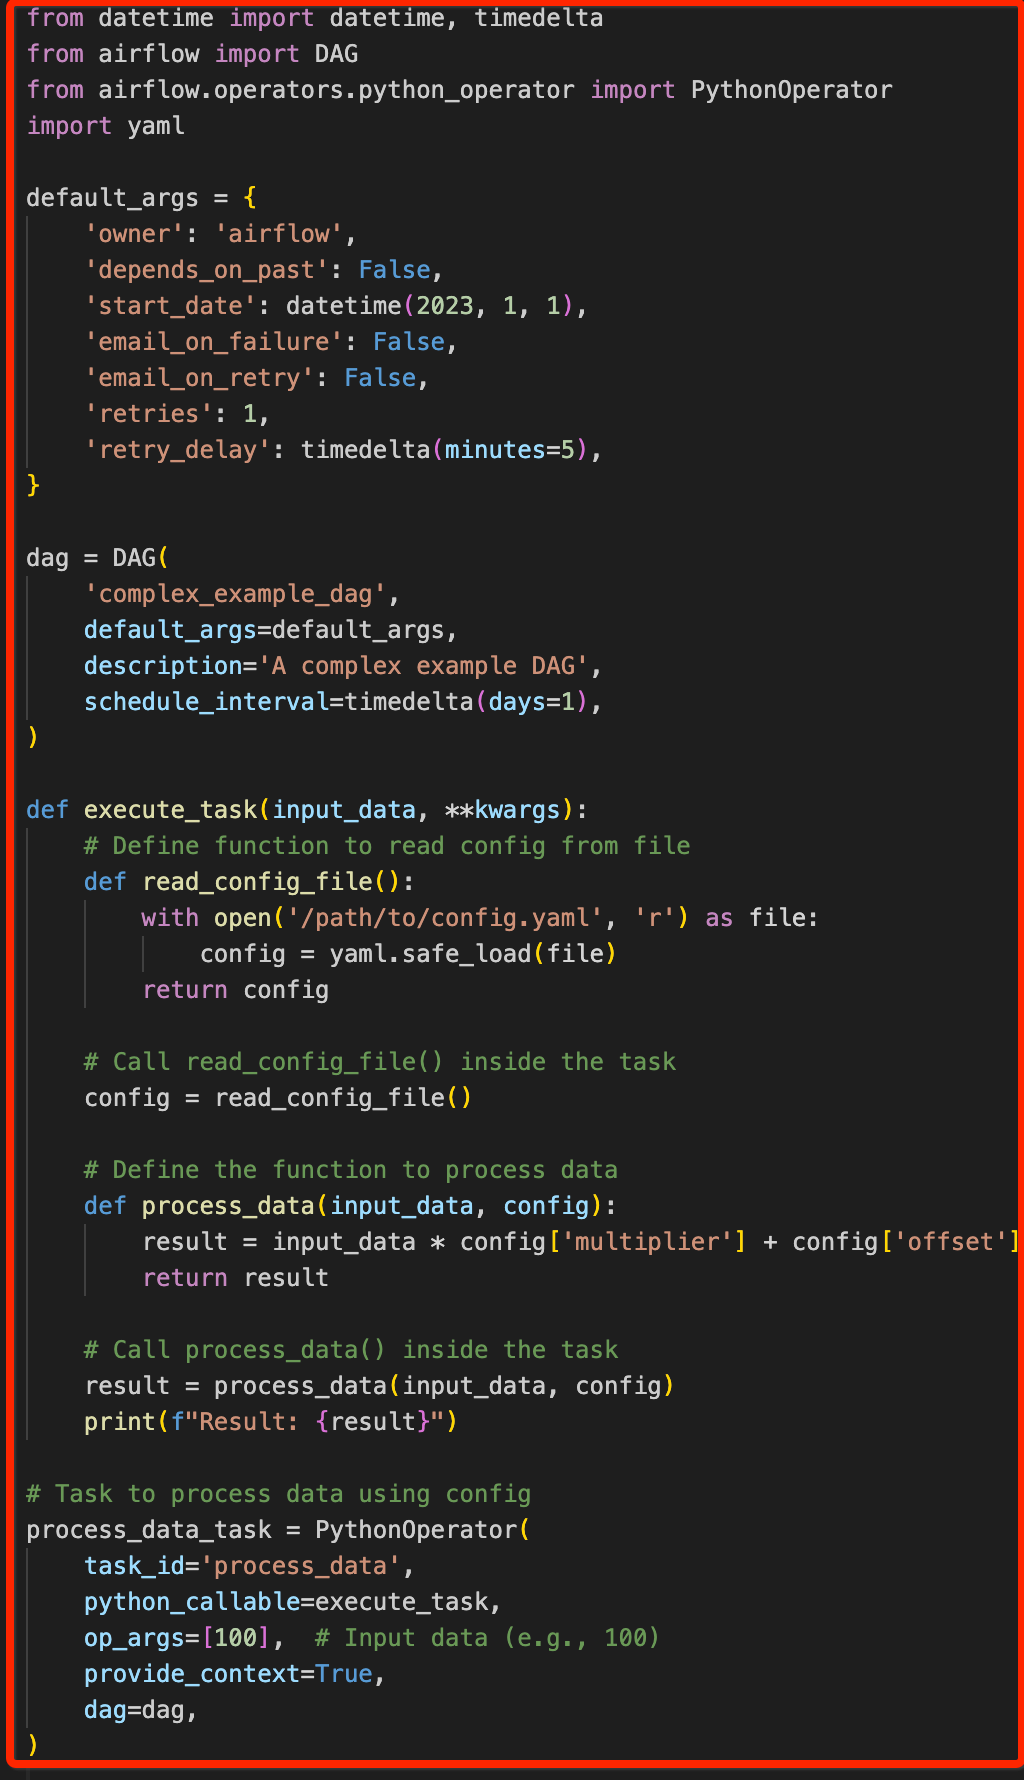 Figure 4: Top Level Python Code Fix & Code Restructure
By changing this logic parsing time of DAG get reduced to next level.
Airflow Performance Tuning by managing the Celery Worker Queue & Slots
As we know that by default, all tasks using the Celery worker run in a default worker queue in the airlfow. You can create additional worker queues to enable multiple worker types or configurations for different groups of tasks, and assign tasks to these queues in your DAG code.
To optimise the airflow performance by managing the celery worker queue effectively with worker pool slots which is by default 128 slots in airflow
- Worker Queue Setup: By configuring multiple worker queues and assigning tasks to these queues based on the requirements of the tasks, you can enhance the performance of the airflow. For example in the airflow instances
Suppose we are running Task I and Task II. Task I and Task II are dependent on each other, so they need to run in the same celery deployment. Task I is a long-running task that uses a lot of CPU and memory of the resources, while Task II is a short-running task that uses minimal amounts of CPU and memory . You can assign Task I to a worker queue that is configured to use the A30 worker type, which is optimized for running compute-heavy tasks. Then, you can assign Task II to a worker queue that is configured to use the A10 worker type, which is smaller and optimized. In this way you can manage running multiple tasks in different worker queued based on the airflow worker configuration for example, minimum worker & maximum number of worker instances on each queue.
Note: Each celery worker queue can consist of N number of worker instances in Celery executor deployment
- Celery Worker Concurrency: We Adjust the celery_concurrency setting in Celery to control the number of worker processes. Experiment with different values to find the optimal concurrency level for your workload.
- Scale Workers Horizontally: Consider adding more worker nodes to your Celery cluster to horizontally scale the processing capacity
- Use Priority Queues (if needed): If you have tasks with varying levels of priority, consider using priority queues to ensure high-priority tasks are processed promptly & running inside the worker pool slots.
In summary, the worker pool size (128 slots which is by default) depends on the concurrency setting, as it directly influences how many tasks a worker can handle at the same time.
To see if the performance has improved go to the Admin-> Pools Sections -> Right-click
As you can see below figure the queue tasks were reduced to 0 by configuring & managing the celery worker queue
 Figure 5: Queued Tasks moved to Running Slots immediately
 Airflow Resource Effective Utilisation by using the Deferrable Operators & Triggers
Standard Operators and Sensors occupy a worker slot for the entire duration of their execution, regardless of whether they are actively processing data. This can lead to scenarios where worker slots are tied up by idle tasks, preventing other tasks from being scheduled and executed.
To fix this issue we have used the deferrable operators & triggers in the airflow by utilising the resources by another task during the sensor is running.
Deferrable operator is one that is written with the ability to suspend itself and free up the worker when it knows it has to wait, and hand off the job of resuming it to something called a Trigger. As a result, while it is suspended (deferred), it is not taking up a worker slot and your cluster will have a lot less resources wasted on idle Operators or Sensors. Note that by default deferred tasks will not use up pool slots, if you would like them to, you can change this by editing the pool in question.
Triggers is asynchronous python code designed to be run all together in a single Python process because they are asynchronous, they are able to all co-exist efficiently. It performs the below steps:
- Task instance (running operator) gets a condition where it has to wait and defers itself with a trigger tied to the event that should resume it.
- The new Trigger instance is registered , and picked up by a triggered process
- The trigger is run until it is triggered, at which point its source task is re-scheduled
- The scheduler queues the task to resume on a worker executor
Writing a deferrable operator takes a bit more work but it can great impact on airflow performance resource utilisation.
How to use the Deferrable operator for the DAG code
- To use deferrable operators, you must have a triggerer running in your Airflow environment. For example, we have enabled the trigger on the instance
 Figure 6: Trigger Configuration on Airflow
2. To check whether the deferrable is enabled on the Airflow CFG or not. If not, then set the below config
 Figure 7: Config
3. After you set the variable, all operators with a deferrable parameter enabled will run as their deferrable version by default on the DAG. If not, you can override the default behaviour of the operator by changing the logic setting deferrable=True to enable deferrable inside the task
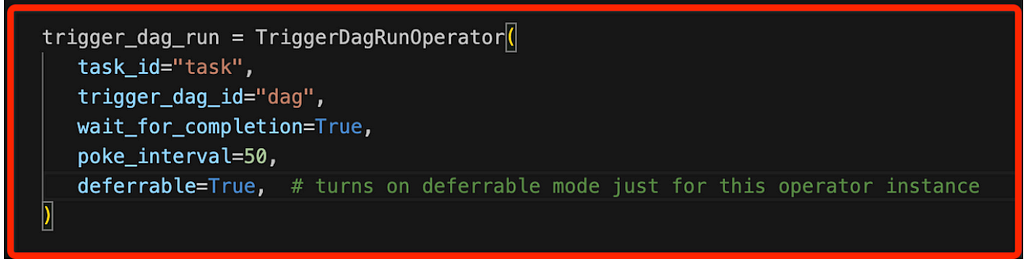 Figure 8: Deferrable Operator- TriggerDagRunOperator
4. To use a deferrable operator of a core Airflow operator in your DAG, you only need to replace the import statement for the existing operator so that deferrable condition will used in the DAG code
 Figure 9: TimeSensorSync Operator instead of TimeSensor for deferrable condition
 Figure 10: DateTimeSenorSync Operator instead of DateTimeSensor for deferrable condition
As shown in below figure, how deferrable operator & trigger increase the resource utilisation even if any Sensor operator is running
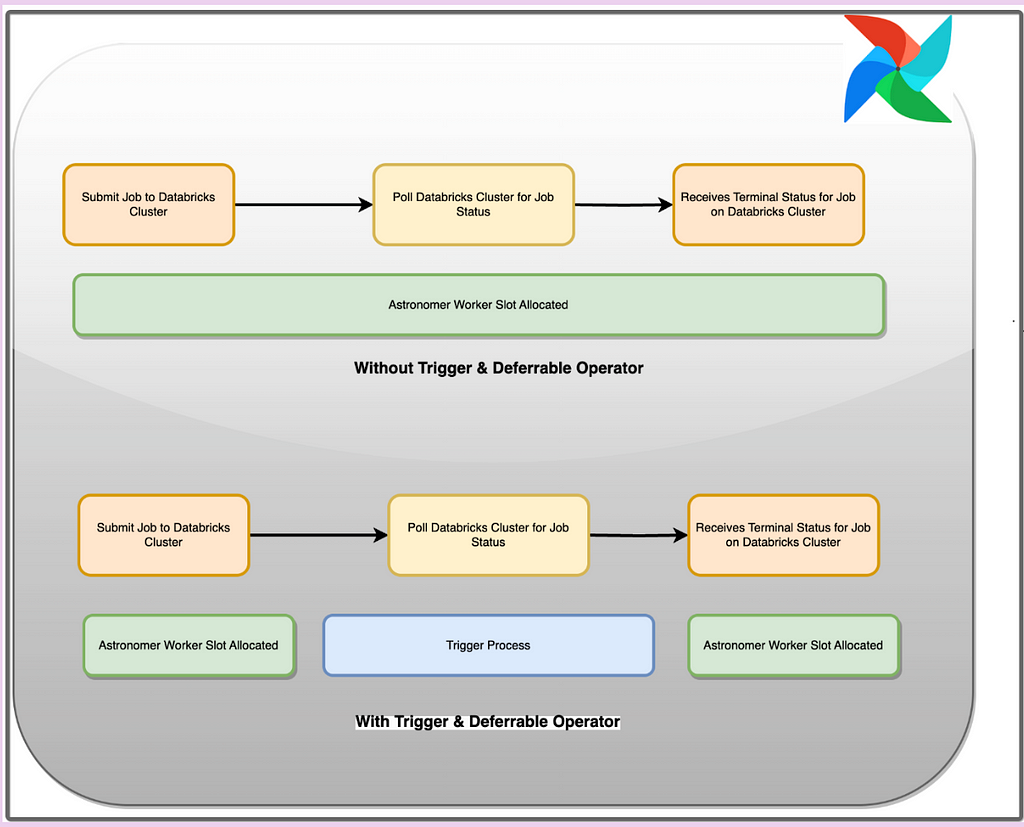 Figure 10: How Trigger & Deferrable Operator works
With deferrable operators stored inside the code, worker slots are released when a task is polling for the job status from databricks cluster. When the task is deferred, the polling process is offloaded as a trigger to the triggerer, and the worker slot becomes available. The triggerer can run many asynchronous polling tasks concurrently, and this prevents polling tasks from occupying your worker resources. This show how you can increase the utilisation of slots for running the jobs
Reduce DAG Parsing & DAG Import Timeout Issues By Reading Configs from Airflow Local Path Instead of Cloud Storage (GCS/S3/Blob Storage)
We can reduce the parsing time & DAG import timeout issues by reading the configs from airflow local path (/usr/local/airflow/) instead of reading the config from Cloud storage GCS, S3 & blob storage using Hook or operator. If any Dag is reading the config for the task, then try to deploy the config on the local path to reduce latency. If we use the bucket based config read, then in every scheduler loop, parsing time increased because it read the configs from bucket which causes external connection to the Cloud Storage .
For that, we take an example by showing how we can reduce our parsing time by changing the logic to read the config from the airflow container’s local path instead of the external storage
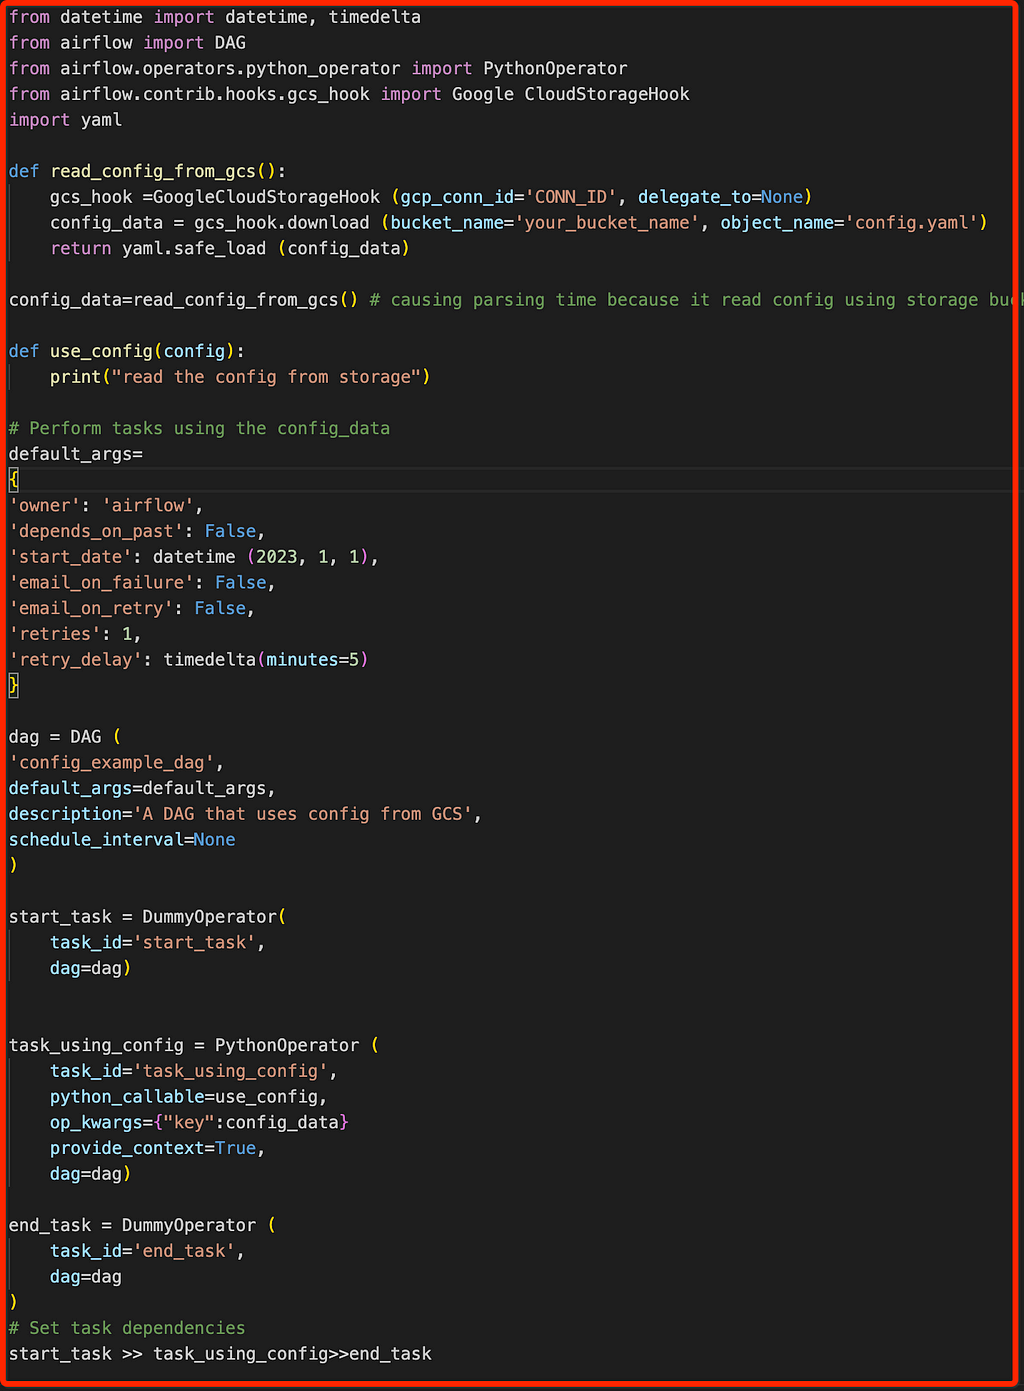 Figure 11: Read config from GCS Bucket (causing parsing delay)
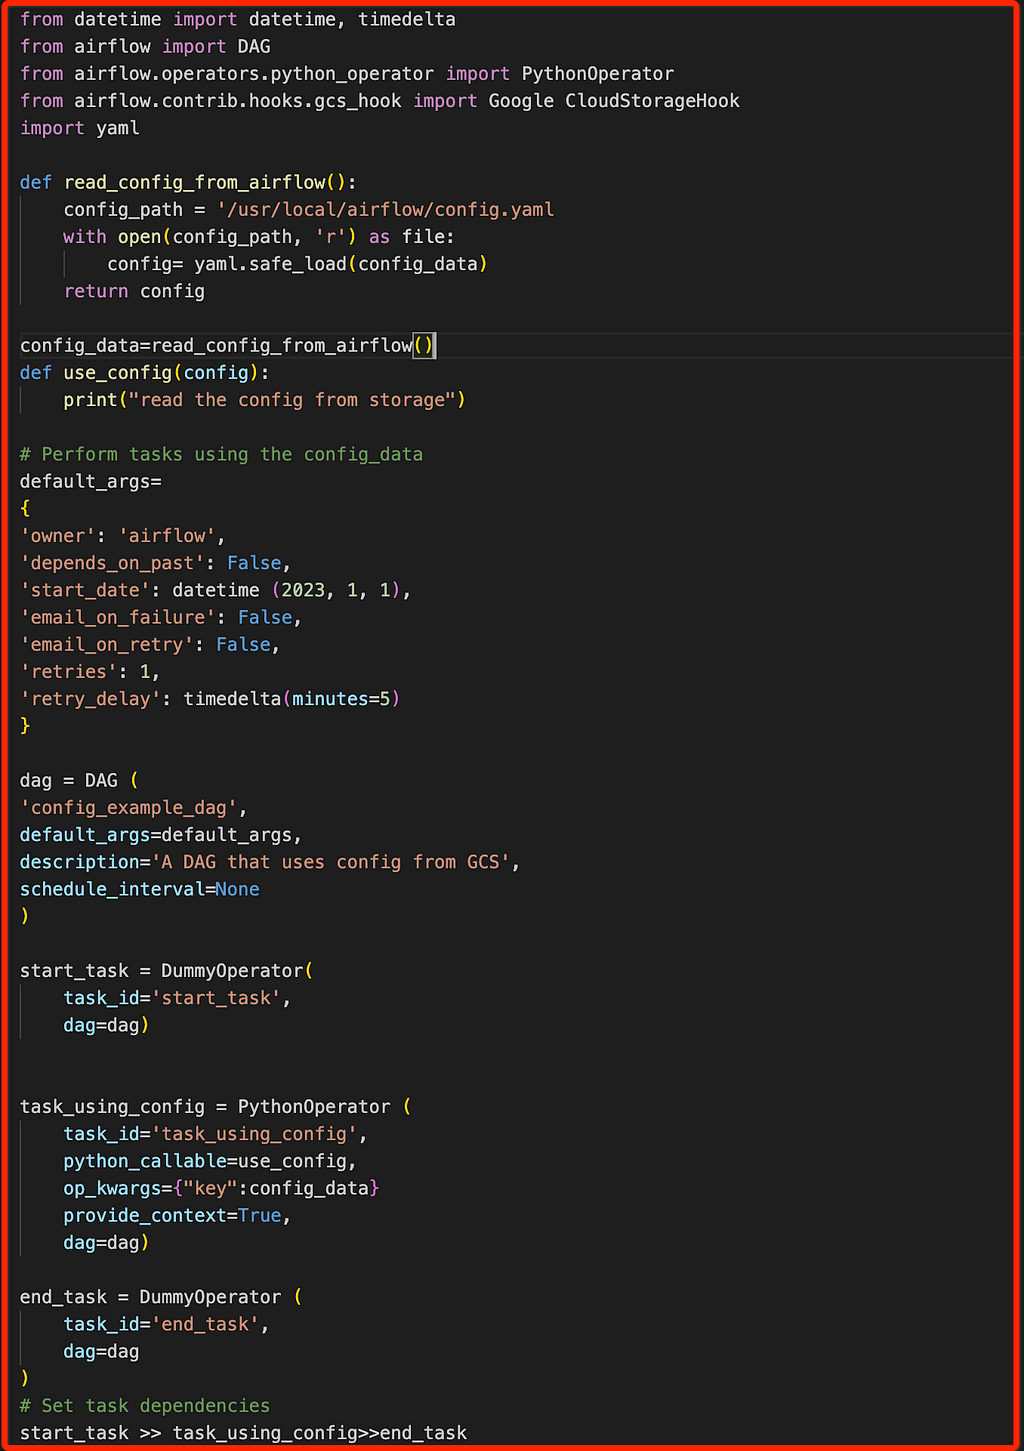 Figure 12: Read config from local (decrease parsing execution time)
 Handling the Airflow Worker Graceful Termination Period to remove Zombie Task Issues
To fix the zombie task issues, we should set the airflow worker graceful termination period more than the time taken by the longest job or DAG running inside the airflow. So that the worker will be gracefully terminated without converting the long-running task into a zombie task
The following improvements you will see by optimal setting the airflow graceful termination period on Airflow
![]() No tasks became zombie
No tasks became zombie
![]() Airflow workers get restarted gracefully
Airflow workers get restarted gracefully
![]() Long running tasks will run fine on the worker instances even after code deployment happens using the CI/CD
Long running tasks will run fine on the worker instances even after code deployment happens using the CI/CD
![]() Downstream tasks will use the latest code & scheduled on the celery worker
Downstream tasks will use the latest code & scheduled on the celery worker
So, this is very important for setting the optimal graceful period in the Airflow configuration & settings. As you can see in the below figure, we have set the Worker Termination Grace Period to 40 mins
 Figure 13: Configure the worker termination grace period on Airflow >= longest-running job execution time
 Conclusion
By using the steps, we achieve the remarkable achievement in airflow performances by fixing the diversity of issues. In conclusion, adopting a step-based approach in Airflow has proven to be instrumental in achieving remarkable performance enhancements. By following number of steps to reduce parsing time, DAG import error timeout issues, converting tasks from queued to running state immediately & increase number of DAG runs in scheduled state for every scheduled interval we can optimise & tune the airflow performance. This strategic implementation significantly boosts overall Airflow efficiency and reliability.
Cracking the Code: Boosting Airflow Efficiency Through Airflow Configuration Tuning & Optimisation was originally published in Walmart Global Tech Blog on Medium, where people are continuing the conversation by highlighting and responding to this story.