This episode will be an extension to the toxiproxy S1E3. Chaos Monkey can also be used to inject latency, fault and kill application. We will focus on adding Chaos Monkey to a Spring Boot application. If you have not seen the introduction, please visit S1E1; to learn about Pod kill experiment, please visit S1E2.
 Chaos Monkey for Spring Boot
I will be listing down the steps to implement Chaos Monkey in your Spring Boot app.
Step 1: Adding Chaos Monkey dependency (update the latest version available)
<dependency>
    <groupId>de.codecentric</groupId>
    <artifactId>chaos-monkey-spring-boot</artifactId>
    <version> ~Latest available version~ </version>
</dependency>
Step 2: Start your application with Chaos Monkey as the active spring profile. Couple of things to note here: one, you might have to create a property file as application-chaos-monkey.properties and two, you can start your application with two profiles.
java -jar your-app.jar --spring.profiles.active=chaos-monkey,dev
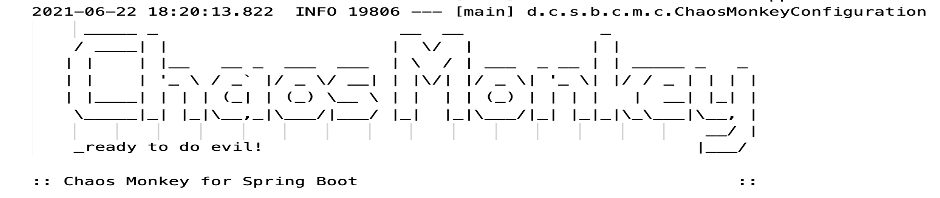 App starts with Chaos Monkey banner
At this point your application starts with Chaos Monkey profile but it does not do any harm. To action Chaos Monkey to start doing evil you need to enable it. Before we go there lets quickly understand what is Chaos Monkey and some of its terms.
Chaos Monkey: Tool invented in 2011 by Netflix to test the resilience of its IT infrastructure. Chaos Monkey is a tool that follows the Principles of Chaos Engineering. Chaos Monkey is responsible for randomly terminating instances in Production to ensure that engineers implement their services to be resilient to instance failures.
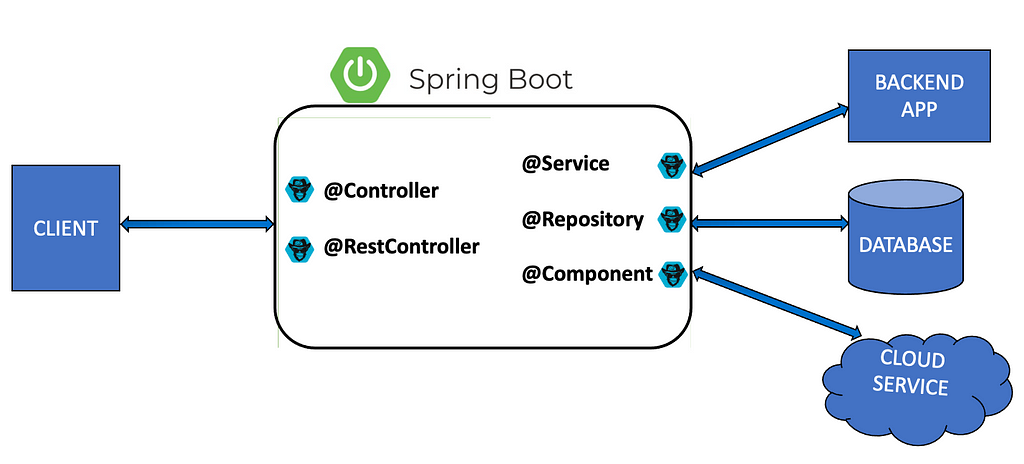
Watcher: A Watcher is a Spring Boot component. Internally it makes use of Spring AOP to identify whenever a public method is executed in classes annotated with the following Spring annotations to inject chaos:
- @Component
- @Controller
- @RestController
- @Service
- @Repository
Assaults: Assaults are the heart of Monkey’s Chaos and it makes use of them based on your configuration. Following are the available assaults.
- Latency: If Latency Assault is enabled, latency is added to a request. You control the number of requests where this should occur via a configurable parameter called level.
- Exception: You can determine at runtime whether an exception should occur when a public method being watched by the Watcher is called. Chaos Monkey can throw any kind of runtime exception.
- Appkiller: When the configured methods are called in the application, Chaos Monkey will shut down the application.
- Memory: Memory Assaults attack the memory of the Java Virtual Machine.
- Assault Scheduler: You can schedule Chaos Monkey Runtime Assaults (Memory, AppKiller) using cron expressions.
Now lets understand how to bring our Chaos Monkey alive to do some evil. We have to enable the below Actuator endpoint to communicate with our application and configure Chaos Monkey watchers and assaults.
management.endpoint.chaosmonkey.enabled=true
management.endpoints.web.exposure.include=chaosmonkey
Chaos Monkey for Spring Boot offers you some built in endpoints exposed via JMX or HTTP. This allows you to change configuration at runtime.
Step 3: Enable chaos monkey
curl --request POST 'http://localhost:8080/chaosmonkey/enable'
To get the current status of Chaos Monkey:
curl --request GET 'http://localhost:8080/chaosmonkey/status'
Step 4: Now let’s configure watchers, after below curl is executed public methods in @Service files will be under Chaos Monkey’s watch.
curl --location --request POST 'http://localhost:8080/chaosmonkey/watchers' \
--header 'Content-Type: application/json' \
--data-raw '{
"controller": false,
"restController": false,
"service": true,
"repository": false,
"component": false
}'
To get the watchers:
curl --request GET 'http://localhost:8080/chaosmonkey/watchers'
Step 5: Lets configure assaults for the public methods being watched:
- Latency assault: Injects latency at the method level which will enable us to see how our application reacts to the slowness in processing.
curl --location --request POST 'http://localhost:8080/chaosmonkey/assaults' \
--header 'Content-Type: application/json' \
--data-raw '{
"level": 1,
"latencyRangeStart": 3000,
"latencyRangeEnd": 6000,
"latencyActive": true,
"exceptionsActive": false,
"killApplicationActive": false
}'
We have activated latency assault by adding a latency between 3000–6000 milliseconds for every request. Level indicates how many requests are to be attacked. 1 means “attack every request”, 5 means “attack every 5th request”.
- Exception assault: This will throw a random runtime exception which will help us to understand how our application reacts.
curl --location --request POST 'http://localhost:8080/chaosmonkey/assaults' \
--header 'Content-Type: application/json' \
--data-raw '{
"latencyActive": false,
"exceptionsActive": true,
"killApplicationActive": false
}'
- App killer assault: This will kill our application at any random point to see the overall impact.
curl --location --request POST 'http://localhost:8080/chaosmonkey/assaults' \
--header 'Content-Type: application/json' \
--data-raw '{
"latencyActive": false,
"exceptionsActive": false,
"killApplicationActive": true
}'
- Enable assault on a specific method:
curl --location --request POST 'http://localhost:8080/chaosmonkey/assaults' \
--header 'Content-Type: application/json' \
--data-raw '{
"level": 5,
"latencyRangeStart": 5000,
"latencyRangeEnd": 7000,
"latencyActive": true,
"exceptionsActive": false,
"killApplicationActive": false,
"watchedCustomServices": [ "com.example.chaos.monkey.chaosdemo.controller.HelloController.sayHello","com.example.chaos.monkey.chaosdemo.controller.HelloController.sayGoodbye"]
}'
To get assaults configuration:
curl --request GET 'http://localhost:8080/chaosmonkey/assaults'
Chaos Toolkit experiment: Below is a sample Chaos Toolkit Experiment to work with Chaos Monkey.
Github — Please visit my github for a sample Chaos Monkey experiment.
How to run the experiment:
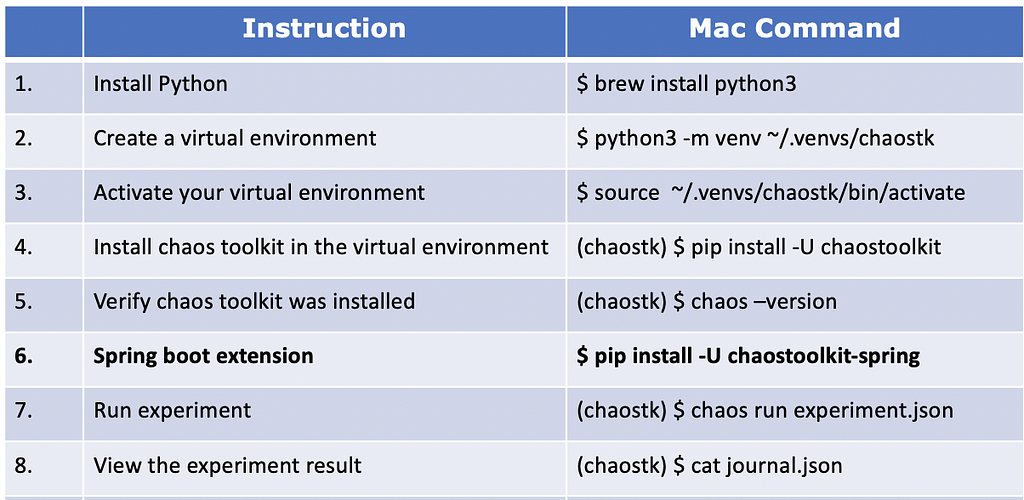 Commands to run experiment
Experiment output:
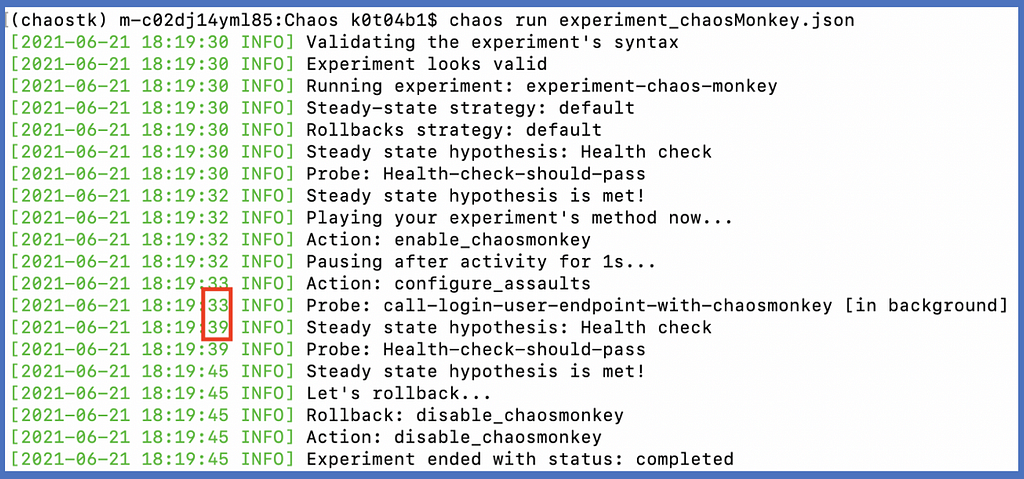 Delay of 6 sec added
This will give you an opportunity to fine tune your application by monitoring the real time behaviour when Chaos is introduced. This is Chaos Monkey for Spring Boot applications.
References:
https://netflix.github.io/chaosmonkey/
https://stackoverflow.com/questions/31038250/setting-active-profile-and-config-location-from-command-line-in-spring-boot
https://chaostoolkit.org/drivers/spring/
Chaos Engineering- Chaos Toolkit- S1E4- Chaos Monkey was originally published in Walmart Global Tech Blog on Medium, where people are continuing the conversation by highlighting and responding to this story.
Article Link: Chaos Engineering- Chaos Toolkit- S1E4- Chaos Monkey | by Kishore Kumar Naidu | Walmart Global Tech Blog | Jan, 2024 | Medium