In this episode we will see a sample experiment on how to inject network level latency in our API calls using a framework called Toxiproxy. If you have not yet seen the introduction on what Chaos Engineering means, please visit S1E1. To learn more about the Pod kill experiment, please visit S1E2.
Network latency is an inevitable evil. Instead of waiting for it to happen in Production and then fixing your system, how about being able to simulate this before it actually happens? Welcome to Toxiproxy, your buddy for introducing Network level latency, helping your system become resilient to this type of failures.
Toxiproxy is a framework by Shopify for simulating Network conditions. It can be used to eliminate single point of failures in your application and make your application more resilient, robust and fault tolerant.
Extension chaostoxi:
This is Chaos Toolkit’s driver for Toxiproxy! This extension allows you to setup Toxiproxy probes and methods from chaos toolkit by leveraging the Toxiproxy http management api.
We create a proxy which will listen to the requests and pass it on to an upstream. This proxy is in our control and we have the capability to inject delays in the proxy simulating a network delay.
In the below example, I have created a proxy to listen to port localhost:7070 and assigned upstream as port localhost:8080 where my actual application(server) is listening. And I have injected a toxic (latency of 6000ms) in the proxy (7070) simulating a network delay.
Normal request flow:
 Normal request flow
Request flow with Toxiproxy: Idea here is to create a proxy, which will listen to the request and route it to the actual application(server) endpoint. As we own the proxy, we can introduce a latency in the request flow simulating a network delay.
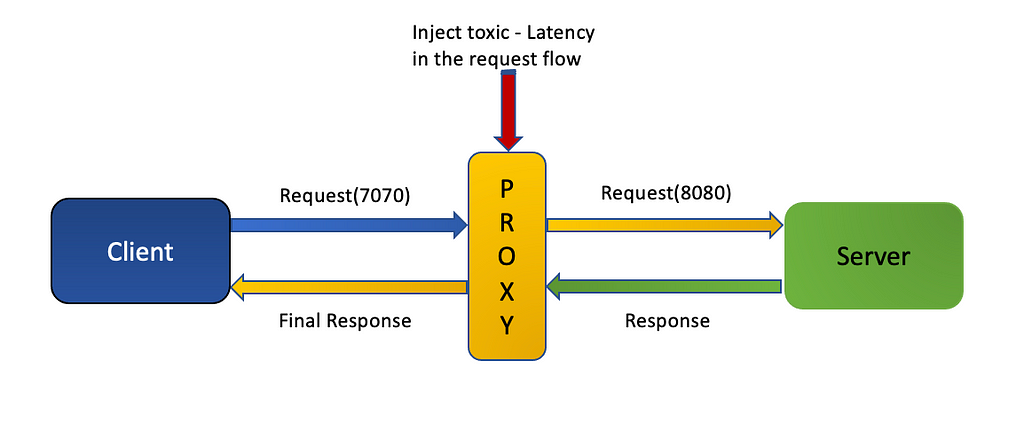 Injecting latency using Toxiproxy
In a Production system, above proxy can also be introduced between an application and external systems like DB, Kafka, Redis and other downstream systems.
Steps to run experiment:
- Install ToxiProxy by following the steps mentioned here. Start Toxiproxy server:
$ toxiproxy-server
 Start toxiproxy server
2. List down all proxies (New terminal):
$ toxiproxy-cli list
 No proxy at the start
3. Create a virtual environment (New terminal):
$ python3 -m venv ~/.venvs/chaostk
4. Activate your virtual environment:
$ source ~/.venvs/chaostk/bin/activate
5. Verify chaos (optional):
$ chaos — version
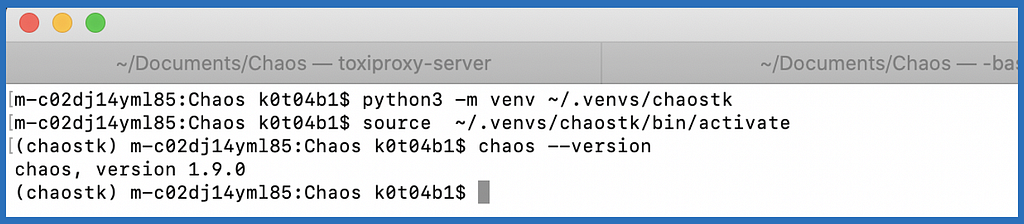 Create and activate virtual environment
6. Run the experiment: My Github link describes a Chaos Experiment JSON containing methods for:
- Creating a Proxy
- Calling your API via the Proxy
- Configuring and introducing Network Delay
- Calling your API again via the Proxy — This is where you can monitor your API’s behaviour and tune it to respond better in case of actual Network latencies.
- Cleanup! Delete the toxic and proxy at the end.
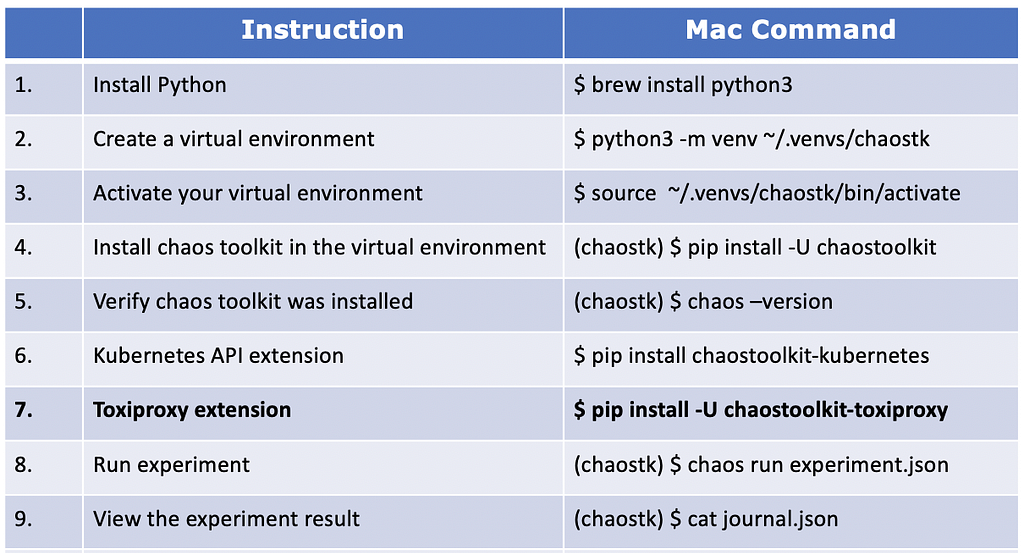 Prerequisites for running an experiment
Finally visit other terminals(step 1 and 2) to see the changes.
 Proxy server listening to requests
 Proxy found
Experiment output: An API is being called before and after adding the latency and we can notice the delay in response for the second call.
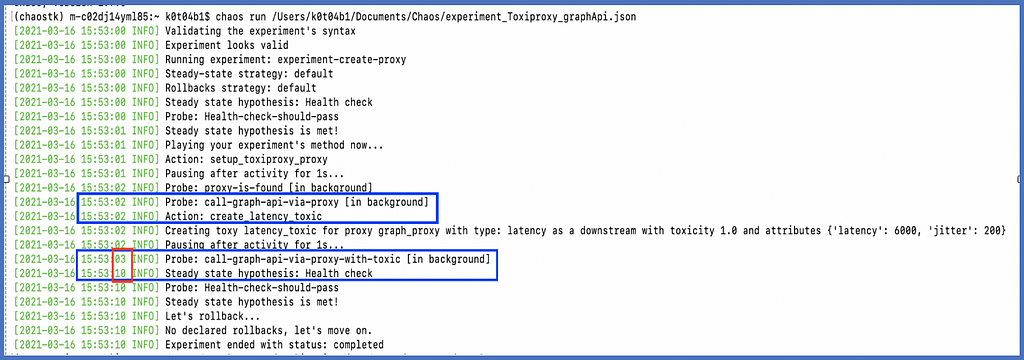 Latency induced by proxy
Conclusion: Based on the experiment results, we can analyse if our system is resilient to Network jitters and to what extent.
Lined up for you in S1E4 is Chaos Monkey, a monkey for Spring Boot lovers.
Reference:
https://principlesofchaos.org/
https://chaostoolkit.org/drivers/toxiproxy/
https://en.wikipedia.org/wiki/Chaos_engineering
Chaos Engineering- Chaos Toolkit- S1E3- Toxiproxy was originally published in Walmart Global Tech Blog on Medium, where people are continuing the conversation by highlighting and responding to this story.
Article Link: Chaos Engineering- Chaos Toolkit- S1E3- Toxiproxy | by Kishore Kumar Naidu | Walmart Global Tech Blog | Jan, 2024 | Medium