Introduction
Earlier this week, I ran into a sample that turned out to be PureCrypter, a loader and obfuscator for all different kinds of malware such as Agent Tesla and RedLine.
Upon further investigation, I developed Yara rules for the various stages, which can be found here (excluding the final payload):
- PureZip
- PureCrypter
- 2nd stage downloader (PureLogStealer related)
With that out of the way, all of this reminded me of the fact that we can also write Yara rules for unique identifiers specific to malware written in .NET, or any other .NET assemblies for that matter.
A bit of history
This isn’t my first encounter with analysing .NET malware at scale: several years ago, I co-authored a presentation with Santiago on hunting SteamStealer malware, which was surging exponentially at the time (the malware intended to steal your Steam inventory items and/or your account). A huge thanks goes to Brian Wallace who had developed a tool at the time called GetNetGUIDs with which it was trivial to extract all the GUID types and start clustering to identify patterns: basically, which of the malware samples are likely authored by the same person or belong to the same attack campaign.
.NET assemblies or binaries often contain all sorts of metadata, such as the internal assembly name and GUIDs, specifically; the MVID and TYPELIB.
GUID: Also known as the TYPELIB ID, generated when creating a new project.
MVID: Module Version ID, a unique identifier for a .NET module, generated at build time.
TYPELIB: the TYBELIB version – or number of the type library (think major & minor version).
These specific identifiers can be parsed with the strings command and a simple regular expression (regex): [a-fA-F0-9]{8}-[a-fA-F0-9]{4}-[a-fA-F0-9]{4}-[a-fA-F0-9]{4}-[a-fA-F0-9]{12}
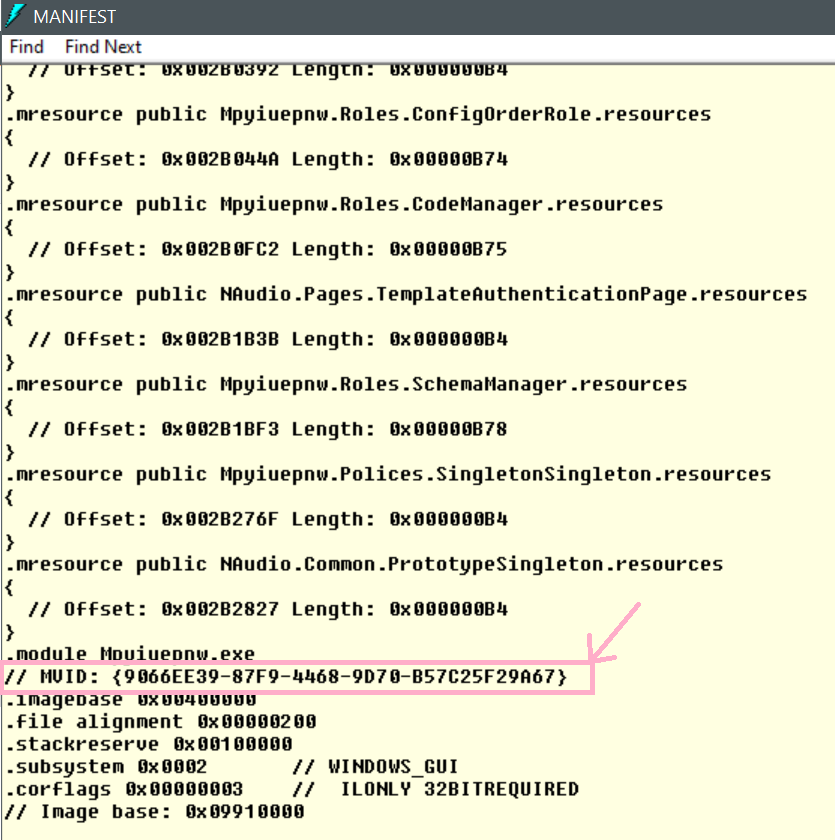
Taking a sample of PureLogStealer posted by James_in_the_box, you could then write a Yara rule based on the MVID or Typelib detected.
As shown on VirusTotal for this sample:
| Figure 1 - Sample with MVID 9066ee39-87f9-4468-9d70-b57c25f29a67 |
And the resulting (simple) Yara rule, could then be as follows:
rule PureLogStealer_GUID
{
strings:
$mvid = “9066ee39-87f9-4468-9d70-b57c25f29a67” ascii wide fullword
condition:
$mvid
}
There are however some issues with this:
The MVID is stored as a binary value rather than a string, whereas the Typelib GUID is effectively stored as a string and since we only have the MVID here, the sample above will not be detected with this rule.
It is important to note that VirusTotal does not seem to report the Typelib.
It is cumbersome to “do it the manual way” with strings and regex, especially on larger data sets – and it’s prone to issues such as:
false positives: if you run "strings" on the sample and then use the following CyberChef recipe: https://gchq.github.io/CyberChef/#recipe=Regular_expression('User%20defined','%5Ba-fA-F0-9%5D%7B8%7D-%5Ba-fA-F0-9%5D%7B4%7D-%5Ba-fA-F0-9%5D%7B4%7D-%5Ba-fA-F0-9%5D%7B4%7D-%5Ba-fA-F0-9%5D%7B12%7D',true,true,false,false,false,false,'List%20matches')Unique('Line%20feed',false) – we get plenty of GUIDs, but only 1 is the actual Typelib;
false negatives: we miss out on unique identifiers, which means we might miss detection of samples, campaigns or actors.
Note that with tools such as IlSpy or dnSpy(Ex), you can also view the Typelib GUID and MVID, however, not all tools display all data, for example:
| Figure 2 - dnSpy detects the Typelib GUID of the sample |
And if we go the “oldschool” route using ildasm:
 |
| Figure 3 - ildasm displays the MVID or Module Version ID |
For all the above reasons, let’s go beyond and do more: both with Yara, and with a new Python tool I’ve created.
The now and the tooling
Before we dive into the tooling, some final history to say that Yara has evolved and thanks to that, we can now hunt and detect more effectively due to the following modules added:
2017: introduction of .NET module https://github.com/VirusTotal/yara/releases/tag/v3.6.0
2022: introduction of console module https://github.com/VirusTotal/yara/releases/tag/v4.2.0
This means that using the .NET module, we can now write a Yara rule like so instead:
import “dotnet”
rule PureLogStealer_GUID
{
condition:
dotnet.guids[0]== “9066ee39-87f9-4468-9d70-b57c25f29a67”
}
And indeed:
| Figure 4 - Yara now detects the sample |
Yara rule
Let’s now leverage the power of Yara and its dotnet and console modules to write a new Yara rule that displays useful data of any given .NET sample that can be leveraged to create meaningful rules, for example: assembly name, typelib and MVID.
| <img alt="A screenshot of a computer code
Description automatically generated" height=“603” src=“https://lh7-us.googleusercontent.com/hC-QgX1sRAbxwZsE1IGc2tQQ4sbADYHMdeMtbzIzKWdBUciviQUvK67QqBEXZdrWkW8lINUXZwpj8SCsxpJNnxUpMR2nxZBeDz-Rw-O19bDwY1FoFrPxoMeCUxGccwGyusPMlsRDNWFbDRKsNhdaBQ” width=“597” /> |
| Figure 5 - Yara rule to display .NET information to the console |
We first verify if the binary is a .NET compiled file, if so, log certain Portable Executable (PE) or binary information to the console as well, and then display all relevant .NET information.
And the output will be, again for the same sample:
| <img alt="A computer screen shot of a computer program
Description automatically generated" height=“306” src=“https://lh7-us.googleusercontent.com/Gx500AS1tjTHZGIcajtGdBd_MNnB1oGJsI8Zw6yoEMfVevDOXmiFKz8iPkF9Sg0F_FuAik5ymVZfyj4hq26RfSKcRmIo33d6AxfDMOHohJfz1MJ6bN3XYY-JgmE2Jvd0mCVCSTslc2IG5GWS3Z_aSQ” width=“491” /> |
| Figure 6 - Yara rule output: sample metadata! |
Meaning we can now write a rule as follows:
import “dotnet”
rule PureLogStealer_GUID
{
condition:
dotnet.guids[0]==“9066ee39-87f9-4468-9d70-b57c25f29a67” or
dotnet.typelib==“856e9a70-148f-4705-9549-d69a57e669b0”
}
Python tool
But what if we want to run this on a large set of samples and produce statistics, which we can then use to hunt or classify malware families, or cluster campaigns?
A newly developed Python tool will help you do exactly just that. It supports both a single file as well as a whole folder of your samples or malware repository. It will skip over any non-.NET binary and simply report the typelib, MVID and typelib ID (if present, which is seldom the case and rarely useful).
If we run it on our single sample like before:
| <img alt="A computer code with white text
Description automatically generated" height=“84” src=“https://lh7-us.googleusercontent.com/xXRgtxNP8PKwspdpOmZ0oykPeiUdXvZgoTxR2_JjwSoVJAMJ7j6sKUEh8k5L9VHtWQWqz6bssUUYR90_wKASH5m5aj-ubtTrdgu_85OOoHeerEPGTKZxEdaj74emmyNVnF7I7Zq0IDY35NDO_AOnRA” width=“435” /> |
| Figure 7 - New tool output on single sample |
The tool (or script) has the following capabilities:
| <img alt="A screen shot of a computer program
Description automatically generated" height=“191” src=“https://lh7-us.googleusercontent.com/UZBznPZwkdXOSaU2eHnDMjEhWHcZRf8UFhHpZTOuL1E6vYAO_M5rqwlQc7lgZ1guG6HrC-S-cZ0ha31MG6SCLdWChSo-3xWAK2_zzV6oJJiGn9v9RjoAiisv5Zg1z9Q2Wfuw_azRM6Qby8M6YpUeEw” width=“602” /> | |
|
You are of course not limited to just using the MVID or Typelib for .NET malware hunting: you can also use the assembly name and other features that could be unique, using either the Yara rule or the Python tool to extract the data you’d like.
I highly recommend to use the tool rather than the Yara rule, as it detects .NET metadata more reliably. Both Yara rule and Python tool can be adapted to display less or more information according to your needs.
Clustering
Tracking attacker’s campaigns is always an exercise, and can be both fun and exhausting, depending on how many rabbit holes you (want to) go through. An example of clustering campaigns as well as malware developers was done in the work I did with Santiago as mentioned earlier, which resulted in the following graphics:
| <img alt="A screenshot of a graph
Description automatically generated" height=“549” src=“https://lh7-us.googleusercontent.com/ebl9McoA0Hm5QOKCGPIKW_JKruUOUjYZbde5Ygq0H2szIY0TzBa7mg433ID75EneAd-ox0j4TYrQtF9n9Yiz7AXF5Jq3wfB7Csgyow_ERXAF5UxNsVn2fiQ6ZfBz0Gg3kBoab4h4lJK8FqS5tRdh4Q” width=“511” /> |
| Figure 9 - Statistics from 2016 research (bonus obfuscation stats) |
This was a pretty large dataset (1.300 samples!) and specific to SteamStealers at the time.
For our analysis purposes, I took 4 of the most current popular malware (that are .NET based or have at least a .NET variant) according to Any.run’s Malware Trends: https://any.run/malware-trends/. These are:
RedLine
Agent Tesla
Quasar
Pure*: basically anything related to PureCrypter, PureLogs, …
Downloading the latest available samples per family from MalwareBazaar, then running my DotNetMetadata Python script, and playing around with pandas and matplot, we can create the following graphs per family:
RedLine – 56 samples
| <img alt="A pie chart with colorful circles
Description automatically generated" height=“315” src=“https://lh7-us.googleusercontent.com/gC35fsDulj6e1P4sWQ2hp5W1W4vhqLR2DW_JOBgk2Wt2bIDTR7GOGSmBQc6_jrLVh0Tm5bv-uB-wBaYe1jUWgPxYcp9BaUVMfze_mLkiYIRkSVKS9-HcuQXsUZcITZ3LCUszfGla8Luc4H1FlCzkqA” width=“526” /> |
| Figure 10 - Typelib GUID frequency |
| <img alt="A colorful circular chart with numbers and numbers
Description automatically generated" height=“361” src=“https://lh7-us.googleusercontent.com/4iodvSSHX_djuvo15Ce2Pk2l_aAKWl5-Pze_pkbloiN3TxmNVYfwE5YdQDtqz-4OTEFdijaLBAeyF1iiElV9a2oMbyKlA62bslKraaXGlKTo-FxBsMMRxxnJ2MchrCRU6oCYqXH20i6xSPliq459pQ” width=“602” /> | |
|
Agent Tesla – 140 samples
| <img alt="A pie chart with numbers and a number
Description automatically generated" height=“361” src=“https://lh7-us.googleusercontent.com/iEjlYFsZtyXaLwvJRit4Z-J35cfEVkZsDVH6DEFmpof67AddyPp-s3nI2BpsHJPE9GxC3nURKa61Dc6CoHzrkBYvHIuaS4f6NARXeHNDnCIJb8wypgpxyeARnbmUprD4SdHl03_8_NBQ54EYlLvtww” width=“602” /> | |
|
| <img alt="A circular pattern with different colors
Description automatically generated with medium confidence" height=“361” src=“https://lh7-us.googleusercontent.com/Lr4Ls11Qa3s6tpphpoywowFj4er3_G2ds5T6zsSIXk9eWxmX1kIgI1RL21lwdRjOKBncKZ-_Yl58AuOcpj_3YPKWHuByjeb4pmXAy_0nSB_MvDZhUpO2B4ekxWIBkD4N5qosztZXvsUdWFi5Z9okKg” width=“602” /> | |
|
Quasar – 141 samples
| <img alt="A pie chart with colorful circles
Description automatically generated" height=“361” src=“https://lh7-us.googleusercontent.com/gC35fsDulj6e1P4sWQ2hp5W1W4vhqLR2DW_JOBgk2Wt2bIDTR7GOGSmBQc6_jrLVh0Tm5bv-uB-wBaYe1jUWgPxYcp9BaUVMfze_mLkiYIRkSVKS9-HcuQXsUZcITZ3LCUszfGla8Luc4H1FlCzkqA” width=“602” /> | |
|
| <img alt="A pie chart with different colored circles
Description automatically generated" height=“361” src=“https://lh7-us.googleusercontent.com/JNu9qRWEOOBrmU-yL30Y-knNS1C5CwUoI-jFzmwSojNXH43ZhJTFb8X1FvyliSLGOZ5HgjB23wj5MCipiRzDolWOGvCcxjhvay0Xl2RUGfa4v4VJ3Uy0EljyhXVrwgGh8VPvb94UjkYBta5KBr9a8Q” width=“602” /> |
| Figure 15 - MVID frequency |
Pure* - 194 samples
| <img alt="A diagram of a pie chart
Description automatically generated" height=“361” src=“https://lh7-us.googleusercontent.com/faQvmkzofZz5gum1rZwq0u-1r_LKzmxspcSlQ2jOCsn-mMx9aiUI2wGc3wtUJrBvxTE1LGyeSrrA9jJxJyuN6PTfF0EQ6bsReZrLzvvY_VntBJV63Rzj_Xeg5ugyqgjUUFqdNwnAsqa4x1otfRFT0w” width=“602” /> |
| Figure 16 - Typelib GUID frequency |
| <img alt="A circular pattern with different colors
Description automatically generated with medium confidence" height=“361” src=“https://lh7-us.googleusercontent.com/sWiC3m-bZW6F1E-xmCxwNIp_BP2JN6laEjM8QcN_QsBBEEfQ1_mc5GclEbr2FzPt3Wpnh9-OF0GvP5dL1ZB0HnbzveDmCzstleeNx1elibiNN4qKB4hSElofcQ3DiYgHqrhbzanZa06-7-jSs-XD0Q” width=“602” /> |
| Figure 17 - MVID frequency |
While these piecharts are certainly hypnotic and display the frequency - or occurrence of the same typelib or MVID, we can also leverage these and create meaningful Yara rules for clustering samples per family, especially in the case of Quasar, the MVID with GUID “60f5dce2-4de4-4c86-aa69-383ebe2f504c” appears like a good candidate.
You might think that while these charts look visually appealing (depending on your art preferences), they may not be particularly useful because they don’t scale well with larger datasets. You’re exactly right! By limiting the amount of results displayed, we can indeed produce even better results. In our sample dataset for the 4 malware families above, so a total of 531 samples, let’s execute the Python tool again and let’s:
Run it on the whole sample set
Extract the assembly name
List only the top 10 of assembly names
Use a bar chart instead of a pie
And the result:
| <img alt="A bar chart with blue squares
Description automatically generated" height=“340” src=“https://lh7-us.googleusercontent.com/qssSTTHjxqLCvq-Xfcx2tcY17uzMLwYEQ_daLz2ra7g5RpxW9WhFZP0NDcQq2dvJBjTIpUVfQrdzCsFrTFcQ_Z0XNqploArcR3aMz2M6A_1R9s0o-g3wpXoMxA_3u3w9yOXBgOBW3vibPsApDlERWw” width=“602” /> |
| Figure 18 - Assembly name frequency - looking better right? |
The top 3 is then:
“Client”: Quasar family
“Product Design 1”: Pure family
“Sample Design 1”: Pure family
Client is likely the default assembly name when compiling the Quasar malware (project), and Product Design and Sample Design are likely default assembly names from the PureCrypter builder.
If we then want to write a Yara rule for Quasar based on the default assembly name:
import “dotnet”
rule Quasar_AssemblyName
{
condition:
dotnet.assembly.name == “Client”
}
But why stop there? We can build a Yara rule to classify our malware dataset or repository:
import “dotnet”
import “console”
rule DotNet_Malware_Classifier
{
condition:
(dotnet.assembly.name == “Client” and console.log(“Likely Quasar, assembly name: ", dotnet.assembly.name)) or
(dotnet.assembly.name == “Product Design 1” and console.log("Likely Pure family, assembly name: ", dotnet.assembly.name)) or
(dotnet.assembly.name == “Sample Design 1” and console.log("Likely Pure family, assembly name: ", dotnet.assembly.name))
}
And we run this new Yara rule on the combined samples of the Pure family and Quasar:
| <img alt="A screenshot of a computer
Description automatically generated" height=“427” src=“https://lh7-us.googleusercontent.com/Cw6aCnyNBy3oWelYfXTq8-t4CLTthBcSKVobBOWWPzeW8R-TRszdXsPbM81RGn1utbRyL2KDZPLhH1KUNrI2COK1RjlknGjQoIVvV9WOc63EWvRzetd4XWhXNQfC4DAj470bgHHXVerA_PfKnn39BQ” width=“454” /> |
| Figure 19 - Simple “malware classifier” |
We can combine sets of Yara rules bases on assembly name, Typelib, MVID and so on to create rules with a higher confidence, and we can use this in further hunting, classification and… much more.
Bonus
If you’ve made it this far, it only makes sense to add in an additional extra use-case for all of this: finding new crypters or obfuscators!
When I ran the script on the +500 samples, there was 1 assembly / binary that stood out:
| <img alt="A cartoon of a bathtub
Description automatically generated" height=“45” src=“https://lh7-us.googleusercontent.com/ZbDh1R-g6qouAYQaHujAsnWZBrO5ML2Zpy3GOwnzeIugZQsScJLPnR98AI49qvHjD7j8oY036C4v3OIa8OUJmzW4_NAyrVfhULHhKCpWPr2A5LXBrQyvAaiEKi-CLmN28s4yczBN20-51vSTEcY8ew” width=“352” /> |
| Figure 20 - Potential new crypter “Cronos” |
Making a simple Yara rule again:
import “dotnet”
rule cronos_crypter
{
strings:
$cronos = “Cronos-Crypter” ascii wide nocase
condition:
dotnet.is_dotnet and $cronos
}
Running this on the Unpac.me dataset yields:
| <img alt="A screenshot of a computer
Description automatically generated" height=“171” src=“https://lh7-us.googleusercontent.com/_H6VGCsQItV1JcMozc34fU0_ri1quxwtG1fXdHbN0VNfqfw0LDNWaLXmNiOtPmzmt_8fzhR9xu548mPU5pZyRGqjBfCVsqL6y5yhJg93aKvrgIfVH22KCQM7aaceBSsZdJONce3RaVFMkRraJI9cuA” width=“602” /> |
| Figure 21 - Unpac.me Yara hunt results |
4 matches in 12 weeks: it appears this crypter is not popular (yet): 2 Async RAT samples and 2 PovertyStealer samples have used it so far.
Bonus on Bonus
Let’s go with a final bonus round: improving the previous “classification” rule by also reviewing results for Async RAT. Seeing the previous crypter was used on at least 2 Async RAT samples, I wanted to see some statistics for this malware as well, for just the assembly name. This results in:
| <img alt="A pie chart with different colored circles
Description automatically generated" height=“361” src=“https://lh7-us.googleusercontent.com/76e1uWaCFCQHEDfQSrUYvR4MLmxf9iCKB52grDM7fLgRvQh1oQkUfbuojqLhH5ZpU4VMSCSxksuHIUhZsGv6GK7t8NxcVGFnAH1K4gOokDJq4UFen-l1J5S2xi-OEYm8BnrPZcJ6vJnuzlt0IkJYOw” width=“602” /> |
| Figure 22 - Another pie chart: top used assembly names |
Jumping out are the following assembly names:
AsyncClient
Client Also seen in Quasar!
XClient
Output
Loader
Stub
AsyncClient is likely the default name when building the Async RAT project. But we are interested in widening the net: from the previous rule DotNet_Malware_Classifier, let’s update it with these new “generic” or default assembly names:
import “dotnet”
import “console”
rule DotNet_Malware_Classifier
{
condition:
(dotnet.assembly.name == “Client” and console.log("Suspicious assembly name: ", dotnet.assembly.name)) or
(dotnet.assembly.name == “Output” and console.log("Suspicious assembly name: ", dotnet.assembly.name)) or
(dotnet.assembly.name == “Loader” and console.log("Suspicious assembly name: ", dotnet.assembly.name)) or
(dotnet.assembly.name == “Stub” and console.log("Suspicious assembly name: ", dotnet.assembly.name))
}
| <img alt="A screenshot of a computer
Description automatically generated" height=“223” src=“https://lh7-us.googleusercontent.com/Iegxbg0L6Wuu3Wx-HApY-9BI7FIdrEcZo3CdIW410uIO4sZyMg-_0_HHlNYJmA89sTCc3nngmaSmN9U5Re3hAXpQ3I7F5ANn6mmN1EIQ0fGQtfYgyhe-xvxUzV5FRgThBGaBBAHLaruq2mns0leHWg” width=“580” /> |
| Figure 23 - Classifier Yara rule results |
Conclusion
In this blog post, two new tools were presented to extract metadata from .NET malware samples. Specifically, we can now reliably extract 2 unique GUIDs: the Typelib and the MVID.
The Python script is capable of extracting the desired data from a large set of .NET assemblies, whereas the Yara rule is tailored for use with one particular sample. Of course, either of them can be used interchangeably: you can still fine-tune the Yara rule for a large set and work this way if you don’t want to rely on an external script. Similarly, the script can be extended to extract more data to be used.
Based on the output of these tools, you can then create Yara hunting rules, combine it with your existing rule sets, or use them in an attempt to classify malware families or specific attack campaigns.
Some closing remarks:
GUIDs could be spoofed or even removed. No method is 100% reliable.
However, this method can enhance already existing rulesets, especially those where .NET obfuscators (e.g. SmartAssembly) obfuscate (user) strings, modules and more, making it harder to write Yara rules for a malware family. Detecting based on GUID however, can work regardless of obfuscation method.
That said, obfuscating or deobfuscating may also alter the GUIDs. Keep this in mind when creating your detection rules based on an original or unpacked/deobfuscated sample.
If you encounter a GUID comprised entirely of zeros, such as 00000000-0000-0000-0000-000000000000, avoid using it for hunting since it's an empty GUID, indicating the value may not be set or has been altered. This would make for a poor hunting rule as it can be a default value for any .NET project.
You can also this for .NET assemblies that are not malicious: extract developer information and other metadata per your use case or purpose.
Happy .NET hunting! You can find the tools and some of the example Yara rules in the repository: https://github.com/bartblaze/DotNet-MetaData
As always, feedback is welcomed.
Article Link: Blaze's Security Blog: Analyse, hunt and classify malware using .NET metadata