TL;DR: BOFHound can now parse Active Directory Certificate Services (AD CS) objects, manually queried from LDAP, for review and attack path mapping within BloodHound Community Edition (BHCE).
Background
My last BOFHound-related post covered the support and usage strategies for Beacon object files (BOFs) enabling the manual collection of data required for BloodHound’s AdminTo and HasSession edges, among others. This brief post will cover the addition of AD CS object parsing (shoutout to GitHub user P-aLu for collaborating on the update) and some queries to get you started.
But first, to clear up some misconceptions…
BOFHound is not a BOF!
Surprised and/or confused? Somewhat angry? Yes, this is the most common misconception I hear about the tool. BOFHound is not a BOF implementation of SharpHound; rather, it is a Python script that runs completely offline from your target network. I repeat — it is neither a BOF, nor a tool that actively enumerates a target Active Directory (AD) network. If this is not news to you, enlightened reader, consider skipping ahead to The Good Stuff.
So What Does BOFHound Do (and Why on Earth Did You Name It That)?
BOFHound was born from repeated red team engagements in a large AD network where the blue team would flag SharpHound and other “loud” methods of LDAP enumeration. (In this environment, “loud” meant an expensive LDAP query — a query that returned a number of results over a threshold the client had determined to be indicative of attacker reconnaissance.) The team I worked with at the time adjusted by primarily relying on the ldapsearch BOF, part of TrustedSec’s situational awareness collection, for LDAP reconnaissance. This had two main benefits:
- It grants the operator full control over the LDAP query filter, meaning discretion can be used to avoid static query strings tied to common offensive tools and leveraged in detections [1, 2]
- The operator can specify a limit on the result count, so that the query returns no more than N entries; this is helpful when consciously avoiding expensive queries (result pools can also be narrowed with search scope, targeted query filters, or through a search base)
Here are some downsides to solely relying on this approach for LDAP enumeration:
- Queries only return text-based results (i.e., there is no visualization or BloodHound-like graph that many operators prefer)
- Identifying ACL abuses is essentially impossible with this approach alone
- Trying to keep track of and organize relationships between objects, like group memberships (let alone nested memberships), by hand in text/Excel files is difficult
The bigger the target environment is, the more these problems are amplified. These also all sound like problems that BloodHound was originally created to solve. Is there any way we could maintain the granular control the ldapsearch BOF offers us over enumeration and still be able to use BloodHound?
Enter BOFHound. It aims to serve this very niche need by reading LDAP objects from your ldapsearch results in C2 logs, processing them, and producing BloodHound JSON files.
Thus the name BOFHound — read output from the ldapsearch BOF in log files and make it BloodHound-usable. LogHound just doesn’t have the same ring to it, does it?
This allows for ACL relationships to be parsed (from base64 encoded nTSecurityDescriptor attributes) and for your operators to continue visualizing nodes and relationships in the BloodHound UI where they are happy.
Now you might be wondering “BloodHound collects all data [that we frequently care for] in an AD environment, so how can this work with partial data obtained from manual queries?” Well, it’s simple; the BloodHound UI will only show you what you have enumerated via manual queries and parsed with BOFHound. In other words, it will be incomplete data and, if you’re using this approach, you’re likely fine with that. We can target specific information we want to populate the graph with, such as objects related to our objectives, objects that have privileges we want to compromise, or objects that often make easy targets (i.e., AD CS, SCCM).
But BloodHound will actually show you a little more than only what you’ve queried. Object ACLs return references (SIDs) to other objects in the environment that are granted some permission over the object you queried. When you parse these ACLs without an object tied to the SID, they are represented in the graph by nodes with SIDs for names or question mark icons. For example, if I query only the domain object, run it through BOFHound, upload the result to BloodHound, and check the Inbound Object Control on the domain object, we’ll see this.
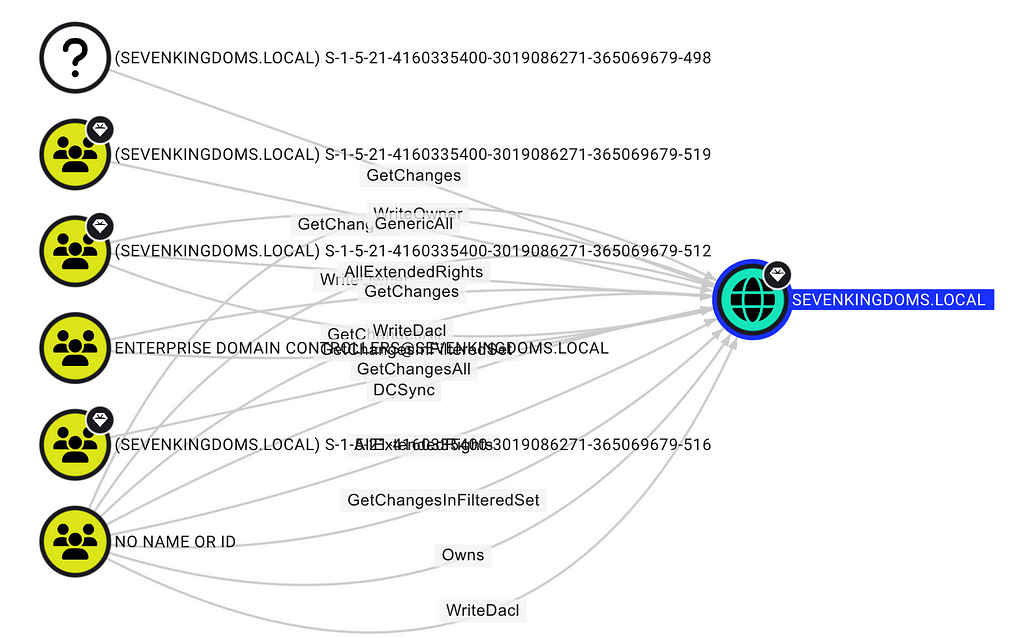 Parsing Single Object Reveals the Presence of Many More
I’ve only queried the domain object, but I also now know that these six other objects exist. Knowing their SIDs provides a means to query those objects that might be of interest. As I query them and rerun BOFHound, we can slowly fill in that picture and expand it, essentially providing a way to identify objects of interest, and work backwards from them.
The Fog of War
A while back, I was talking with Jared Atkinson about BOFHound and these very misconceptions when he made a very apt analogy: clearing the fog of war. In games like Civilization or Age of Empires, you start surrounded by the “fog of war,” representing the world you know exists, but otherwise know nothing about. As you scout around, you reveal more of the map, pushing back the fog of war, and gaining more information about the game’s world.
An unsophisticated player may just send their scouts out to chart the entire map as fast as possible. This could end up being advantageous, but it could also backfire by increasing the probability of encounters the player is unprepared for (i.e., a hostile faction). A sophisticated player may choose to scout areas as it’s advantageous to them, or when they’re prepared to deal with potentially hostile discoveries.
 Brb, Building a Scout
As a prospective BOFHound user, the fog of war is the great unknown AD environment: objects, relationships, attack paths, etc. Immediately trying to chart the entire map is like trying query every AD object at once (i.e., (objectClass=*), running SharpHound); very beneficial data to have if successful, but you’re at high risk of revealing your presence to the hostile blue team. BOFHound is supposed to aid you in taking the careful, “sophisticated player” approach. Each time you manually run a batch of LDAP queries and parse/process with BOFHound, you clear a bit more of the fog and incrementally learn more about the environment you’re in. It is an iterative process (query → parse → query, etc.) until you feel you have sufficient information to take additional action or move on.
I think it goes without saying, but this approach is quite niche. If you do not care about being detected performing LDAP reconnaissance or know/think an alert will not fire for something like running SharpHound or ADExplorer, then you should run them. Having a more complete dataset will always allow you to spend your time more efficiently. I use this methodology described with BOFHound a handful of times a year, when I care about being stealthy; you really have no need for this in your playbook otherwise.
I hope this detour helped clear up some of the self-inflicted misconceptions around BOFHound’s purpose, intended usage, and name. This took up way more space than I initially intended (and became a bit rant-y), but now we can get into the AD CS updates.
The Good Stuff
In addition to the AD CS support, I recently added parsing support for Havoc log files. The rest of this blog will use the ldapsearch BOF via Havoc to demo one method of AD CS enumeration. While you’re probably not rolling out Havoc on your red team assessments, I realized only supporting log parsing for commercial C2s might otherwise turn users away from testing BOFHound in a lab. Havoc ships with an outdated version (as of 10/22/2024) of the ldapsearch BOF (needs updated for AD CS querying), but that can be easily remedied by copying the latest BOFs over to havoc/client/Modules/SituationalAwareness/ObjectFiles/and updating the ldapsearch_parse_params() function within hacov/client/Moduels/SituationalAwareness/SituationalAwareness.pyto the definition in this gist.
On past assessments, I’ve typically leveraged one of the various adcs_enum BOFs included in situational awareness collection for AD CS enumeration and config analysis. These work great and I’ve used them to identify vulnerable templates and AD CS ESC paths during real-world engagements. Why bother switching enumeration playbooks? Manually analyzing a wall of certificate config text can work, but it can also be error prone, especially when it comes to trying to unroll group memberships for permissions like enrollment rights.
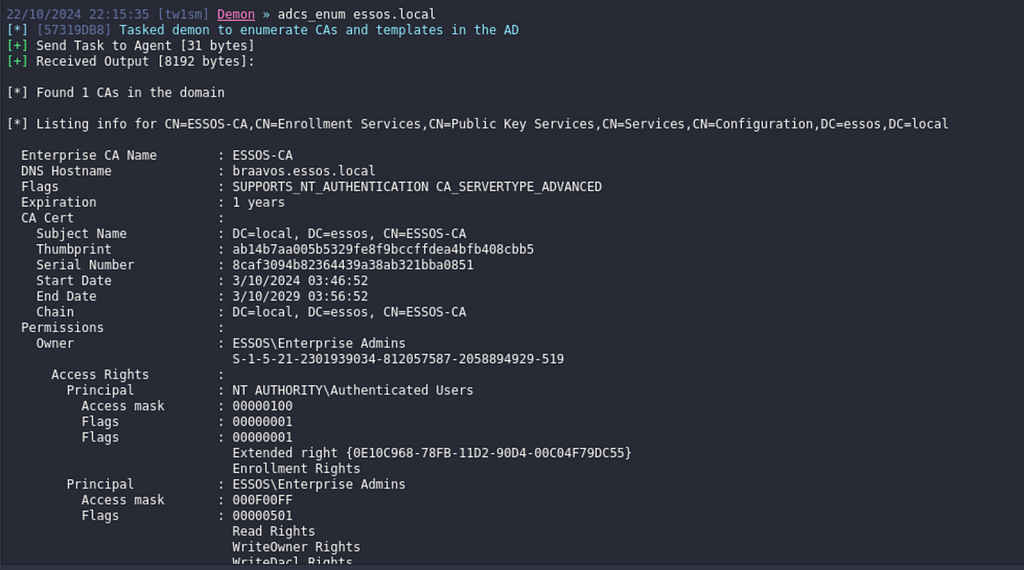 Trusty Old Text Wall of Certificate Configs
While it’s still all too common to find paths like ESC1 with groups such as Domain Users, Domain Computers, and Authenticated Users jumping out when checking enrollment rights, unrolling nested rights (like the path below) isn’t always so straightforward when reviewing these config dumps.
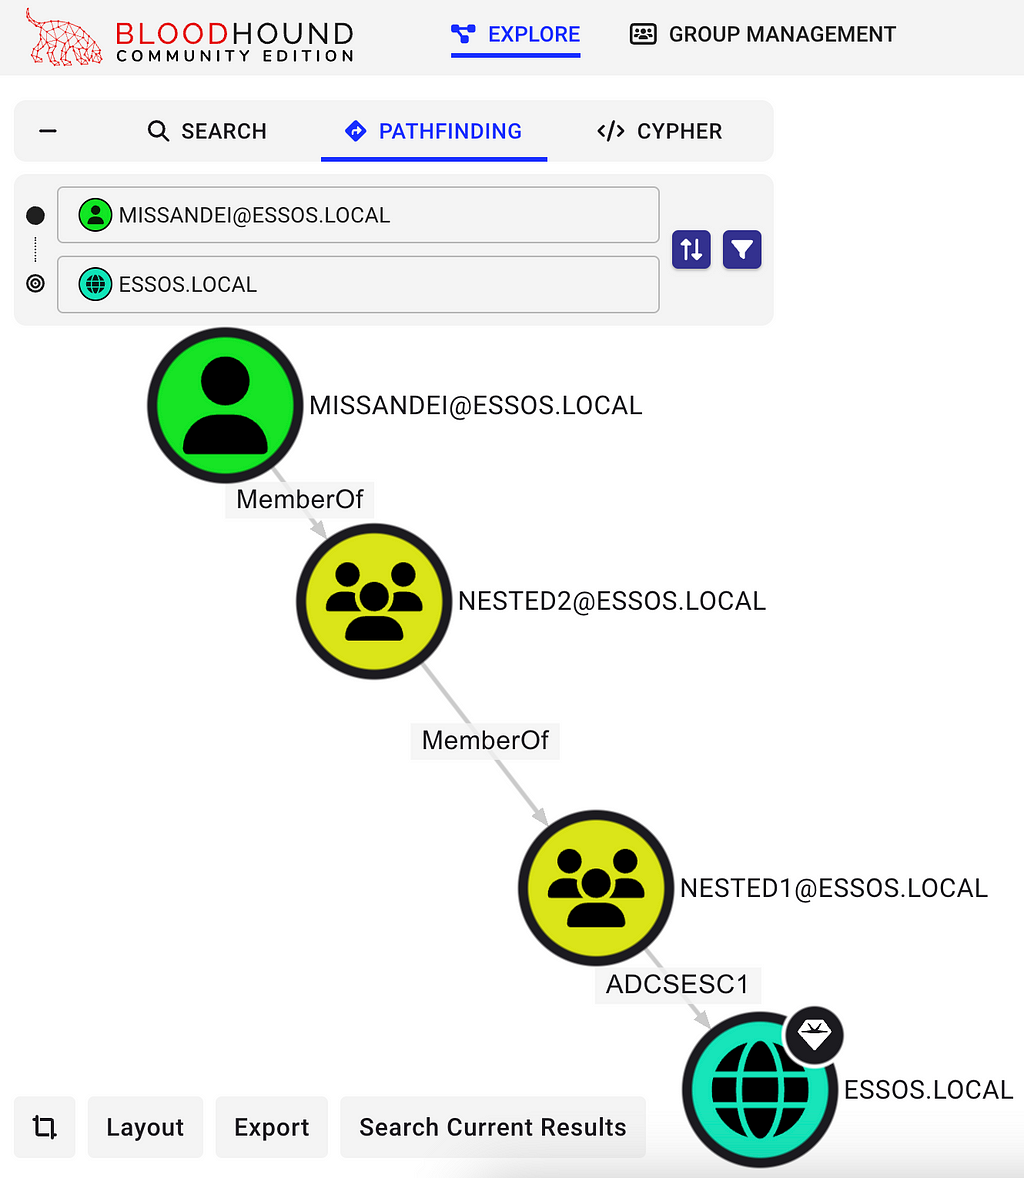 ESC1 Path Through Nested Group Membership
The question the remainder of the blog tries to answer — can we piece together this same picture without burning the red team by running SharpHound? My coworker Jonas Bülow Knudsen released a very informative blog about AD CS attack paths in BloodHound when they were introduced and his blog details the types of LDAP objects relied upon for mapping AD CS relationships. In short, there are six “new” types of objects we care about:
- Enterprise CAs
- AIACAs
- Root CAs
- NTAuth Stores
- Certificate Templates
- Issuance Policies
If we query these objects (and the domain object), we can graph out the attack paths. There’s no “right” way to do this with ldapsearch, but a basic approach is a sequence of queries based on object class. All the target objects are nested in the Configuration naming context — technically we could query them all at once with (objectClass=*)and a search base of CN=Cofiguration,DC=domain,DC=local. However, if you’re interested in this manual approach in the first place, you may not be interested in that sort of wide-ranging query .
Here’s a sample query transcript to get you started:
# Query the domain object
ldapsearch (objectclass=domain) *,ntsecuritydescriptor

# Query Enterprise CAs
ldapsearch (objectclass=pKIEnrollmentService) *,ntsecuritydescriptor 0 3 "" "CN=Configuration,DC=domain,DC=local"

# Query AIACAs, Root CAs and NTAuth Stores
ldapsearch (objectclass=certificationAuthority) *,ntsecuritydescriptor 0 3 "" "CN=Configuration,DC=domain,DC=local"

# Query Certificate Templates
ldapsearch (objectclass=pKICertificateTemplate) *,ntsecuritydescriptor 0 3 "" "CN=Configuration,DC=domain,DC=local"

# Query Issuance Policies
ldapsearch (objectclass=msPKI-Enterprise-Oid) *,ntsecuritydescriptor 0 3 "" "CN=Configuration,DC=domain,DC=local"
If you’re new to the ldapsearch BOF (or even just its recent argument updates), here’s a quick breakdown of its positional arguments. Consider this query from the examples: ldapsearch (objectclass=pKIEnrollmentService) *,ntsecuritydescriptor 0 3 "" "CN=Configuration,DC=essos,DC=local" — what does this mean?
<a href="https://medium.com/media/095f6961612f6b8e24622c1c90fbdbeb/href">https://medium.com/media/095f6961612f6b8e24622c1c90fbdbeb/href</a>Here’s an example of one transcript query performed with the ldapsearch BOF via Havoc. I’m doing this enumeration across a domain trust in my lab (GOAD, from sevenkingdoms.local to essos.local), hence the explicit definition of domain controller to query and search base (even for objects in the default naming context).
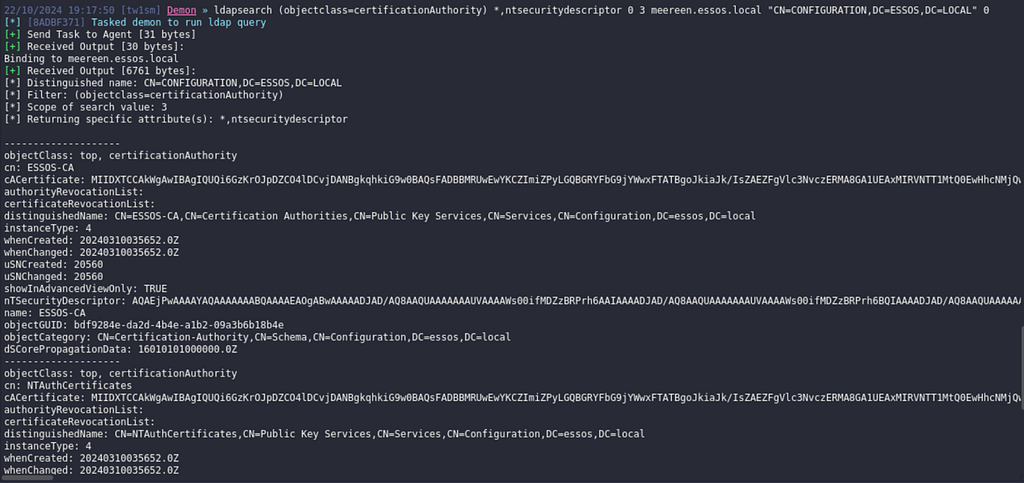 Query for AIACAs, NTAuth Stores, and Root CAs
After running each of the queries in the sample transcript, we can parse that minimal dataset from the Havoc loot logs with BOFHound.
bofhound -i /opt/havoc/data/loot --parser havoc --zip
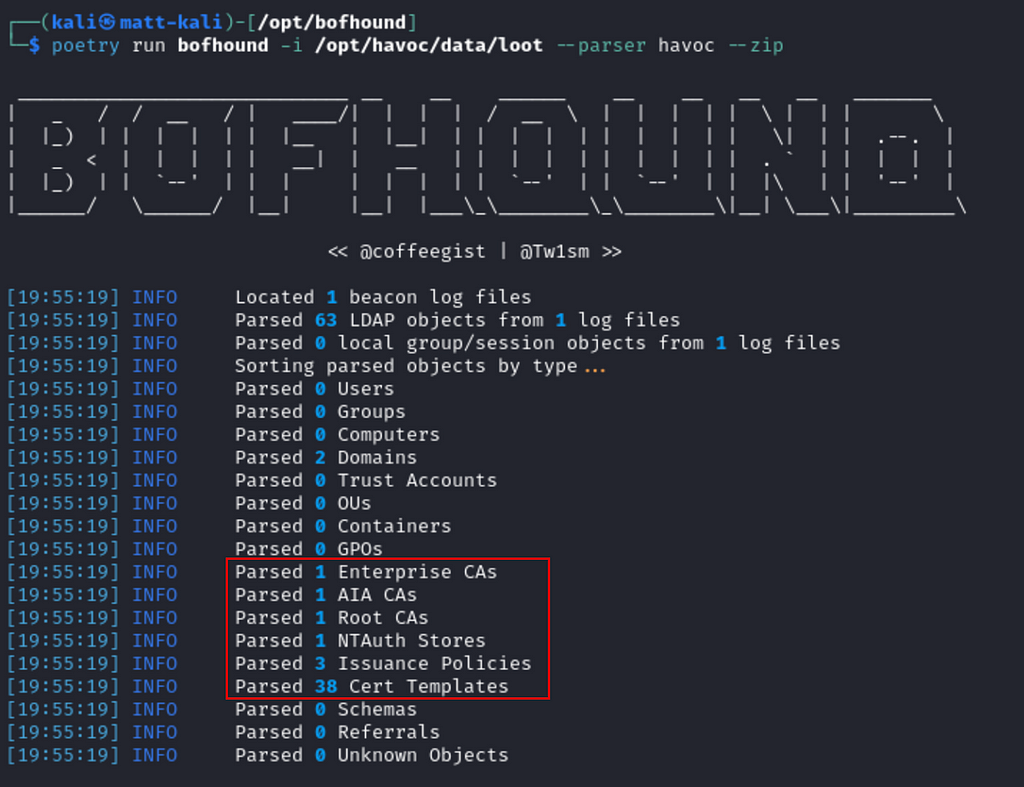 BOFHound Parsing the Log Data
After the data has been parsed, we can load up BHCE and upload the output archive.
curl -L https://ghst.ly/getbhce > docker-compose.yml
sudo docker compose pull
sudo docker compose up
In the UI, we can use some of the prebuilt queries to help us find common misconfigurations and escalation paths. I’ll start with the prebuilt Enrollment rights on ESC1 certificate templates query, which will limit the templates I view to just those that meet ESC1 requirements.
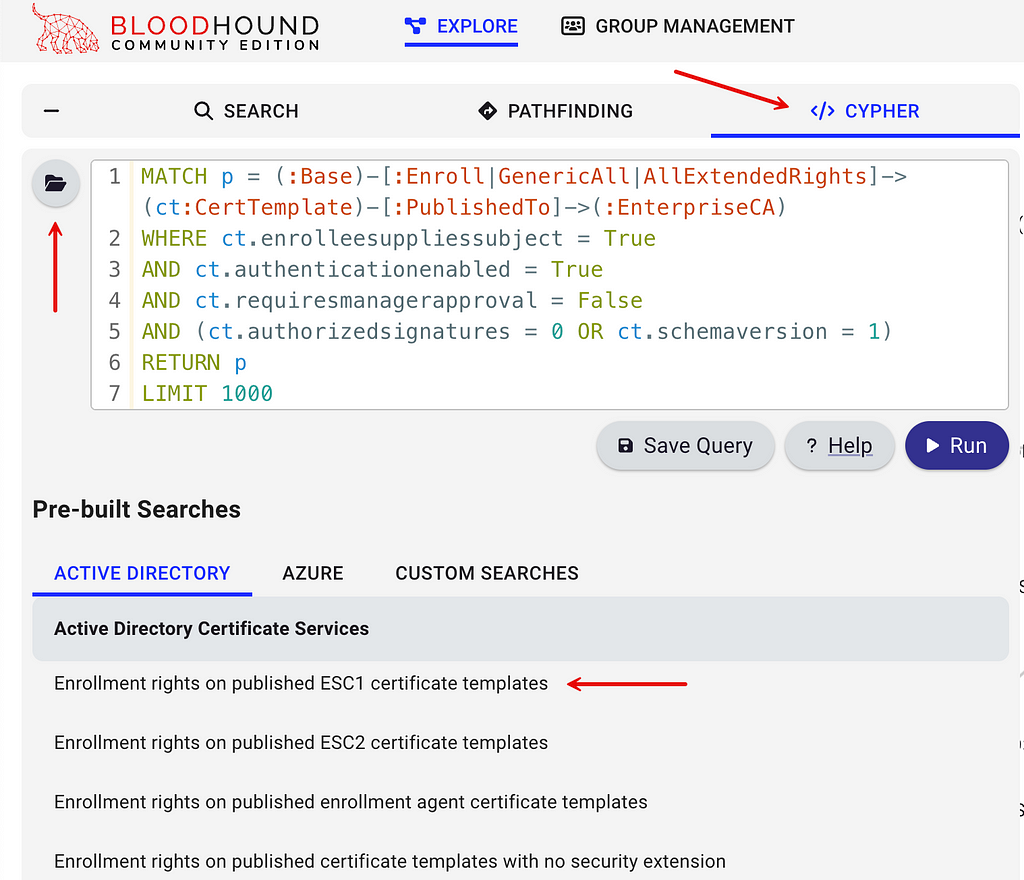 Prebuilt AD CS Queries
Here’s what those results look like with the objects we queried in the lab. We know the SIDs ending in 519 and 512 are Enterprise Admins and Domain Admins, but we’ve got an unknown object with a resource ID (RID) of “1602”.
 The “Fog of War” — Unknown Objects in the Graph
If we issue an LDAP query for that mystery SID, we can determine that it’s a group (think back to the original attack path screenshot we’re working towards).
ldapsearch (objectSid=S-1–5–21–2301939034–812057587–2058894929–1602) *,ntsecuritydescriptor
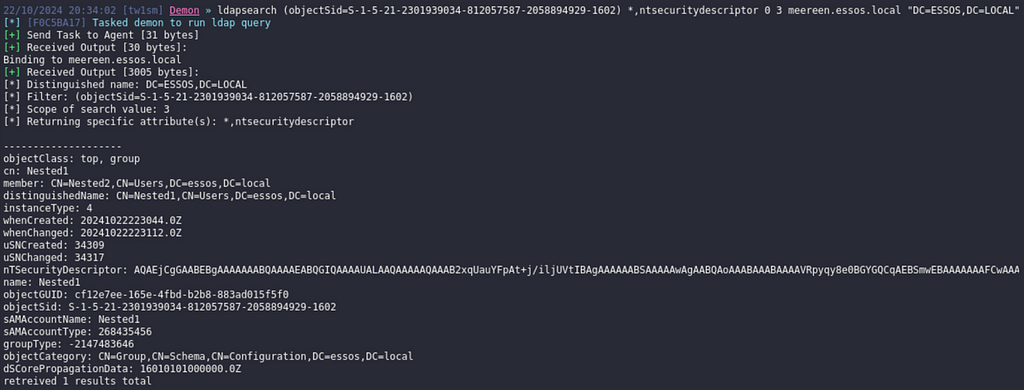 Query the Unknown BloodHound Node
That returned properties for the group granted enrollment rights, including its distinguished name, which we can use to unroll the group members.
 Just One More Turn
To unroll the group’s members (return first and Nth degree members) we can take the group’s distinguished name and issue an LDAP query using the LDAP_MATCHING_RULE_TRANSITIVE_EVAL matching rule.
ldapsearch (memberOf:1.2.840.113556.1.4.1941:=CN=Nested1,CN=Users,DC=essos,DC=local) *,ntsecuritydescriptor
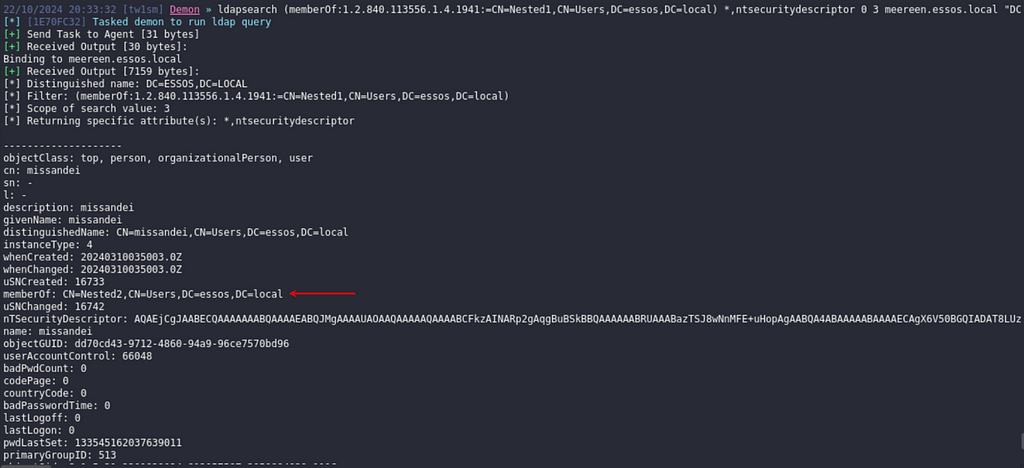 Unroll Group Membership
That query returns two results in the lab, though only one can be seen in the screenshot. However, if you look closely at the user object returned, you’ll notice the memberOf attribute doesn’t contain the Nested1 group from our query filter (meaning the object must be a Nth degree member).
Now we rerun BOFHound, same as we did before.
bofhound -i /opt/havoc/data/loot --parser havoc --zip
After we ingest the data again, rerunning the same ESC1 enrollment rights query shows the previously unknown SID with enrollment rights belonged to the Nested1 group.
 Slowly Clearing the Fog of War
This prebuilt query doesn’t unroll the group members, though. If we click the [email protected] object to bring up the properties pane on the right side, we can click the Inbound Object Control section to unroll enrollment rights (and potentially other ACL-based abuses).
 The Unrolled Enrollment Rights Leading to ESC1
This reveals the path we initially examined, showing a way to perform ESC1 through nested enrollment rights. Should we return to BloodHound’s pathfinding tab and search for paths starting at [email protected] and ending at ESSOS.LOCAL, we now have all the data necessary to map the attack path shown at the beginning of this section (if you’re following along in GOAD, your pathfinding might surface a shorter ASCSESC3 path that you have to filter out).
 Assessment Debrief
BloodHound currently supports edges for ESC1, ESC3, ESC4 and ESC13. You can quickly query any escalation path abusing one of them with:
MATCH p=()-[:ADCSESC1|ADCSESC3|ADCSESC4|ADCSESC13]->()
RETURN p
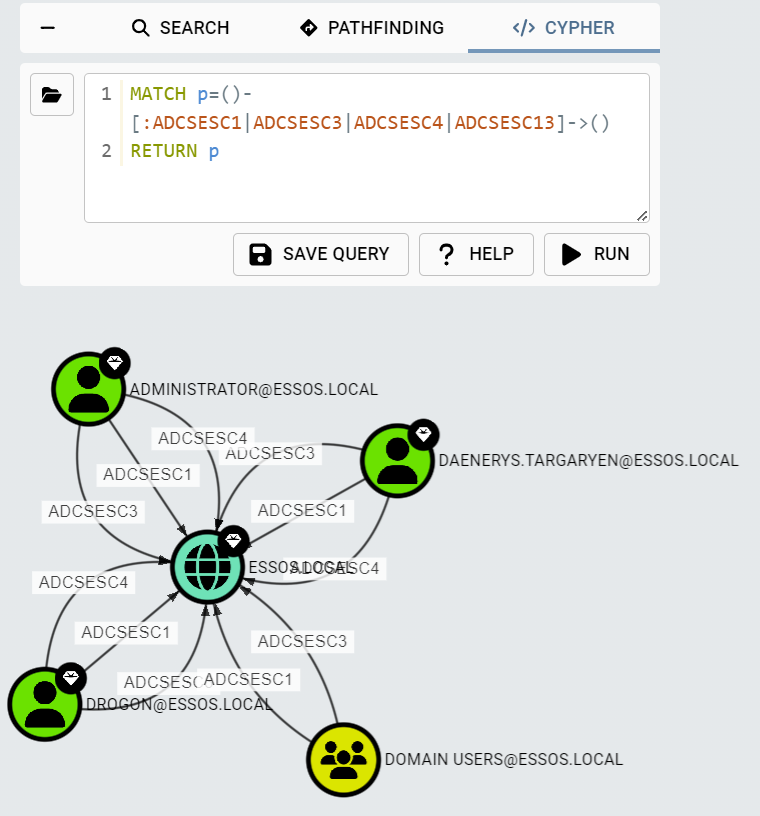 ADCSESC1, ADCSESC3, ADCSESC4 Edges from GOAD “Misconfigurations”
Is Anything Missing?
The ManageCA and ManageCertificates edges from BloodHound are not currently implemented in BOFHound. These relationships require reading values from the registry on CAs, which would require some other “collector” and parser (something akin to how BOFHound supports AdminTo and HasSession edges). These relationships are not currently relied on for any ESC attacks that BHCE supports, but will be if or when BloodHound gains ESC7 support.
Conclusion
This post served to clear up some common misconceptions about BOFHound, introduce the ability to parse AD CS objects, and provide a starting point for querying relevant LDAP objects. I hope that the added support for Havoc makes it easier to follow along with this post in a lab and give BOFHound a try. If you encounter any bugs, please feel free to open an issue on GitHub or shoot me a message in the BloodHoundGang Slack (@Tw1sm).
BOFHound: AD CS Integration was originally published in Posts By SpecterOps Team Members on Medium, where people are continuing the conversation by highlighting and responding to this story.