Introduction
We are all set to start with monitoring and analysis of communication between the application and the server. After we complete the setup of traffic analysis, we can no longer wait to start with this. Refer to the previous article for help in setting up Burp Suite.Brief about HTTP
HTTP is the language of the Internet. Just as we communicate to people, an iOS application communicates to the application server. The simple difference being that one can only ask questions (requests) and the other can only respond to those questions (requests). All this communication has to be done on a mutually agreed language (HTTP). Let us come directly to what we mean by request and response.

Source: http://www.steves-internet-guide.com/http-basics/
The above image shows the typical format of an HTTP Request which an application sends to the server and the response it receives in return. The response is analysed by the application and the needful behaviour shows the content to the user on UI.
For learning about the basics of HTTP, refer to http://www.ntu.edu.sg/home/ehchua/programming/webprogramming/HTTP_Basics.html.
Typical workflow of a mobile application
Every other mobile application these days follow a workflow as mentioned below:- Pre-login screens - These may include information such as search page, about page, contact page, signup page and so on.
- Login screens - An application may avail a user any number or type of procedures for login. The most common login procedures use mobile number, email address or a user id and combine it with a single sign on password, OTP or any other parameter to identify a user.
- Application Functionality - This includes the main functionality offered by the application to its end users. It may relate to transactions, social networking, e-commerce and so on.
- Logout Functionality - An application may also offer an optional logout or a similar functionality to end a user’s session on mobile.
- Recovery Functionality - This functionality is also optional to the developer. It might be labelled as forgot password or any other similar name.
Identifying the request and response parameters
Once we get an understanding of workflow of the target application, we can push ourselves forward to open the secrets behind the workflow of the application. By ‘secrets’ we mean the inputs and outputs to the requests that make the functionality possible. In technical terms, these ‘secrets’ are known as parameters. So we have request parameters and response parameters.Typical request parameters may be one of the following:
- PATH parameters: They are present in the URL itself. Consider the below request line.
GET /api/profile/users/2 HTTP/1.1Here ‘2’ is a PATH parameter.
- QUERY parameters: They are sent with the URL of the server’s resource requested. All the keys after the ‘?’ and before ‘HTTP/1.1’ separated by ‘&’ are the GET parameters.
- HEADER parameters: They are sent along with the other HTTP headers. They may include cookies or any other custom headers.
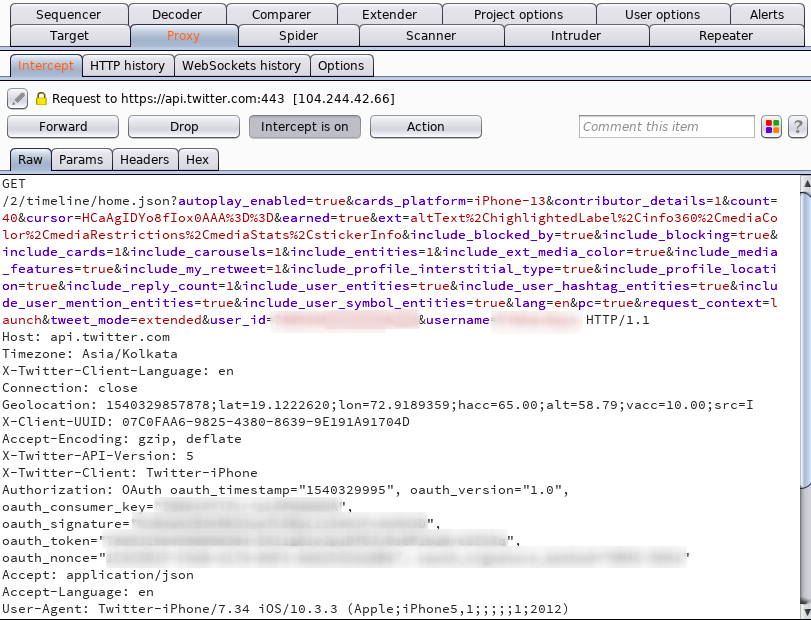
In the above request, we can see the QUERY and HEADER parameters. Query parameters include ‘username’, ‘user_id’ etc. and Header parameters include ‘oauth_consumer_key’, ‘oauth_token’ etc.
BODY parameters: They are sent in the body of the request. They vary depending on the content type set in the request parameters.
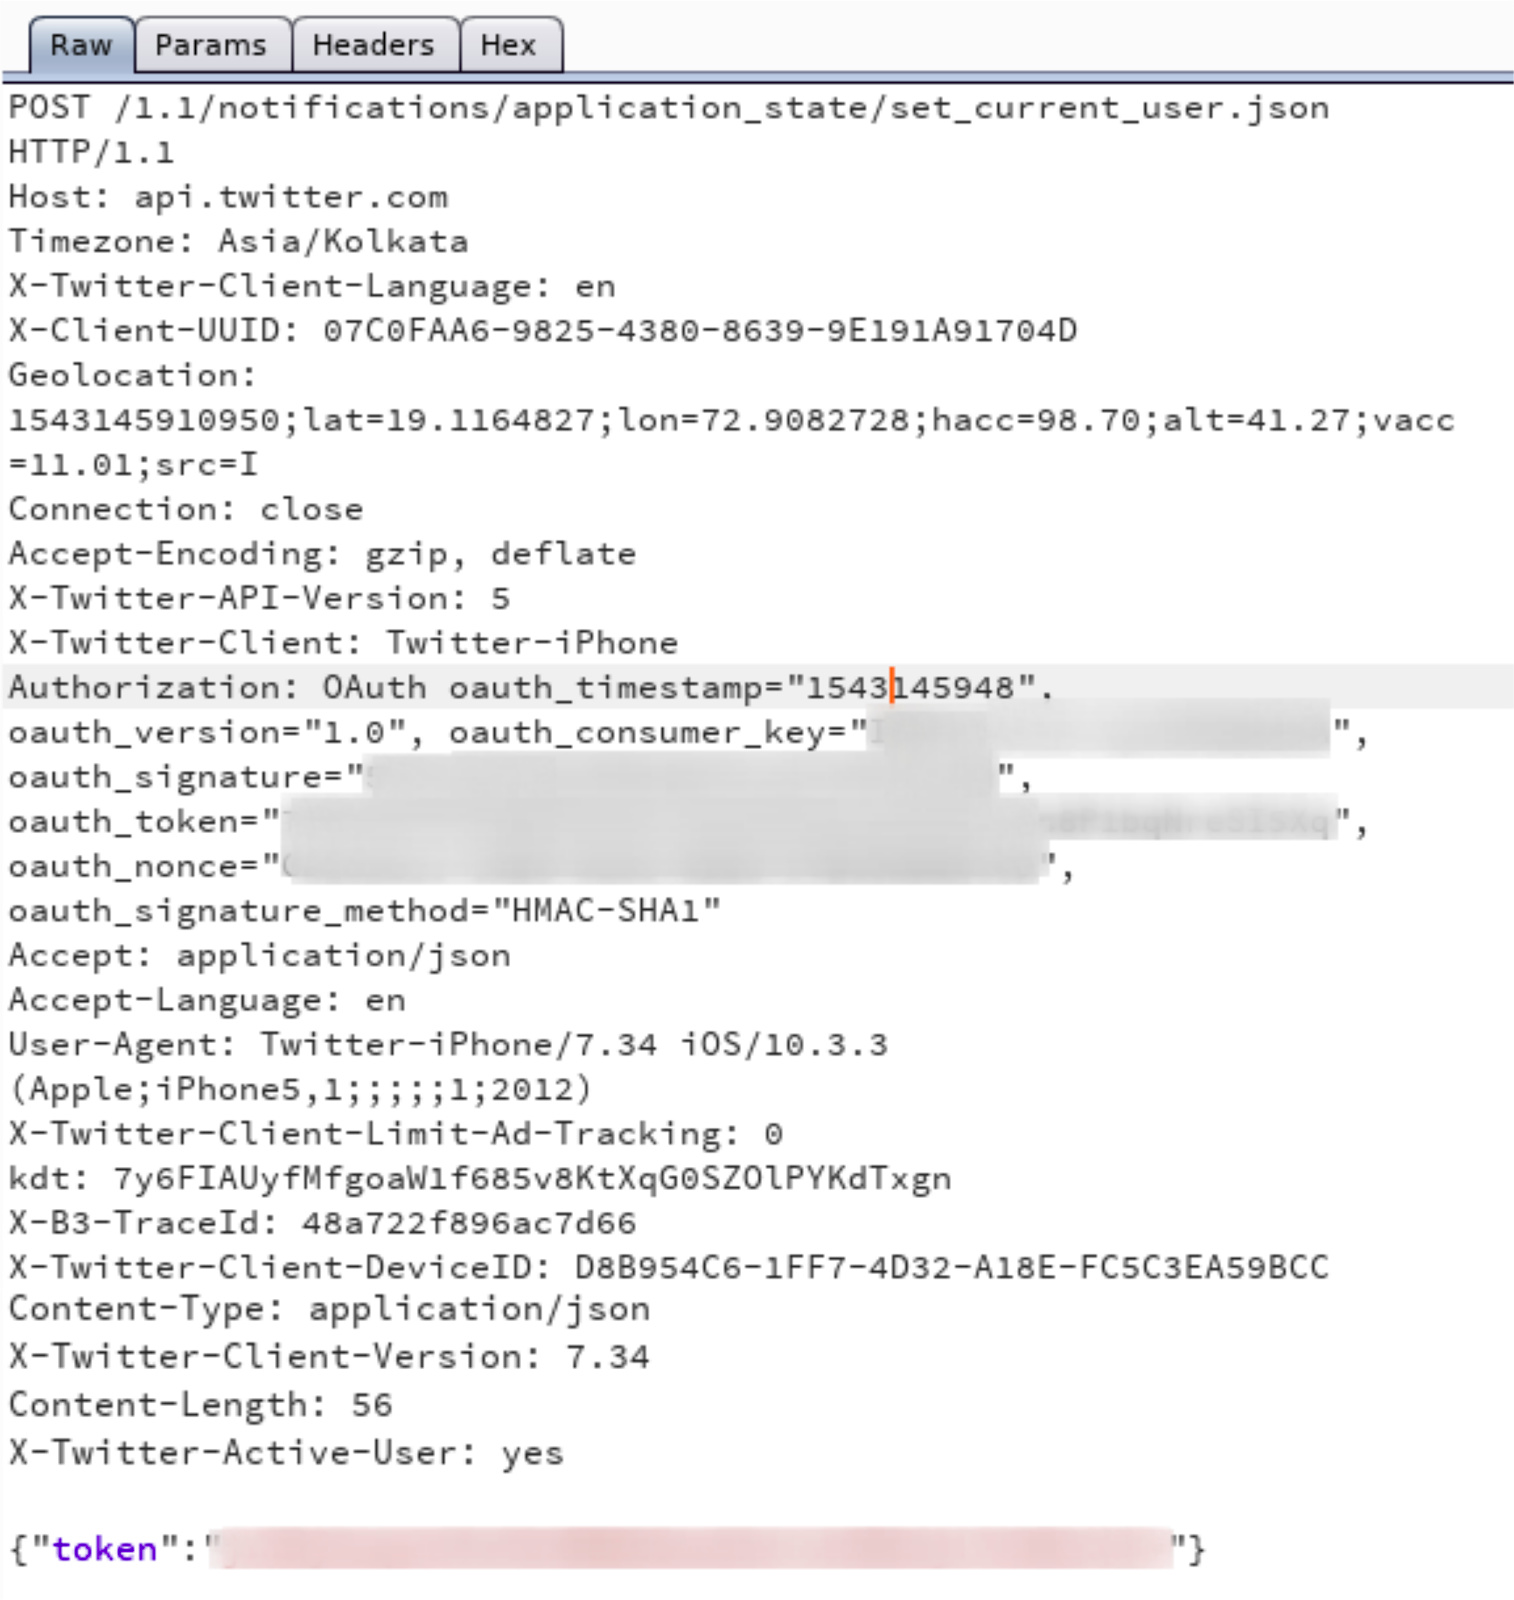
In the above request, ‘token’ is a json-encoded BODY parameter.
What attackers do is nothing beyond the understanding of HTTP and the parameters. They modify the request or response parameters in a way that can alter the functionality of the application according to their requirement and succeed if there is a vulnerability.
Developing a methodology for testing
 Security Professionals tend to develop their own methodologies for testing. Most of the used methodologies use the following strategies:
- GET- This is the exploration phase of traffic analysis. We explore the application, fetch the requests and map them to the purpose they are being used for.
- TEST- In this, we take on a single request and test it on all its insertion points i.e. the parameters. We perform repetitive analysis on the suspected parameters to find out vulnerabilities in that URL-parameter combination.
- ATTACK- Here we make use of an automated tool to try a set of payloads against the suspected parameters of a request.
- BUILD- In some cases, we may want to trigger a behavior by making use of two or more requests consecutively. Also, sometimes we may require help in creating a request or tampering some response in a way that takes time to be done manually. In these cases, we take the help of scripts written in programming languages like Python, Ruby, Java etc. or their integration with Burp (known as Burp Extenders).
- BREAK- We may want to test out some payload and see how the application behaves. So we inject our payload into a live request and observe the behavior of its response on our device.
Copying the requests/responses to the right tool
Interaction between the Burp’s tools is so good that it is very easy and efficient to make the requests flow between tools. The options provided by Burp enable us to use the tools very easily so that we perform the testing without having much trouble. Let us create some scenarios.Repeater test
Testing on Repeater tool is required when:- We want to test a suspect parameter manually and repeatedly find out how the server responds to those payloads.
- We want to test some request before actually forwarding its response to the device
- Repeater is a very useful tool when you want your tests to persist in the Burp’s project and be available for testing again when you reopen the project.

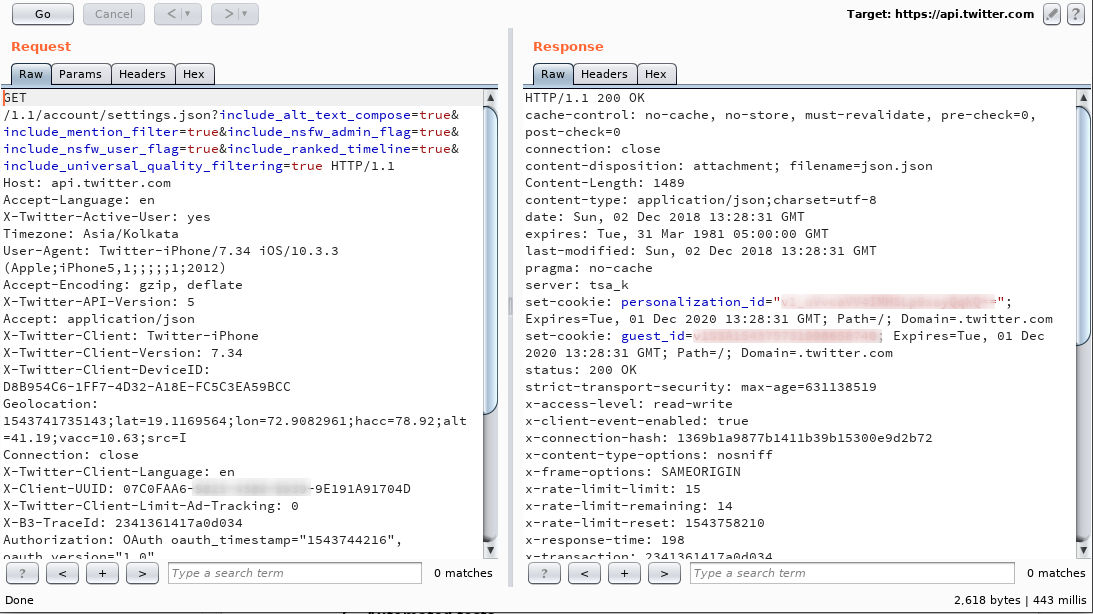
We observe some QUERY Parameters that we would like to test upon to observe the server’s response and the time elapsed before receiving the response. For doing this, we simply send the request to the repeater as shown here.

The request can then be manipulated and played with in the Repeater tool as shown.
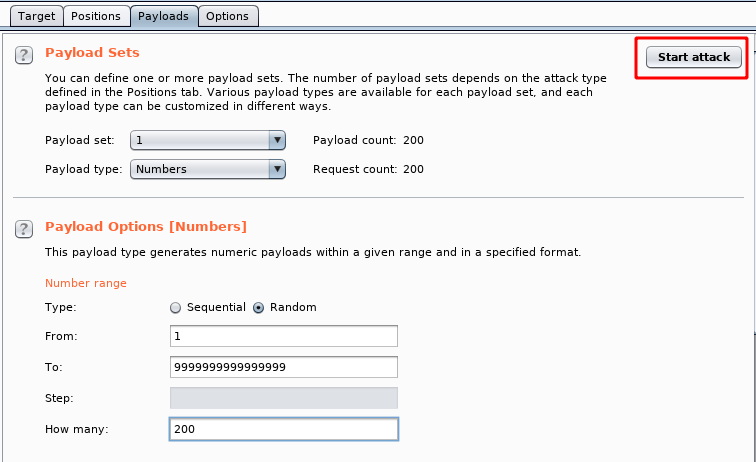
Intruder test
Testing on the Intruder tool is required when:- The server’s response on a fairly large payload list iced on a request is required to be observed.
- Enumeration or Brute Force is to be checked for Proof of Concept.
- Lack of Request Limiters is to be tested.
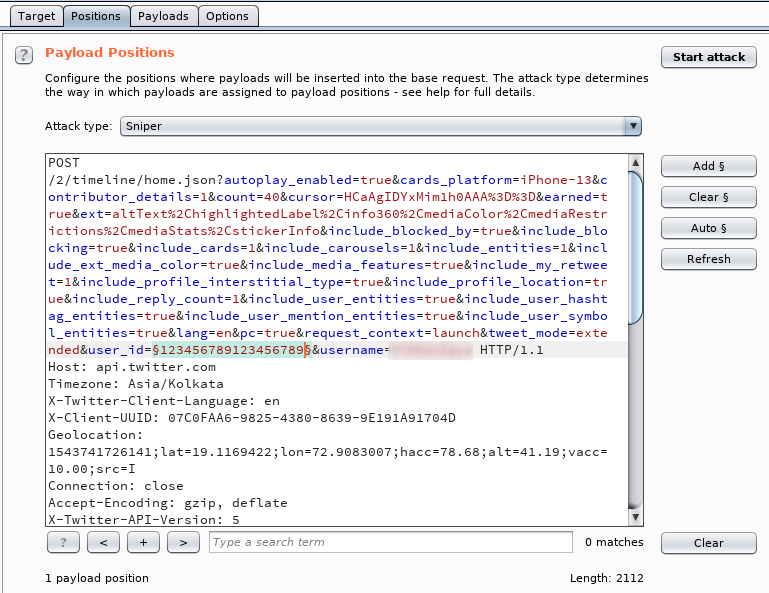
We would send that request to Intruder, configure it according to our requirement and start the attack as shown here.

Then comes our job to analyse the responses using the provided filters.
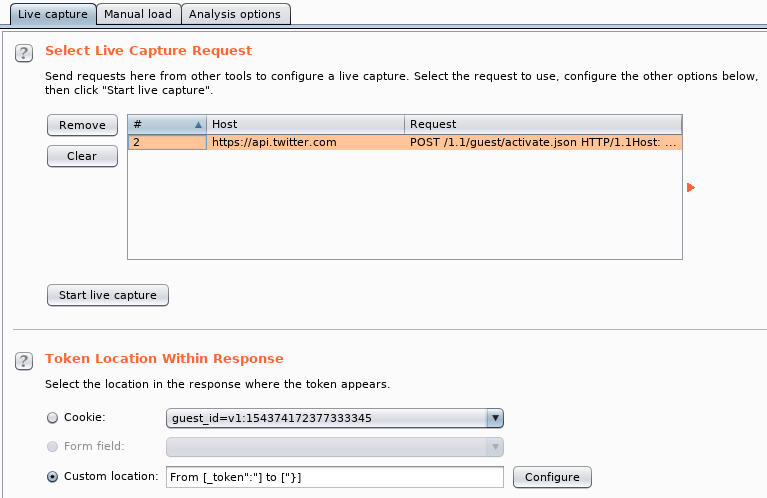
Sequencer test
The Sequencer is used to verify the randomness of parameter values and also provide a proof of the same. A request can be sent to Sequencer as shown.
Then you can provide the tokens manually or auto-generate them by specifying their occurrence as shown here.
There is nothing left for us except to observe Burp’s report for our input.
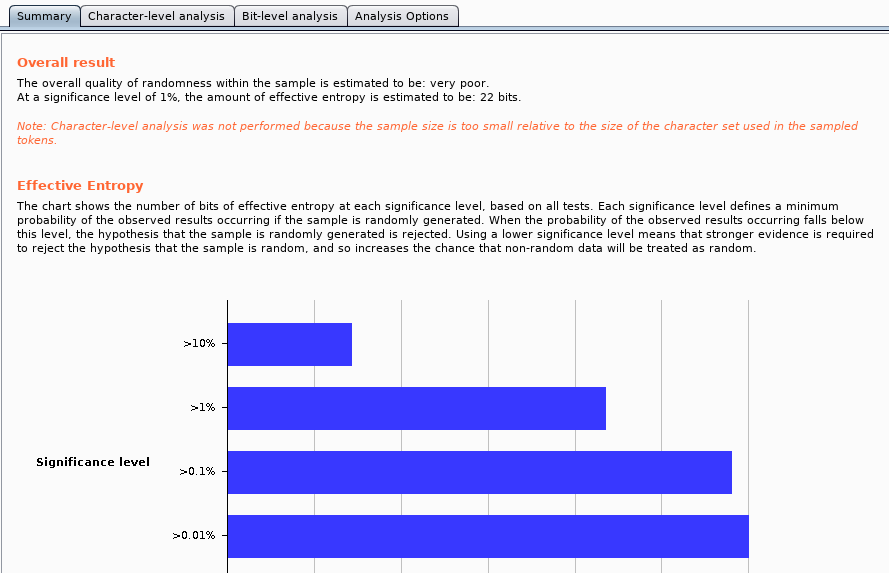
Note: The tested instance was deliberately chosen to have weak randomness.
Comparer test
As the name suggests, the Comparer tool is meant to compare (perform a visual “diff” on) any two items of data. The most common uses of this tool are:- Looking for subtle differences in the responses from requests with different payloads on the parameters.
- Comparing two responses of different lengths from Intruder’s attack.
- Comparing sitemaps of users with different roles.
Other Automated tests
The remaining automated tests are performed using the tools Spider and Scanner.- Spider is used for crawling the host and looking for any URL which is not directly accessible but is mentioned in some response/request.
- Scanner is used for scanning the requests Actively or Passively and reporting any possible vulnerabilities in them. Scanner lists out the vulnerabilities for the requests based on the definitions of the Burp’s version in use.
Conclusion
In this article, we have learnt about Requests and Responses involved while performing traffic analysis on an iOS Application. We can now identify the parameters in the requests and responses. Next, we would be starting with installation and use of some common tools involved in static analysis.Article Link: https://blog.lucideus.com/2019/04/ios-application-security-part-9.html