
The Hancitor malware, first observed in 2015, is a downloader known to deliver several other malware. In its first years, Hancitor was observed delivering information stealers such as Pony or Vawtrak, and in recent years, Ficker stealer and NetSupport RAT.
In 2021, Hancitor was observed delivering the Cobalt-Strike attack framework when its discovered an active directory environment. In addition, after deploying the Cobalt-Strike framework, the operators have been observed sending ransomware to the infected machine, most notably Cuba ransomware.
Adding Cobalt-Strike to its arsenal, and the growing fear of being extorted by ransomware has increased dramatically the potential risk of getting hit by Hancitor.
Today, once a security team suspects a Hancitor intrusion, it needs to act fast.
One of the quick action security team should do is to be aware of the new wave of indicators of compromised (IOCs) that are related to the Hancitor’s C2, this is done for two reasons:
- Add the relevant IOCs into their security products so any new connection will not be allowed.
- Verify that the IOCs are related to Hancitor.
In this tutorial, I will present the logic behind Hancitor’s config extraction, and display three methods to extract the C2 domains:
- Dynamically using x32dbg.
- Statically using Cyberchef.
- Statically using python script (I’ll work with pycharm).
The sample we’ll work on is the following:
SHA1 - 30c1df818dbd511dcff4d5a2ca8d66ea53e12941
Note, this is the unpacked Hancitor malware, in the wild, Hancitor comes packed with a custom crypter.
Hancitor sample metadata in PEstudio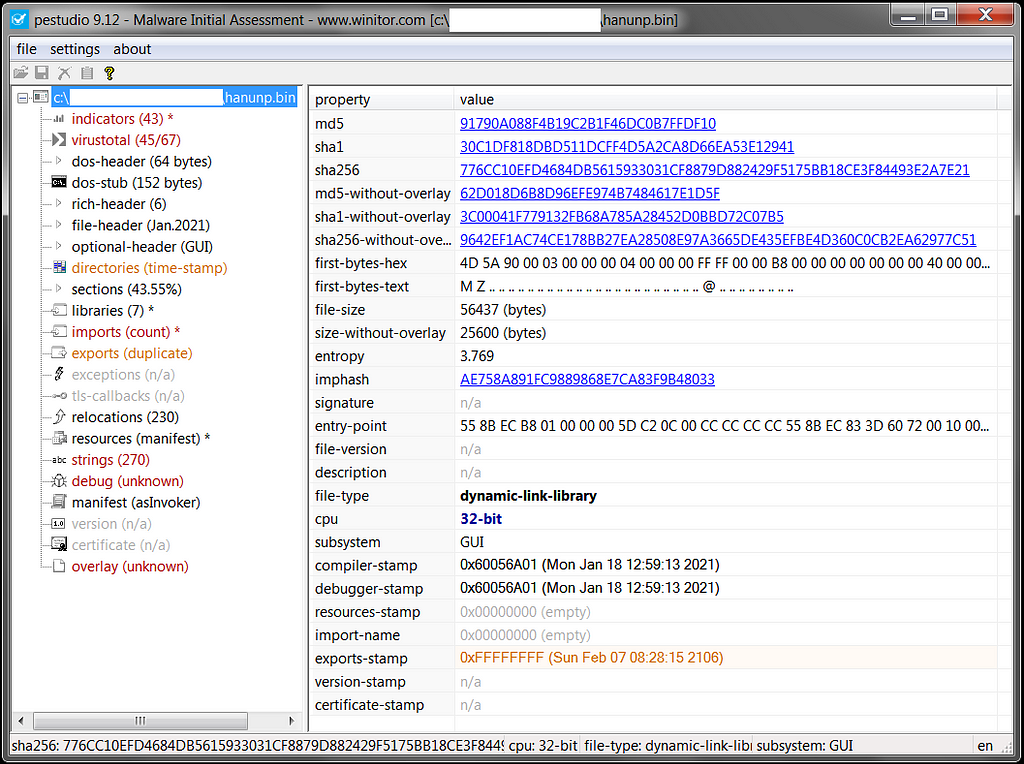
Configs in malware and how to hunt them
Before we start, we first need to understand how config extractions and Hancitor in particular works. To do so, we’ll use the Ghidra decompiler & IDA Disassembler (It doesn’t really matter which tool we use, I chose to use both tools because they are free and accessible for everyone).
Today malware has several approaches when it comes to storing their C2 IOCs. Some malware cares less about hiding their IOCs and with quick static analysis using tools such as PEStudio we can see these indicators of compromised in plain text.
Another approach is obfuscating or encrypting the IOCs in a chunk of data that is embedded within the executable to later decrypts it during runtime. Hancitor approach is the latter, the config is stored in the executable and the IOCs are not visible during regular static analysis.
So the immediate question is “but where can I find this config?”, the answer is not so simple, because it can vary from malware to malware, however, some malware authors tend to store their config close or near after the beginning of the data section, and this will be the line of thought we’ll follow.
Now, another question may arise: “the fact that I see weird chunks of unknown data at the first bytes of the data section does not necessarily mean that this is a hidden config, how can I be sure that this data is suspicious?”
Well, this is a good question, usually, we’ll search for any manipulation of these chunks of data that can indicate any decryption or deobfuscation operation, for example:
- XOR operation that manipulates the chunks of data
- Allocation + memcopy operation and manipulate the copied data
- Usage of CryptoAPI or custom encryption
Understanding how Hancitor config extraction works
In Hancitor’s case, we see two chunks of data almost right at the beginning of the data section, that immediately raises our suspicious:
- DAT_10005010 - which is 8 bytes long
- DAT_10007264 - a larger chunk of data
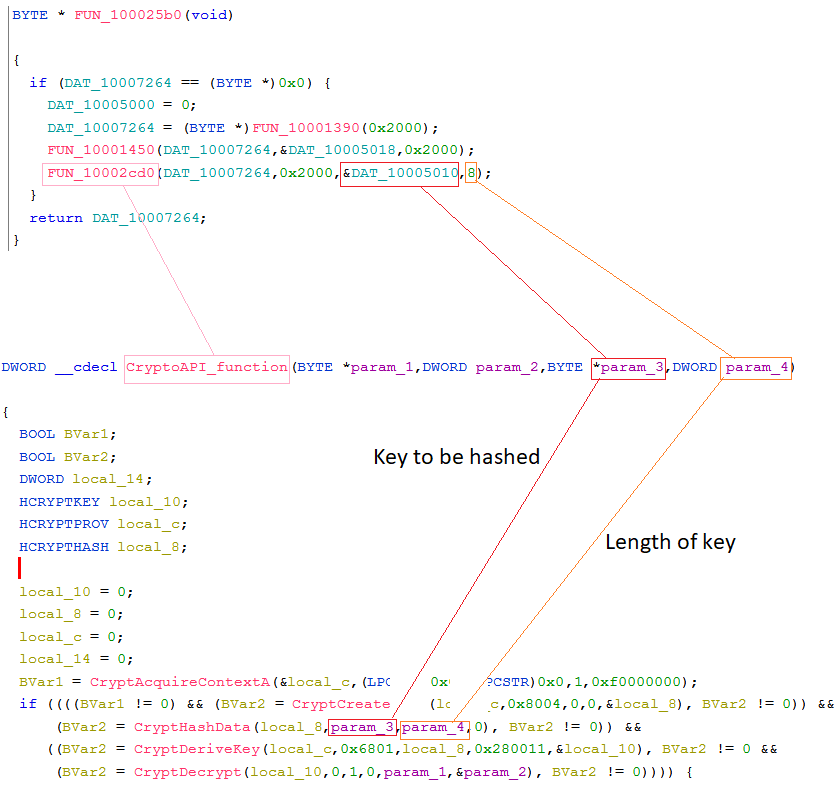
When using Ghidra decompiler, we see that these chunks are used within a function labeled as “FUN_10002cd0”, DAT_10007264 will be the first argument, and DAT_10007264 will be the third.
Furthermore, this function has another two arguments, 0x200 which is the second argument, and 8 which is the fourth.
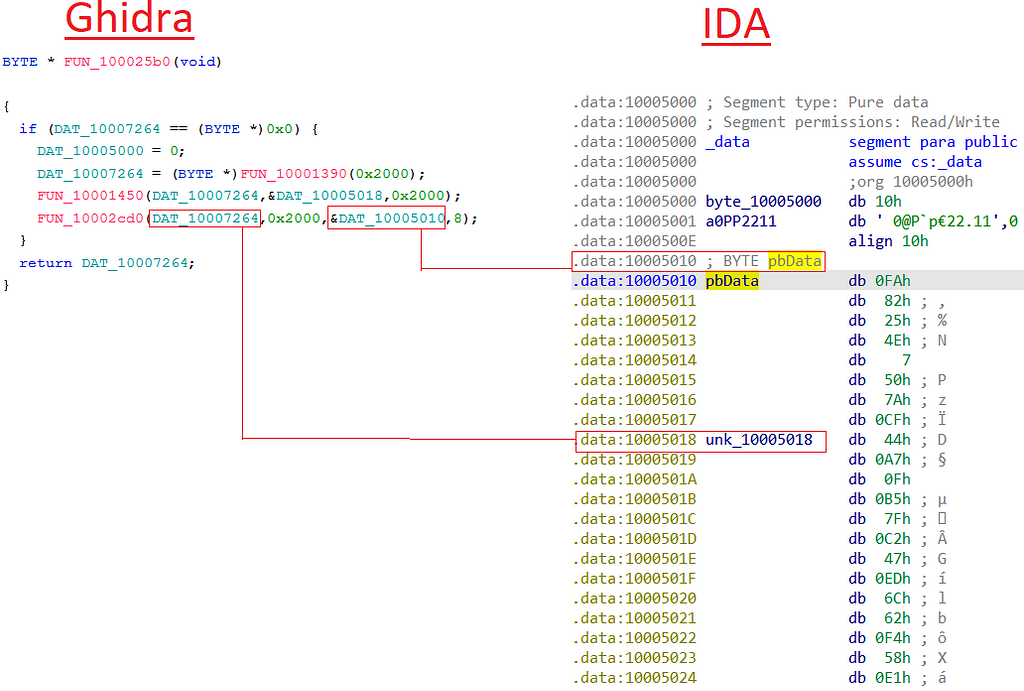
Once we enter FUN_10002cd0 we see that its core functionality is to use the CryptoAPI to decrypt content using the CryptDecrypt function. This solidifies our belief that these two chunks will take part in what we believe to be the config extraction mechanism.
For convenience, we’ll label FUN_10002cd0 as CryptoAPI_function.
Disclaimer - I’m by no means an expert in cryptography or in Microsoft’s Cryptographic Service Provider.
CryptoAPI function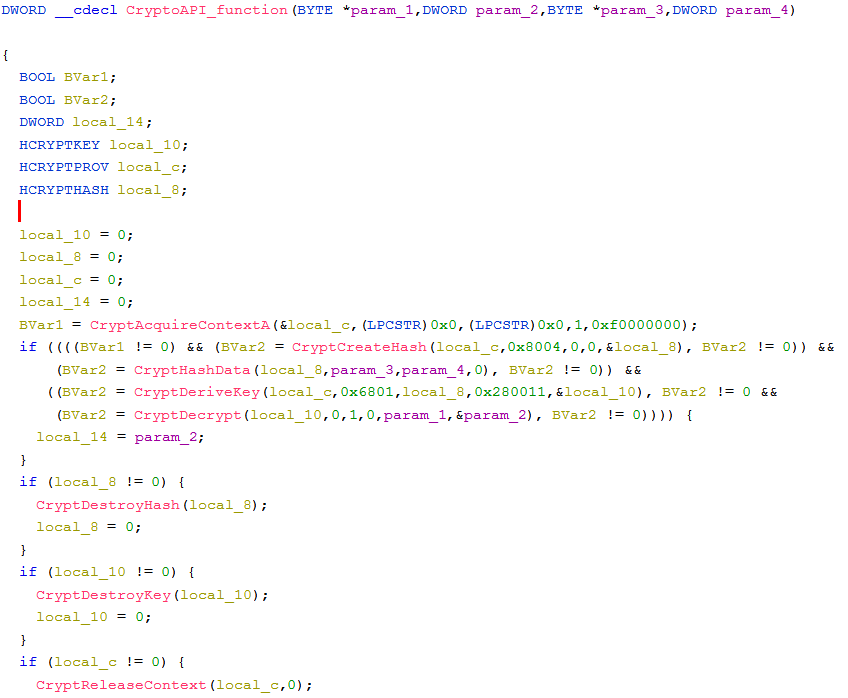
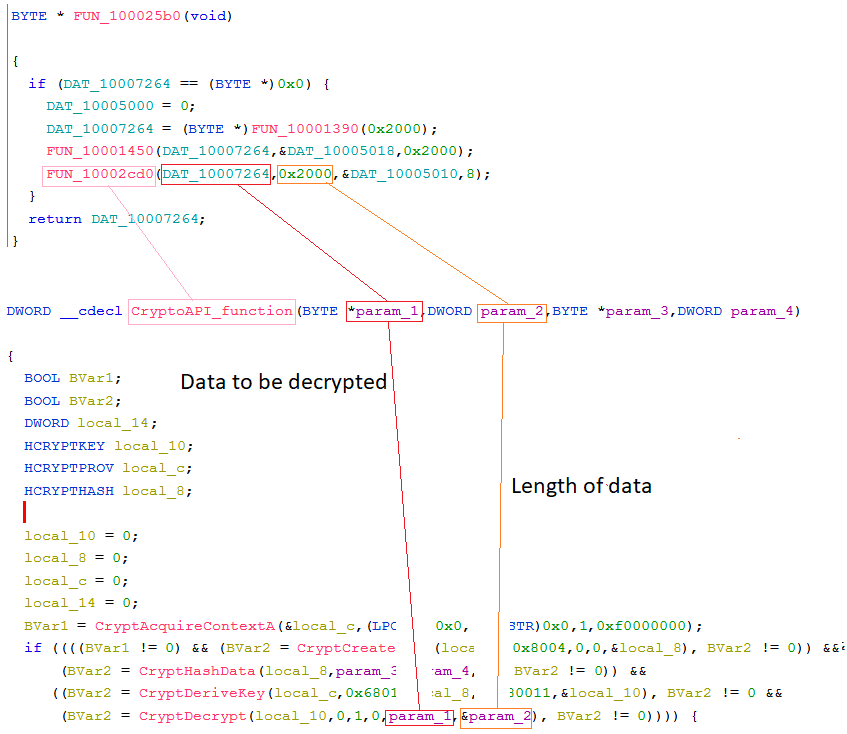
The first answer we immediately get is “which content will be decrypted during runtime”. In the CryptDecrypt function, the fifth argument BYTE *pbData, is a pointer for the data to be decrypted, in Ghidra’s decompiler this argument labeled as “param_1”.
If we’ll look at the beginning of the function, we’ll see that param_1 is the first argument that the CryptoAPI_function receives, and we already know it is “DAT_10007264”.
Also, we see that param_2 is the fourth argument in CryptDecrypt, in CryptDecrypt, this argument is DWORD *pdwDataLen, which holds the size of the data to be decrypted.
param_2 is also the second argument that the CryptoAPI_function receives, and as we remember, this argument equals 0x200.
To recap, from looking at CryptDecrypt, we can learn that:
- The data chunk named DAT_10007264 (aka param_1)will be decrypted during runtime, and it can be assumed that this will be our config.
- The length of the config will be 0x200.
Findings the encryption algorithm
Usually, when we try to understand a function that uses the CryptoAPI decryption mechanism, the first question we want to answer is “which encryption algorithm is used?”
To answer this question we need to know the following flow:
- CryptDecrypt is the function that decrypts the content, to decrypt, the encryption algorithm needs a cryptographic session key.
- The pointer for the key that will be used in CryptDecrypt will be generated by the function CryptDeriveKey.
- To match a key to an algorithm, CryptDeriveKey also receives in its second argument ALG_ID the algorithm identifier, which according to Microsoft documentation: “An ALG_ID structure that identifies the symmetric encryption algorithm for which the key is to be generated”.
In our case, we can see that the Algid is equal to 6801, which according to Microsoft documentation stands for CALG_RC4.
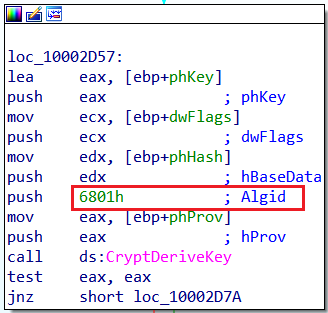 CryptDeriveKey Algid in IDAAlgid CALG_RC4 in Microsoft documentation
From that, we learn two things:
- The config is encrypted with the RC4 algorithm.
- RC4 is a stream cipher algorithm, which means that in order to decrypt it we need the initial key that the malware authors create (not the same as the session key generated by CryptDeriveKey).
Findings the initial key
In order to find the RC4 key, we need again to understand how the decryption\encryption mechanism of the CryptoAPI works.
We already know that CryptDeriveKey creates a session key, we also know that it gets the algorithm identifier as an argument.
Another argument that it gets is HCRYPTHASH hHash, which is a handle to a hash object, this object is actually the hashed initial key (or password if you will) that the malware authors decide for decryption.
The only obstacle is that this is a hash object, and we care about the actual key, luckily for us, the CryptoAPI mechanism shows us the solution.
The hash object that will be used by CryptDeriveKey is hashed by a previous function called CryptHashData. CryptHashData works in the following way:
- In its second argument, it gets a pointer for the actual key to be hashed.
- In its third argument, it gets the length of that key.
- In the first argument, it outputs the hashed key (to be sent to the CryptDeriveKey function).
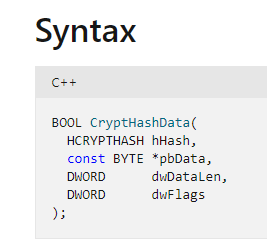 CryptHashData in Microsoft documentation
Now that we know how to find the key we’ll go to CryptHashData, we found that the second argument holds the argument “param_3” and the third argument holds “param_4”. We also see that these two arguments are used in the CryptoAPI_function arguments in the third and fourth places.
Similar to what we did with CryptDecrypt, we can trace back and find that param_3 is the data chunk named DAT_10005010, and param_4 holds the number 8.
Finding the hashing algorithm of the key
The last thing we need to verify is which hashing algorithm the key will be hashed with. Again, we’ll need to understand how the crypto API works and go upstream.
CryptHashData’s first argument is a handle to a hash object, and it gets this handle from a previously called function named CryptCreateHash.
The second argument of CryptCreateHash is ALG_ID Algid, and as we already know stores algorithm identifiers.
This time, the algorithm id equals 8004, which is according to Microsoft documentation represents SHA1.
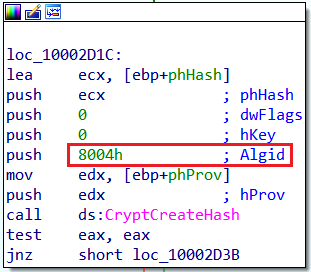 CryptCreateHash Algid in IDAAlgid CALG_SHA1 in Microsoft documentation
Getting the final decryption key
As we remember, the final session key will be generated by CryptDeriveKey, the size of this key is determined by the fourth parameter called DWORD dwFlags. This parameter specifies desired key size in bits, in Hancitor’s case, set it to be 0x280011, which effectively discarding all but the first five bytes of the SHA1 hash created by CryptHashData.
Recap of Hancitor config extraction mechanism
In the first part, we tried to first understand how the Hancitor config decryption mechanism works, our analysis led us to the following findings:
- The config itself is the data array named DAT_10007264, and when decrypted its size will be 0x200 bytes.
- The decryption mechanism is done with the CryptoAPI
- The config is encrypted with the RC4 algorithm.
- The initial key for the config is the data array named DAT_10005010, and its size is 8 bytes.
- The initial key (DAT_10005010) will be hashed with SHA1
- The final session key will be the first 5 bytes of the SHA1 hash.
After learning how the “config backend” works, it’s time to reap the rewards and formulate a work plan to actually see the indicators of compromise.
First extraction method - Dynamically using x32dbg
Usually, the dynamic approach is the quickest, and in Hancitor’s case, it’s no different. First, we can see that this module has two randomly named export functions, so it will make sense to operate through one of them.
Hancitor export functions in PE-bear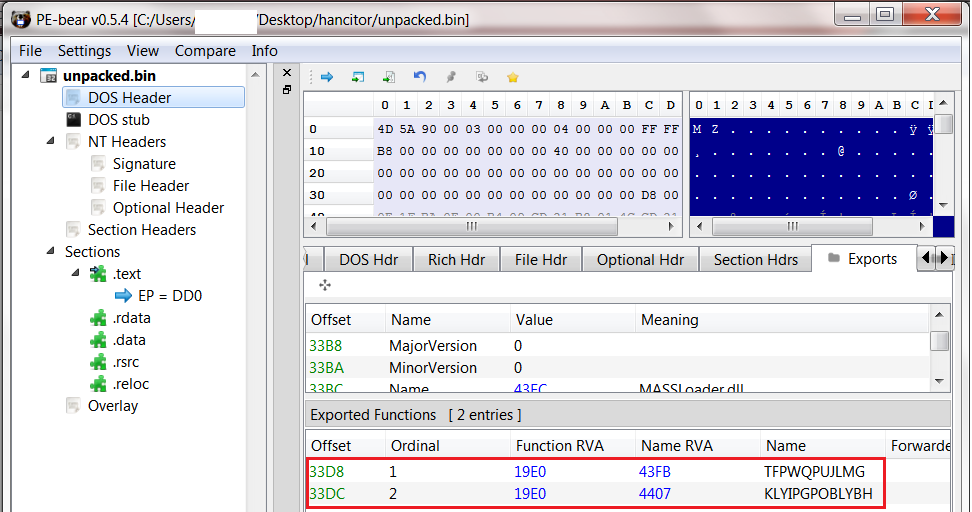
To do so, open x32dbg and load rundll32.exe. Then, go to File -> Change command line, and put as an argument the location of the Hancitor module, and one of the exports (ordinals), then, press OK.
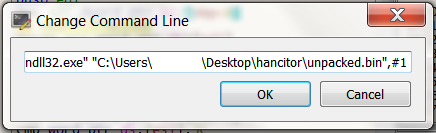 Executing Hancitor using rundll32
Now, click on Run to reach the Rundll32 process entry-point, set a breakpoint on CryptDecrypt, and hit Run.
Once we reach the breakpoint, go to the fifth argument and click Follow in dump, the dump we’ll see is the encrypted config.

Next, click “Run to user code”, we can see that once CryptDecrypt ends its operation the encrypted data has been decrypted and contains several domains. This is also the first time we actually confirm our initial hypothesis that this is indeed the config.
After CryptDecrypt
Second extraction method - Statically using Cyberchef
In some cases, malware researchers prefer to extract the IOCs statically, this approach reduces the risk of human error that can lead to malware communication with its C2. In our case, this way will allow us to really prove our hypothesis about the decryption mechanism to the test.
First, we need to collect the encrypted config and its initial key, to do so we can go do IDA and mark the desired data. for example, if we want to collect the key:
 Extracting the initial key
Then, on the keyboard do SHFIT+E to get the export data represented in HEX.
Initial key represented in HEX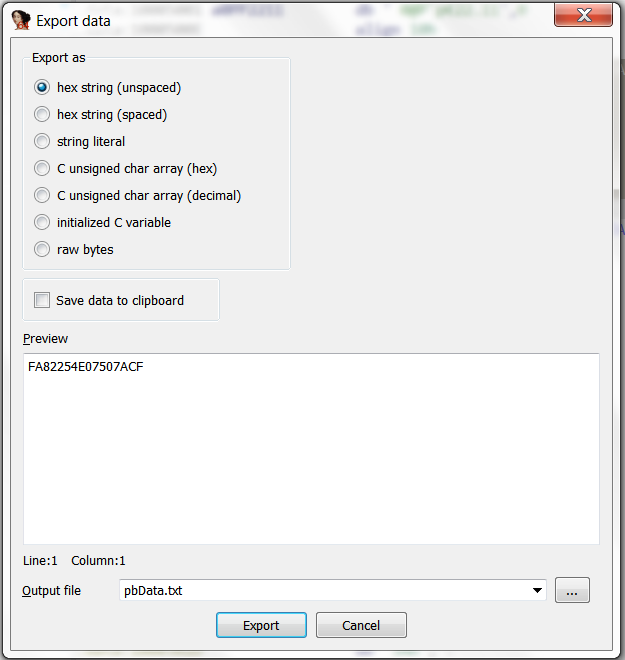
Now, copy the key to your text editor and do the same for the encrypted config data array.
Initial key and encrypted config in HEX
Getting the session key
To get the session key, all we need to do is to follow our hypothesis from part one. Let’s do it again step by step in Cyberchef:
We know the initial key needs to be hashed with SHA1, so let’s first unhex it, and add SHA1 into our recipe.
Manually creating the session key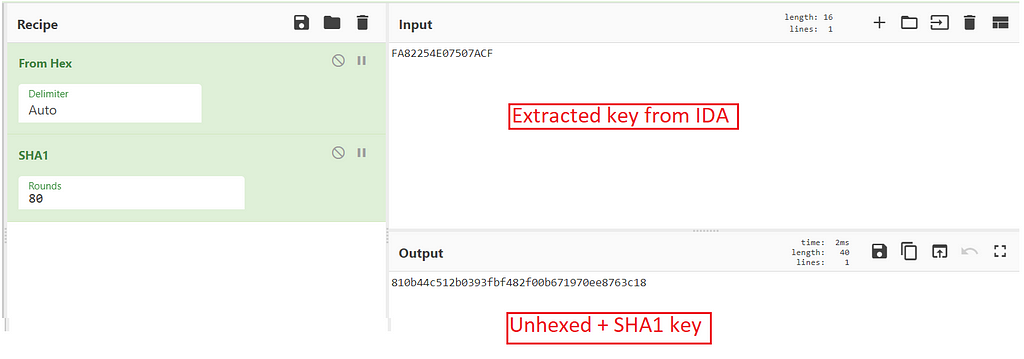
Now, our hashed key is 810b44c512b0393fbf482f00b671970ee8763c18, however, we know that the final session key has to be just the first 5 bytes. Therefore, the final key will be 810b44c512.
Now, let’s put our encrypted config into Cyberchef, and add RC4 into our recipe. Then, change the input to HEX and add the final key in the passphrase, and as we expected we can see the config.
Decrypting the config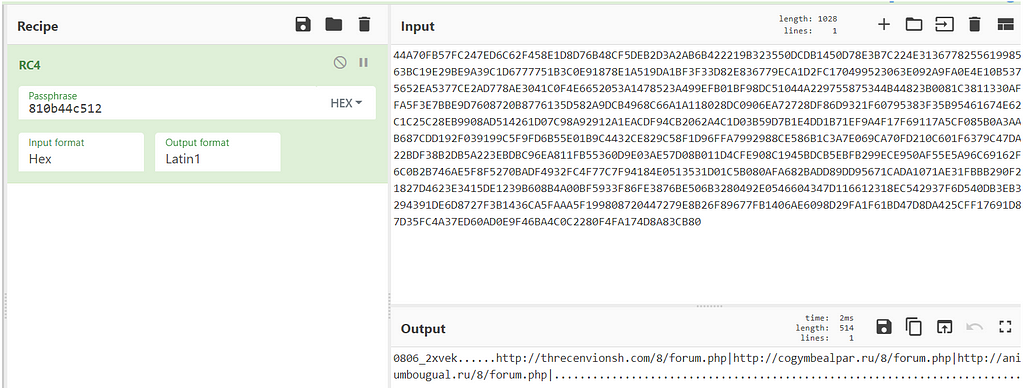
Third extraction method - Statically using Python script
The last approach is to extract the config using python script, the biggest advantage of this method is that once we have our script, it can basically work on any other Hancitor sample (as long the malware keeps using the current config decryption mechanism).
Let’s first design our future code architecture, to get the config as an output we need our code to:
- Have the ability to receive any Hancitor sample as an argument.
- Extract the data section, because the config and its key stored in it.
- Extract the encrypted config and its key from the already extracted data section.
- Hash the key with SHA1 and then have only the first 5 bytes as the final key.
- Decrypt the encrypted RC4 config with the final key.
- Display the config.
Importing modules
First, our code will require four libraries
- Binascii - The binascii module contains a number of methods to convert between binary and various ASCII-encoded binary representations.
- pefile - a multi-platform Python module to parse and work with Portable Executable (PE) files.
- Hashlib - an interface for hashing messages.
- arc4 - A small and insanely fast ARCFOUR (RC4) cipher implementation of Python.
import binascii
import arc4
import pefile
import hashlib
Extracting the data section
Now, in order to work on any sample, we need a path, therefore we’ll first get the sample’s path as an input.
filepath = raw_input('please write the file path: ')After we have the path, we need to have a function that will extract the data section from this file.
We’ll create a new function and labeled it “extractDataSection”, this function will get as an argument the string that holds the file’s path.
Next, we’ll use the module pefile to get all the information about the sample’s PE header using the following command:
pe = pefile.PE(“path of the sample”)
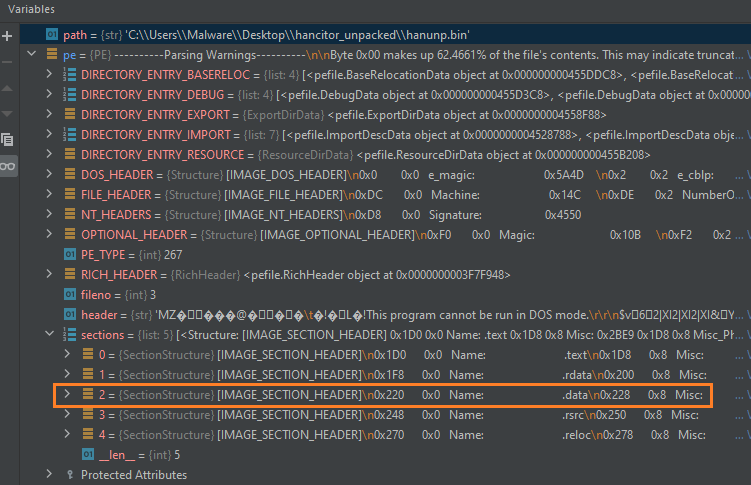
When observing the new pe object we see it’s a nested data structure, we also see information about each section (in this case 5 sections), one of them is the data section (marked in orange).
Because we only care about the data section, we can just iterate in the pe object and extract the entire content. this is done using the following lines:
for section in pe.sections:
        if “.data” in section.Name:
            return section.get_data()
When combining the facts that this function will receive the sample’s path as an argument, the final function should look like this:
def extractDataSection(path):
    pe = pefile.PE(path)
    for section in pe.sections:
        if “.data” in section.Name:
            return section.get_data()
Also, in the main function, we’ll create a call to this function and a variable (in this case named “rawdata”) that holds the returned extracted data.
rawdata = extractDataSection(filepath)
We still need to do some adjustments, although the key and config are stored near the very beginning of the data section, they are still not at the start of it.
If we look at IDA, we can see that the key starts 16 bytes after the beginning of the data section.
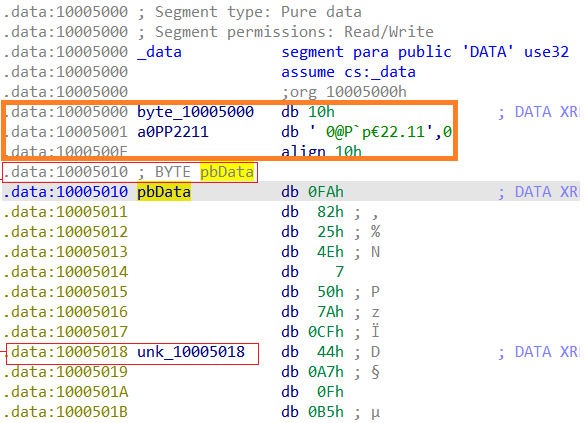
In order to cute those 16 bytes, all we need to do is to use the command:
keyPlusData = rawdata[16:]
Getting the key and encrypted config
As we already know, the key length is 8 bytes, therefore, to extract it we need to take only the first 8 bytes from the rawdata variable.
This can be done with the following command:
key = keyPlusData[:8]
For the encrypted config, we know that the config is stored right after the key, so we need to take the bytes right after the initial key bytes.
This can be done with the following command:
encryptedConfig = keyPlusData[8:]
Hashing the key
Now that we have the initial key, we know that we need to hash it using the SHA1 algorithm, with the help of the hashlib module we can do it with the following command to do so:
hashedKey = hashlib.sha1(key).hexdigest()
And finally, from this hashed key we only need the first 5 bytes, and because this is represented in hex, we need to cut the first 10 characters.
finalkey = hashedKey[:10]
Decrypting the config
First, we need to create a new function that will get the final session key and the encrypted data as arguments. Next, with the help of the module arc4, we’ll use the key to decrypt the encrypted content.
To do so, do the following commands:
cipher = arc4.ARC4(key)
decrypted_content = cipher.decrypt(encryptedConfig)
Then, because most of the data in decrypted_content are not relevant, we’ll take only the first 150 characters.
final_config = decrypted_content[:150]
Eventually, we can print the decypter_content variable with the print command
print(final_config)
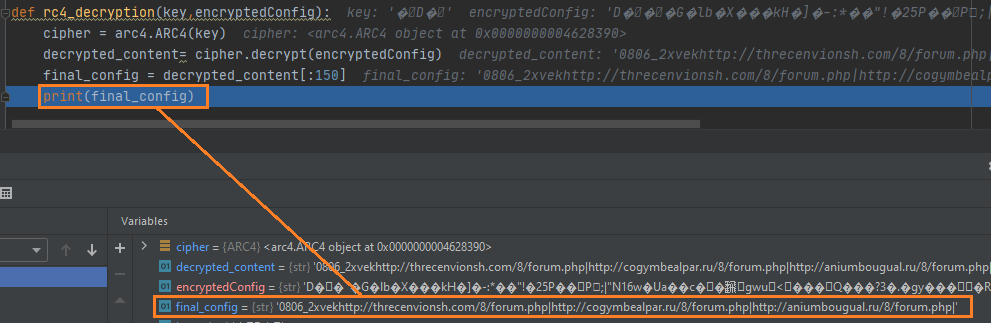
The final rc4 decryption function should look like this
def rc4_decryption(key,encryptedConfig):
    cipher = arc4.ARC4(key)
    decrypted_content = cipher.decrypt(encryptedConfig)
    final_config = decrypted_content[:150]
    print(final_config)
Once we print the final_config variable we can see that it indeed shows the decrypted config.
In the end, the entire python code of Hancitor’s config extraction should look like this:
import binascii
import arc4
import pefile
import hashlib
def rc4_decryption(key,encryptedConfig):
    cipher = arc4.ARC4(key)
    decrypted_content = cipher.decrypt(encryptedConfig)
    final_config = decrypted_content[:150]
    print(final_config)
def extractDataSection(path):
    pe = pefile.PE(path)
    for section in pe.sections:
        if “.data” in section.Name:
            return section.get_data()
def main():
#getting the file’s path
    filepath = raw_input('please write the file path: ')

    #call to data extraction function
    rawdata = extractDataSection(filepath)

    #remove the first 16 bytes of the extracted data section
    keyPlusData = rawdata[16:]

    #extracting the key
    key = keyPlusData[:8]

    #extracting the encrypted config
    encryptedConfig = keyPlusData[8:]

    #hashing the key with SHA1
    hashedKey = hashlib.sha1(key).hexdigest()

    #getting only the first 5 bytes from the hashed key
    finalkey = hashedKey[:10]

    #call for decryption function
    rc4_decryption(binascii.unhexlify(finalkey),encryptedConfig)
if name == ‘main’:
    main()
Conclusion
In this article \ tutorial, I presented the theory behind malware configs, and particularly, the config extraction mechanism of the Hanicotr malware.
After learning the theory, we discussed and implemented three approaches to get the final config.
When dealing with config extractions we need to take into consideration two aspects, time and familiarity with the malware. With a relatively small familiarity, we can decide to take the fast dynamic approach using the debugger. However, with extensive understanding, we can create a long-term solution in the form of automation using scripts.
References
- Analysis of Hancitor - When Boring Begets Beacon - Binary Defense
- Recent Hancitor Infections Use Cobalt Strike and a Network Ping Tool
- Connecting the Bots: Hancitor fuels Cuba Ransomware Operations
Article Link: Dissecting and automating Hancitor’s config extraction | by Eli Salem | Jun, 2021 | Medium